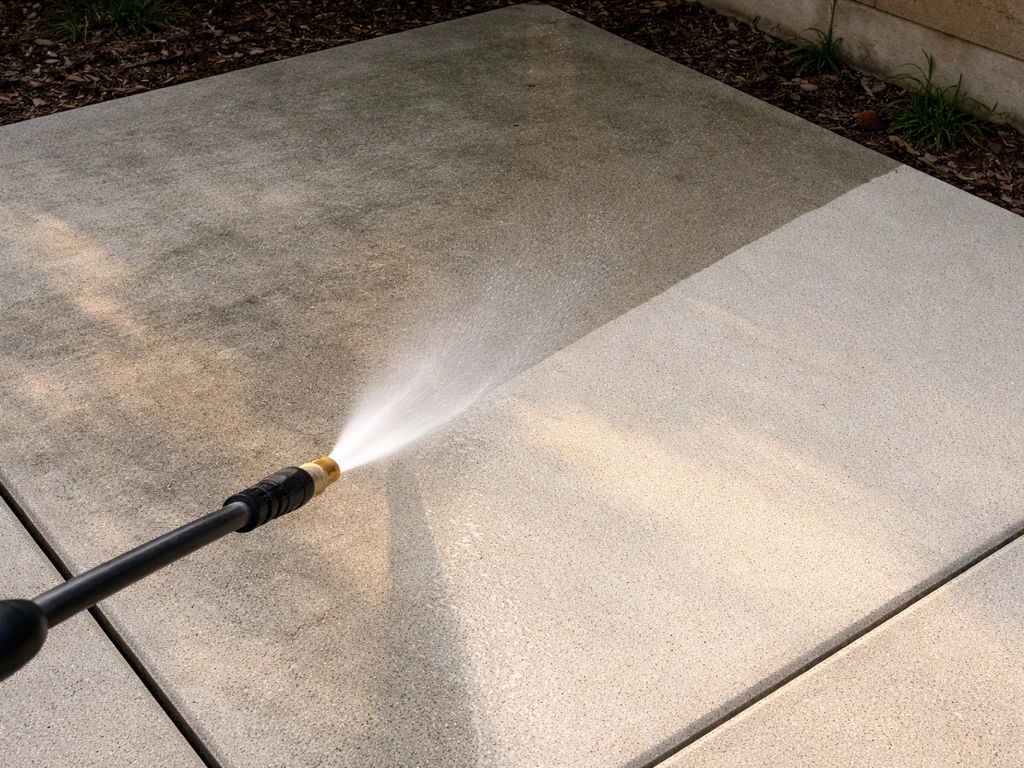
For a standard concrete patio, you want to be working in the 3,000 to 3,500 PSI range using a 25-degree nozzle. That's the sweet spot that removes embedded dirt, mold, algae, and general grime without etching or pitting the surface. If your concrete is older, already showing wear, or you're new to pressure washing, start at the lower end around 2,800 PSI and work up. For lighter jobs like a quick seasonal rinse, even 2,500 PSI with good technique will do the job. The number changes significantly if you're working on brick, stone, sandstone, slate, or porcelain, so scroll down if that's your surface.
How Much PSI Do I Need to Clean a Concrete Patio
Rhea Lang
11 May 2026
PSI ranges for concrete patio cleaning at a glance
Concrete is one of the more forgiving patio surfaces when it comes to pressure washing, but that doesn't mean anything goes. Here's how the numbers break down based on what you're dealing with:
| Cleaning Task | Recommended PSI | Best Nozzle |
|---|---|---|
| Light dirt, dust, seasonal rinse | 2,000–2,800 PSI | 25° or 40° (green or white) |
| General concrete cleaning (standard) | 2,800–3,000 PSI | 25° (green) |
| Embedded dirt, mold, algae, moss | 3,000–3,500 PSI | 25° (green) |
| Heavy grease, oil stains, stubborn rust | 3,000–4,000 PSI + pre-treatment | 15° (yellow) with caution |
Groundworks and TriStar Built both recommend 3,000 PSI as the go-to benchmark for residential concrete cleaning, and that lines up with what I've found works consistently in practice. Harbor Freight's buying guide puts the tougher jobs (oil stains, mildew, ground-in dirt) in the 3,000 to 4,000 PSI range, which is fair, but I'd only push that high if you've pre-treated the stain and you're confident in your nozzle distance and technique.
PSI isn't the whole story: GPM, nozzle, and distance matter just as much
This is the bit most people skip, and it's where cleaning results either come together or fall apart. PSI measures the force of the water. GPM (gallons per minute) measures how much water is actually flowing. The two work together to create what's called cleaning units, and PowerWash.com points out there's a tremendous difference in real-world cleaning power between a 2,000 PSI machine with low GPM and a 3,000 PSI machine with higher flow, even if both say similar things on the box. A machine delivering 3,000 PSI at 2.5 GPM will outperform one at 3,000 PSI at 1.5 GPM on a heavily soiled patio.
Then there's nozzle orifice size. According to American Pressure Systems, if your nozzle orifice is oversized for the machine's rated GPM, you'll get less actual pressure at the tip than the machine is rated for, even though the water is still flowing. This is why matching the nozzle to your machine matters, not just grabbing whichever tip is closest.
Distance is the third variable most people underestimate. Holding the nozzle 6 inches from concrete at 3,000 PSI hits very differently than holding it 18 inches away. TriStar Built recommends a 6 to 12 inch distance for concrete. Harbor Freight suggests 12 to 24 inches with a wide spray tip. I'd say 8 to 12 inches with a 25-degree nozzle is a solid starting point for concrete, and you should be adjusting that distance in real time based on what the surface is telling you.
- Residential electric pressure washers: typically 1,300–2,000 PSI. Fine for light cleaning but underpowered for heavy concrete grime.
- Mid-grade gas pressure washers: typically 2,500–3,500 PSI. This is the right tool for most concrete patio jobs.
- Higher-end gas units: 3,500–4,000+ PSI. More than enough for concrete; use carefully and keep a wider distance.
- GPM matters: aim for at least 2.0–2.5 GPM for effective patio cleaning, not just high PSI.
- Nozzle orifice must be sized to your machine's GPM rating or you'll lose pressure at the tip.
Matching PSI to your actual grime level
Light dirt and general maintenance
If your patio just needs a seasonal clean after winter or has surface dust and light soiling, you don't need to max out your machine. A setting around 2,000 to 2,800 PSI with a 25-degree or even 40-degree nozzle at a comfortable distance will handle this cleanly and quickly without putting unnecessary stress on the surface or the joints between slabs.
Mold, algae, and moss
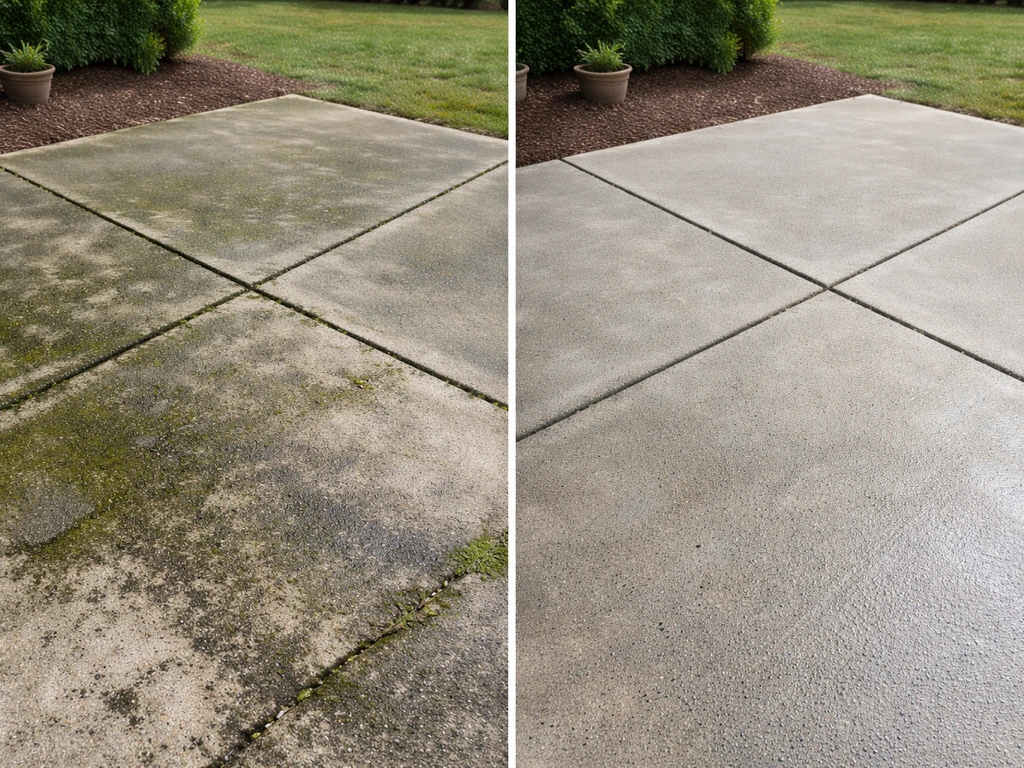
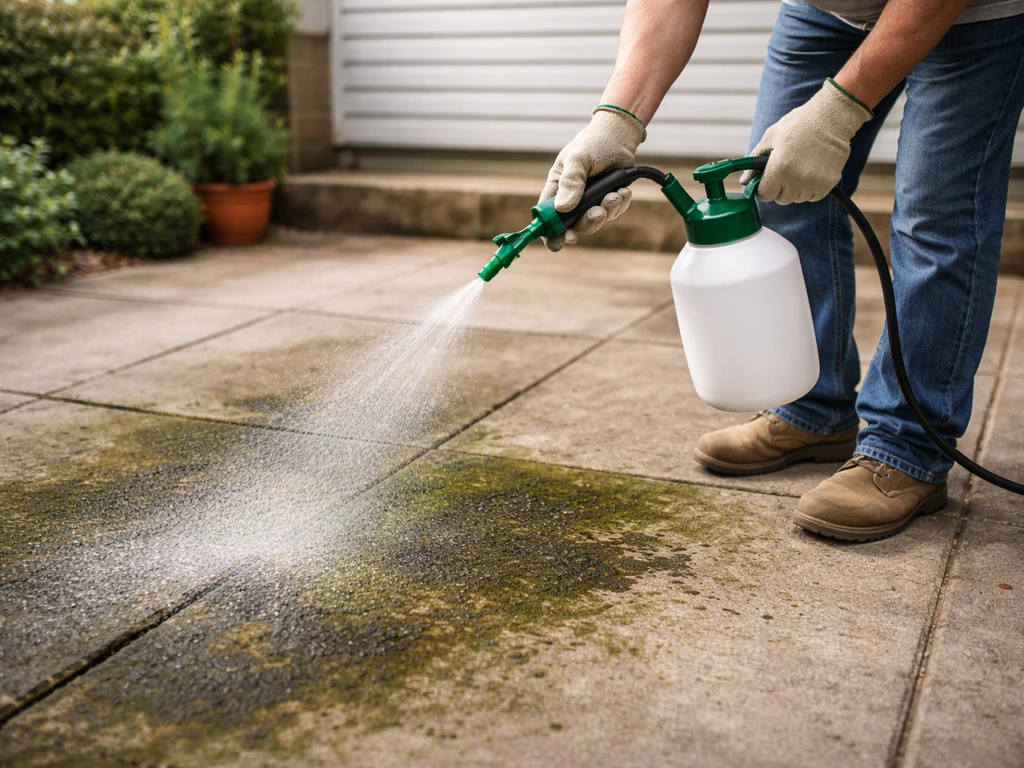
This is probably the most common reason people pull out the pressure washer, and this is where getting the PSI right pays off. For mold, algae, and moss on concrete, I'd go 3,000 PSI with a 25-degree nozzle as the starting point. Before you even start the machine, apply a concrete-safe biocide or patio cleaner and let it dwell for at least 15 to 20 minutes.
That pre-treatment does a lot of the biological breaking down for you, so you're not relying purely on brute force pressure, which reduces your risk of surface damage. The pressure washer then rinses and lifts what the chemical has already killed and loosened. To clean patio cushions with a pressure washer, use low pressure, avoid soaking the fabric, and let them fully dry before putting them back out how to clean patio cushions with pressure washer.
Grease, oil, and rust stains
These need the most pressure and the most preparation. For oil or grease, apply a degreaser and let it soak in before you start. Then work with 3,000 to 4,000 PSI, and if you're using a 15-degree (yellow) nozzle for the stubborn spots, keep your distance and don't linger in one spot. The 15-degree nozzle gives you intense cleaning force in a narrow fan, which is powerful enough to gouge or etch concrete if you hold it too close or too still. Use it in short, moving passes over pre-treated stains only. For rust, a specific rust remover applied first will give you far better results than high pressure alone.
Nozzle guide: which tip to use and how to use it without wrecking your patio
Getting the nozzle choice wrong is the fastest way to etch, pit, or strip the surface of your concrete, or blow out the mortar joints between pavers. Here's what each colour-coded tip actually does and when to use it on a patio:
| Nozzle Colour | Angle | What It Does | Patio Use |
|---|---|---|---|
| Red | 0° | Pinpoint jet, maximum force | Avoid on patios entirely |
| Yellow | 15° | Narrow fan, heavy-duty cleaning | Pre-treated grease/rust spots only, keep 12+ inches away |
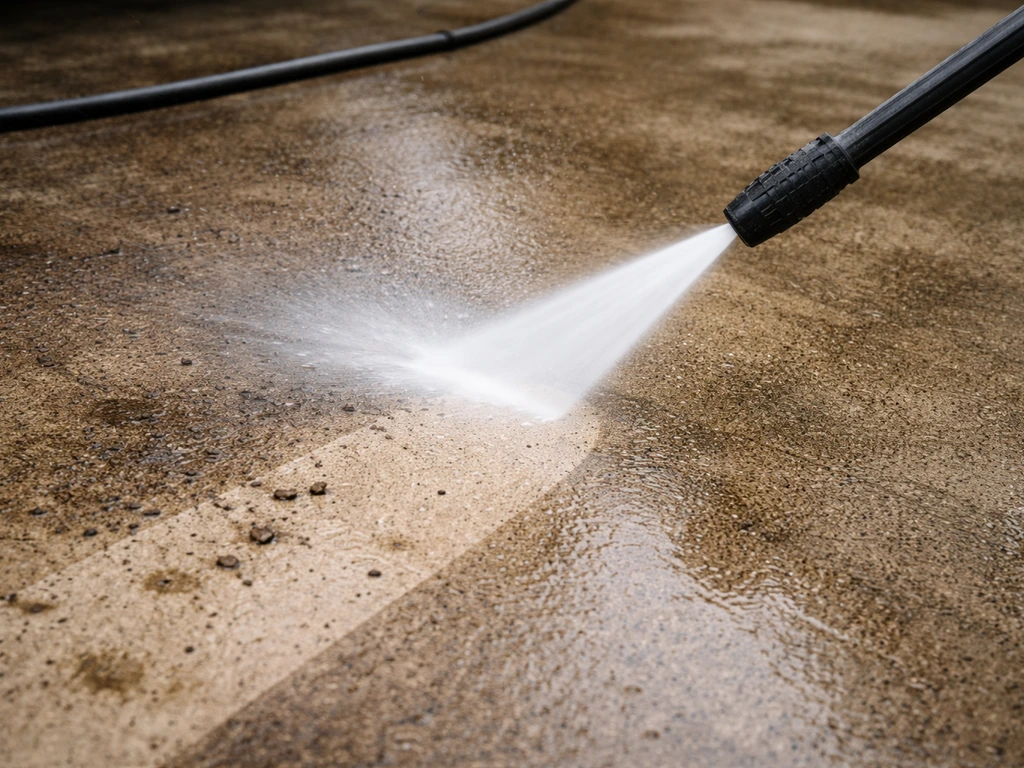
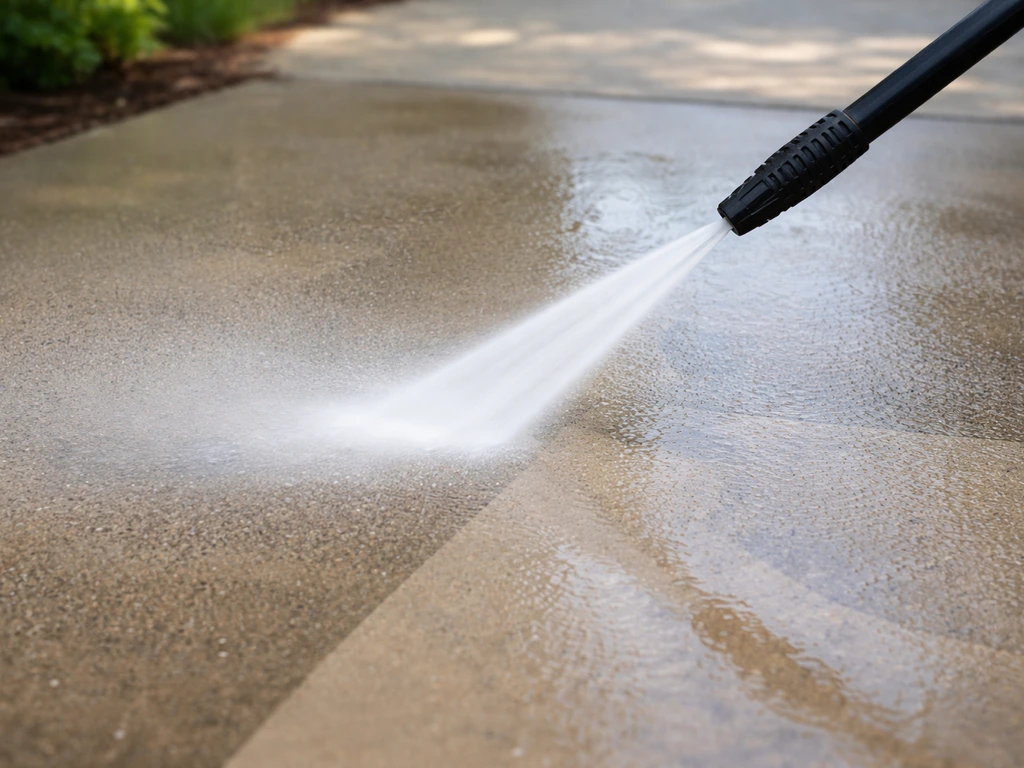
| Green | 25° | Medium fan, general cleaning | Main workhorse for concrete patios |
| White | 40° | Wide fan, gentler pressure | Light concrete cleaning, delicate surfaces |
| Black | Soap/low pressure | Low-pressure detergent application | Applying cleaning solution before pressure rinsing |
The green 25-degree nozzle is the one you'll use for probably 90% of your concrete cleaning. Simpson's manual lists it as the standard cleaning nozzle for concrete and brick, and that matches real-world use. Northern Tool describes it as a medium fan ideal for patios, decks, and driveways. The yellow 15-degree is for specific stubborn stains only, not for sweeping across the whole surface.
One important technique note: always use overlapping passes. Think of it like mowing a lawn, each pass should overlap the last by a few inches. This prevents streaking and ensures you're not leaving harder-hit lines in the surface. Keep the wand moving at a consistent pace. The moment you slow down or stop while the trigger is pulled, that's when etching happens.
If your patio has mortar or sand-filled joints between pavers, be especially careful. PressureWashersArea specifically warns that if your pressure washer exceeds 2,000 PSI, you need extra caution around joints. A direct blast into a joint at 3,000 PSI will wash out the filler. Use a wider nozzle (40-degree) near joints, hold it back further, or angle the spray so it runs parallel to the joint rather than directly into it.
Adjusting PSI for different patio surfaces
Concrete is the toughest common patio surface for pressure washing. Most other materials need you to dial things down significantly. If you're pressure washing a surface other than concrete, treating it like concrete is probably the single biggest mistake people make.
| Surface | Recommended PSI | Nozzle | Key Cautions |
|---|---|---|---|
| Concrete | 2,800–3,500 PSI | 25° green | Avoid lingering; watch joints |
| Brick | 800–2,000 PSI | 25°–40° | Mortar joints are the weak point; keep distance |
| Natural stone (general) | 800–1,200 PSI | 40° white | Soft stones etch easily; test first |
| Sandstone | 800–1,000 PSI | 40° white | Very soft; high pressure will pit the surface |
| Slate | 1,000–1,500 PSI | 40° white | Can delaminate under high pressure; low and slow |
| Porcelain | Up to 1,600 PSI max | 40° white | High pressure damages grout and can chip tiles; keep 50cm away |
Brick looks tough but the mortar joints are not. Brick Doctor recommends staying between 800 and 2,000 PSI with 25 to 40-degree spray angles and keeping the tip well back from the surface. Power Washing Dude puts it at 500 to 1,200 PSI for brick cleaning. I've found that anywhere in the 1,000 to 1,500 PSI range with a 40-degree nozzle is a safe working zone for most brick patios.
Sandstone is one surface where I'd strongly advise not even reaching for a pressure washer unless you really know what you're doing. It's extremely soft and pressure washing at even moderate levels will pit the surface permanently. If you do use a pressure washer on sandstone, stay at 800 to 1,000 PSI maximum with a 40-degree nozzle held well back, and honestly consider using a patio cleaner applied by hand and rinsed with a low-pressure garden hose instead.
Porcelain patio tiles are increasingly popular and they need careful handling. The skydeck porcelain paver maintenance guide recommends a maximum of 1,600 PSI. Ideal Home advises keeping the jet around 50cm (about 20 inches) away and using low to medium pressure, because high pressure can damage grout lines and even chip the tile edges. Compared to concrete, you're working at roughly half the pressure with twice the distance. Whether pressure washing porcelain is appropriate at all is worth thinking through before you start.
Similarly, slate patio surfaces have their own considerations around pressure washing that go beyond just PSI, including the risk of delamination. Slate patio surfaces have their own pressure-washing considerations, including delamination risk. If you're working on slate or porcelain, it's worth researching the specific surface before committing to a pressure washing approach.
Prep, safety, and avoiding the common mistakes
Before you start
- Clear the patio of furniture, plant pots, and anything else that can be hit by spray or runoff.
- Cover nearby plants, garden beds, and borders with plastic sheeting or old towels. Pressure washer runoff can carry detergents and dislodged debris into borders.
- Check your inlet filter (usually at the water connection point on the machine) to make sure it's clear.
- Connect your water supply and confirm you're getting adequate flow before starting. Most gas pressure washers need at least a 5 GPM garden hose supply.
- Select your starting nozzle. For concrete, start with the 25-degree green tip.
- Put on safety glasses or shatterproof eye protection. PressureWashersDirect specifically recommends this to prevent propelled debris injuries. For gas pressure washers, hearing protection is a good idea too.
Always test a small area first

This is the step I know most people skip, and it's the one I'd genuinely never miss. Pick a corner or edge of the patio that's less visible, do a 30-second test pass at your intended PSI and distance, and then stop and look at the surface. Simpson's manual specifically advises testing surfaces before high-pressure spraying to make sure they can handle it. If you see etching, pitting, or the surface appears to be getting damaged, you need to back off the pressure or increase your working distance before doing the whole patio.
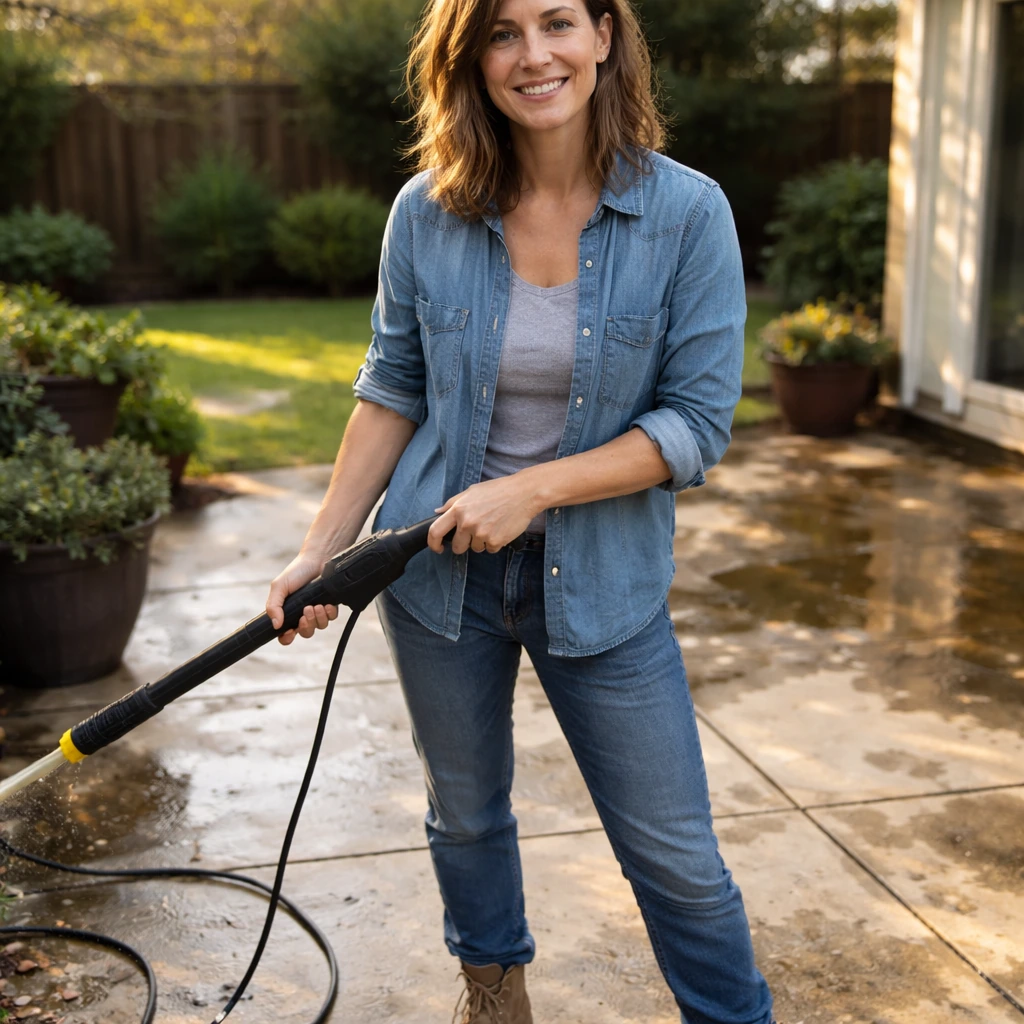
Cleaning pattern and technique
- Work in overlapping passes, moving at a consistent walking pace.
- Keep the nozzle at a consistent angle, typically about 45 degrees to the surface rather than directly perpendicular, to help lift and push debris away.
- Work from one end of the patio to the other, pushing dirty water ahead of you.
- Don't let the spray linger in one spot. If something isn't shifting, apply more pre-treatment rather than holding the pressure washer in place.
- Stay 6–12 inches from concrete. Increase to 12–20 inches for softer surfaces.
- Angle the spray away from building walls, door seals, and window frames.
After cleaning: rinsing and sealer considerations
If you've used a detergent or chemical cleaner, switch to your soap/black nozzle for application and then back to your rinse nozzle for the clean water flush. Simpson's manual advises flushing the chemical injection line with clean water after use until it's thoroughly rinsed through. Don't skip this step or the detergent residue will gum up your machine over time.
If your concrete patio has a sealer on it, be aware that high-pressure washing can strip it, especially if it's a topical or film-forming sealer. After pressure washing and once the patio is fully dry (usually 24 to 48 hours), it's worth reapplying a penetrating concrete sealer. This protects the surface from future staining and makes the next clean much easier. If you're working on pavers with polymeric sand in the joints, the same applies: pressure washing will almost certainly displace some of it, so have a bag on hand to re-fill and re-compact the joints after the surface has dried.
Choosing the right equipment and getting set up today
If you don't own a pressure washer yet and you're buying or hiring one specifically for a concrete patio, here's what to look for:
- PSI rating: at least 2,800 PSI for concrete. A 3,000–3,500 PSI gas unit covers everything you'll encounter on a residential patio.
- GPM: don't ignore this. Aim for 2.0 GPM minimum, and 2.5 GPM or above is better for larger patios.
- Nozzle set: make sure the machine comes with or can accept a standard colour-coded 5-tip nozzle set (0°, 15°, 25°, 40°, soap). Most mid-grade machines include these.
- Electric vs. gas: electric units top out around 2,000 PSI, which is workable for light concrete cleaning and fine for brick, stone, and porcelain. For heavy concrete work, a mid-grade gas unit is worth the investment or the hire cost.
- Rotary/turbo nozzles: some machines offer a rotating nozzle attachment that combines a 0° pencil jet with a circular motion. These clean very effectively but are aggressive; use them on concrete only and not near joints or on any softer surface.
- Surface cleaners: a circular surface cleaner attachment (a spinning bar nozzle inside a housing) is genuinely useful for large concrete patios. It gives you consistent, streak-free results much faster than a standard wand.
Quick setup checklist before you press go
- Check inlet filter is clear on the pressure washer.
- Connect garden hose and turn water on fully before starting the engine or motor.
- Fit your 25-degree (green) nozzle for concrete, or the appropriate nozzle for your surface.
- Put on safety glasses and (for gas units) hearing protection.
- Cover plants and clear the area.
- If using detergent, fit the soap (black) nozzle first, apply chemical, let it dwell for 15–20 minutes.
- Switch to your rinse nozzle, test on a small corner area at your chosen PSI and distance.
- Work in overlapping passes at a consistent pace, keeping 6–12 inches from the surface on concrete.
- Do a final rinse pass with clean water.
- Flush the detergent line with clean water if you used any chemical.
- Allow the surface to dry fully before applying any sealer or refilling joints.
That's really all there is to it. The right PSI for your patio isn't one fixed number, it's a range you choose based on your surface, your grime level, and your technique. For concrete, 3,000 PSI with a green 25-degree nozzle at 8 to 12 inches is your reliable starting point. Scale down significantly for any other surface type, and let the pre-treatment chemicals do their share of the work so you're not relying on raw pressure alone to solve every problem.
FAQ
Should I start at 3,000 PSI, or do I need to increase if dirt is heavy?
If your patio is noticeably stained but not slimy, you’ll usually get better results by staying around 2,800 to 3,000 PSI and using dwell time with a concrete-safe cleaner, rather than instantly jumping to 3,500 to 4,000 PSI. Once you can’t see grime lifting after a few passes, the next step is shorter, overlapping passes at the same pressure with a slightly closer distance (not a big PSI jump), because higher PSI without dwell time mainly increases risk of surface etching.
Can I just turn up the PSI to make the job go faster?
Yes, but only if you’re using the right combo of pressure, nozzle, and movement. “More pressure” can create new problems, like cleaning lines from lingering too long, especially at 15-degree. For concrete, a safer upgrade path is keep the nozzle at 25-degree and adjust distance in small steps (for example, 12 inches down toward 8 inches), while pre-treating first for mold, algae, and mildew.
How do I know I’ve reached the point where PSI is too high for concrete?
For concrete, the practical limit is whether the surface shows damage. A good decision aid: do a 30-second test pass in an inconspicuous area, then check for darkening that looks like etching, rough “fuzzy” concrete texture, or tiny pits. If you see those signs, back off by either reducing pressure or increasing distance, because once the surface is etched, you cannot “pressure-wash it back” to a clean, smooth finish.
What should I do if I have both oil stains and algae or mold on my patio?
When a patio has both mildew and oil spots, pre-treat the oil with a degreaser first and allow it to soak, then separately treat biological growth with a patio cleaner or biocide. Don’t assume one chemical will handle both, and don’t blast everything immediately, because you can drive oily residues deeper while you’re trying to kill the algae.
My concrete looks cleaner after spraying but stains return quickly, what’s going wrong?
If water only makes things look slick but not lift, it’s often because the biological growth needs time to break down, or because the nozzle angle/distance is too gentle. Increase effectiveness by using the recommended dwell time (often 15 to 20 minutes for bio cleaners) and make overlapping passes, then rinse thoroughly. If it’s still there after dwell and rinse, then consider moving a little closer rather than jumping PSI.
Which nozzle angle should I use if my patio has both general grime and a few stubborn spots?
A 25-degree nozzle is typically the default for concrete, but the “right” choice depends on whether you’re treating broad grime or isolated stubborn marks. Use 25-degree for normal cleaning, 40-degree near joints and delicate areas, and reserve 15-degree for short, moving passes on pre-treated stubborn spots only. Avoid sweeping the whole patio with 15-degree because it concentrates force and increases etching risk.
How should I handle joints, cracks, or gaps so I don’t damage the patio or filling?
Yes, the joint risk is real even on concrete, but it’s more severe when the patio has paver-style joints or gaps filled with sand. For pavers, pressure washing can displace joint filler, so plan to re-fill and re-compact after drying. For concrete slabs with cracks, focus the spray away from edges and don’t hold the wand still over seams.
Will pressure washing remove my concrete sealer, and what should I do afterward?
If the concrete is sealed, high pressure can strip or thin the sealer film, especially soon after application or if the sealer is topical. After washing, wait for full dry time (often 24 to 48 hours) before judging whether the sealer needs reapplication. Re-sealing matters because it reduces how quickly future stains soak in, and it can make your next cleaning easier.
How do I avoid detergent residue streaks and keep the machine from gumming up?
Over-saturating and leaving residue can cause streaks and re-soil faster. Use an application nozzle for detergents if your machine has one, then switch to a rinse nozzle and flush thoroughly. Also, if you use chemical injection, flush the system with clean water afterward to prevent residue buildup inside the unit.
What should I do if I already started and I notice etching or pitting?
If you’re getting visible etching, pitting, or a rough, chalky texture, don’t keep turning up the PSI. The fastest correction is to stop and switch to lower pressure and/or a wider nozzle, then move back and increase pass overlap while staying in motion. For already-etched concrete, future improvement is usually limited to resealing or surface restoration, not more pressure washing.
Next Article
How to Use Wet and Forget Patio Cleaner Step by Step
Step by step guide to apply Wet and Forget patio cleaner, prep and safety, dwell time, rinse or no rinse, and troublesho