For most patio grout lines, a stiff nylon grout brush with an angled head is the best all-around choice. Nylon bristles are firm enough to lift embedded grime, mold, and algae without scratching stone, tile, or brick surfaces, and an angled or narrow head lets you work directly into the grout channel instead of skimming over the top. For heavier buildup or wider mortar joints, a stiffer synthetic deck scrub brush with a long handle saves your back and speeds things up considerably. Wire bristle brushes, by contrast, are too aggressive for most patio surfaces and should be avoided almost entirely outdoors.
Best Brush in Patio Grout: Choose the Right Scrubber Today

Rhea Lang
23 May 2026

Why patio grout lines get so dirty (and when brushing is actually the fix)
Outdoor grout is in a completely different environment from indoor tile. It sits exposed to rain, soil, leaf debris, shade, and fluctuating moisture all year. The Royal Horticultural Society points out that algae, moss, lichen, and liverworts don't necessarily damage the surface itself, but they make patios dangerously slippery when wet. Moss in particular loves shaded, damp spots, which is exactly where most patio grout lines sit. The grout channel collects water that won't fully dry out, and that constant moisture creates ideal conditions for green growth and embedded grime.
There's also the issue of joint sand and pointing. Traditional sand-and-cement pointing can last 10 to 15 years under normal use, but damp joints and organic growth accelerate breakdown. Once joint material starts to crack or loosen, more dirt gets trapped, and what started as surface grime becomes a structural concern. Brushing is the right fix when the grout is still structurally intact and you're dealing with surface-level discoloration, biological growth, or embedded grime. If the pointing is already loose, crumbling, or missing in sections, brushing hard will make it worse. In those cases, you need repointing first, then a maintenance cleaning routine.
Pressure washing alone often isn't the answer for grout lines either. High-pressure water can carve out joint sand and dislodge pointing, which creates worse problems down the road. Brushing with the right tool and cleaner is more controlled and less destructive for the joints themselves, even if the surrounding slabs get a pressure wash afterward.
What to look for in the best patio grout brush
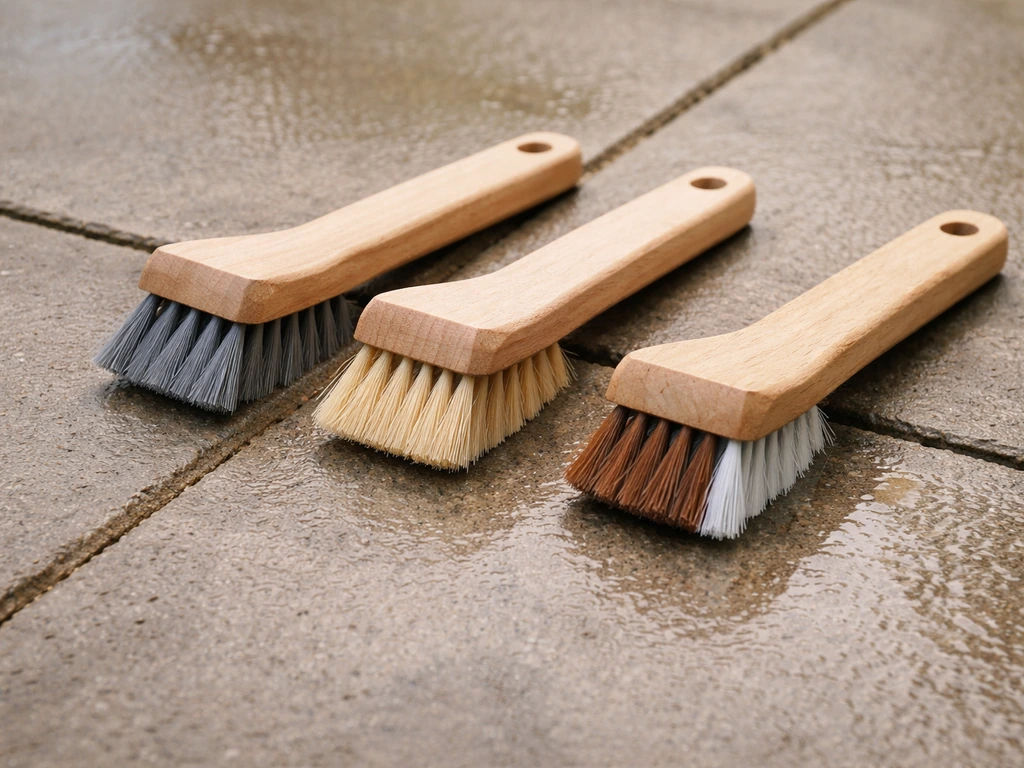
Bristle material
Nylon is the clear winner for outdoor patio grout. It's resistant to most cleaning chemicals, holds its shape after repeated scrubbing, and is stiff enough to dislodge algae and grime without scratching porcelain, sandstone, slate, or brick. Several well-regarded brushes use crimped nylon bristles (like the ALLWAY soft-grip grout brush), which improves surface contact and gives more consistent coverage across the grout line. Some brushes, like the OXO Good Grips model, use a combination of nylon and polypropylene, which adds durability for heavier outdoor use. Wire bristles are not suitable for most patio surfaces as they scratch stone and can pull out soft pointing. Save them strictly for bare concrete with no surrounding stonework.
Head shape and size
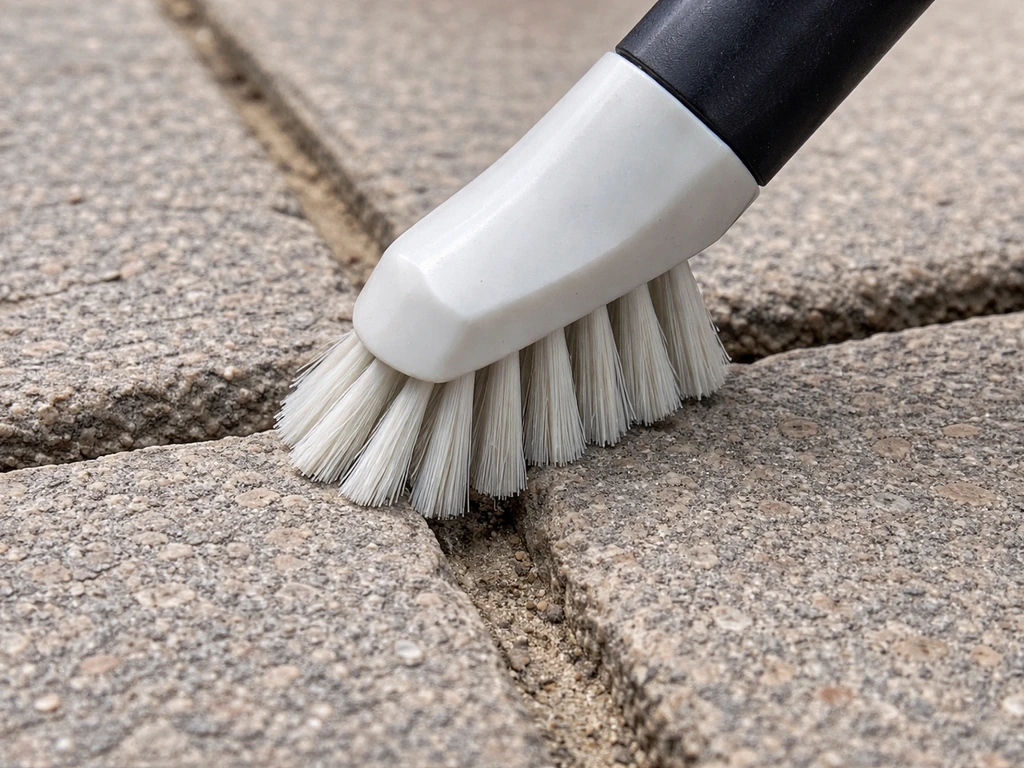
A narrow angled head is the most practical design for grout lines. Products like the QEP 20842 and the Grainger swivel grout brush specifically use angled bristle arrangements to get into the channel of the grout rather than sitting flat on the slab surface. The angled design also helps when you're working at floor level because it lets you apply downward pressure at an angle without your knuckles dragging along the paving. For very narrow grout joints on porcelain or precision-cut stone, a toothbrush-style or detail brush works better than a full-width scrub head. For wide mortar joints on brick or rustic stone, a wider stiff brush or even a deck scrubber head is more efficient.
Handle length and ergonomics
This is where outdoor patio brushes differ from bathroom grout brushes. A standard short-handled grout brush works fine for small areas, but for a full patio you'll be on your knees for a long time. A brush with a longer handle, or a handheld scrubber that fits onto an extendable pole, makes the job much more manageable. The Hillyard Boardwalk brush uses an angled handle specifically to give leverage when working tightly packed bristles into grout channels. Non-slip handles matter too when working with wet surfaces and soapy cleaners. The OXO Good Grips design addresses this directly with a rubberised grip that stays secure with wet hands.
Stiffness
Medium-stiff is the ideal stiffness for most patio grout scenarios. Too soft and the bristles deflect rather than scrub. Too stiff and you risk scratching softer stone like sandstone or slate. Choosing the best sandstone patio cleaner for the grime you see helps you lift deposits without risking surface damage. For mold, algae, and general grime on concrete, brick, or robust stone, a stiff nylon brush (as Grainger categorises its grout brushes) works well. A dedicated cleaner, like the best patio brick cleaner, helps lift mold and general grime without damaging the surface. For Indian sandstone, limestone, or slate, drop down to a medium nylon brush to avoid surface scratching. You'll know the stiffness is wrong if you see faint scratching on the slab surface adjacent to the grout line.
Durability and ease of cleaning the brush itself
Outdoor grout cleaning is grimier work than indoor tile cleaning. The brush will pick up soil, algae, and chemical residue. Look for brushes with tightly packed bristle rows that don't trap debris permanently, and rinse the brush thoroughly after every session. Nylon bristles that are heat-resistant and solvent-resistant (like those in the ALLWAY crimped nylon design) hold up better when used with diluted bleach or oxygen bleach solutions. Avoid brushes with wooden handles outdoors as they rot quickly with repeated wet use.
Best brush picks by patio scenario

| Scenario | Best Brush Type | Key Spec to Look For | Avoid |
|---|---|---|---|
| Mold/algae on concrete or brick | Stiff nylon grout brush (angled head) | Crimped or tightly packed stiff nylon, narrow angled head | Wire bristles |
| Heavy grime, wide mortar joints | Stiff synthetic deck scrub / large grout brush | Wide-head, long handle, polypropylene or stiff nylon | Soft household scrubber |
| Porcelain or glazed tile patio | Medium nylon angled grout brush | Angled nylon, medium stiffness, non-scratching | Wire or very stiff synthetic |
| Sandstone, slate, or limestone | Medium nylon grout brush or soft detail brush | Soft-to-medium nylon, narrow head | Wire, stiff synthetic, abrasive pads |
| Tight/narrow grout joints | Toothbrush-style or detail grout brush | Narrow angled head (like QEP 20842 or OXO Good Grips) | Wide deck brush |
| Full patio with large area | Long-handled stiff nylon brush on extendable pole | Extendable or angle-head deck scrubber with nylon | Short-handled brush only |
For an all-around pick that handles most residential patio scenarios, the OXO Good Grips grout brush or the QEP 20842 are both solid choices. The OXO's angled head, non-slip handle, and nylon/polypropylene construction handle heavy outdoor use well. The QEP 20842 specifically reaches deep into grout creases to remove mold, mildew, dirt, and grease, and works on all grout joint widths. If you're doing a large patio, pair a detail brush like these for the grout lines with a stiffer long-handled deck scrubber for the slab surfaces.
How to clean patio grout with a brush, step by step
Step 1: Prepare the area
Clear the patio of furniture, pots, and anything else that will get in the way. Sweep or brush off loose debris, leaves, and soil first. You want the cleaner to hit the grout, not a layer of dirt sitting on top of it. If there's significant loose grit in the joints, a quick rinse with a garden hose at low pressure is fine to clear it. Do not use high-pressure at this stage, as you'll likely displace joint sand before you've even started.
Step 2: Choose and apply your cleaner
Matching the cleaner to your surface and grout type is just as important as the brush. For choosing the best patio slab cleaner, focus on products that are compatible with your stone and grout and that help prevent residue from re-soiling the surface. Here's how to think about it:
- Concrete, brick, or robust stone (not acid-sensitive): A diluted bleach solution (roughly 1:10 bleach to water) or an oxygen bleach (sodium percarbonate) solution works well for mold, algae, and green staining. Apply with a watering can or brush, let it dwell for 10 minutes, then scrub.
- Indian sandstone, limestone, slate, or marble: Avoid anything acidic. Vinegar is a common recommendation online but MAPEI explicitly warns it can etch natural stone, and Stone Forensics notes it can damage grout lines over time too. Use a pH-neutral specialist stone cleaner like STONETECH Revitalizer or MAPEI UltraCare Concentrated Tile and Grout Cleaner instead.
- Porcelain patio tiles: pH-neutral or mild alkaline cleaners are safe. Avoid strong acids. Purpose-made grout cleaners from MAPEI or LATICRETE are designed for exactly this use.
- General grime without biological growth: A dedicated block paving cleaner or biological patio cleaner is a less aggressive option and is easier on both the grout and any surrounding planting.
- Never mix bleach with vinegar, ammonia, or OxiClean-type products. The CDC/ATSDR warns that sodium hypochlorite reacts with acids and ammonia to release toxic chlorine or chloramine gases. Use one product at a time and rinse thoroughly between applications.
Let the cleaner dwell on the surface. Oxygen bleach especially benefits from 10 minutes of contact time before you start scrubbing, giving it time to break down organic matter in the grout channel. For heavier algae or moss, a longer dwell of 20 to 30 minutes improves results noticeably.
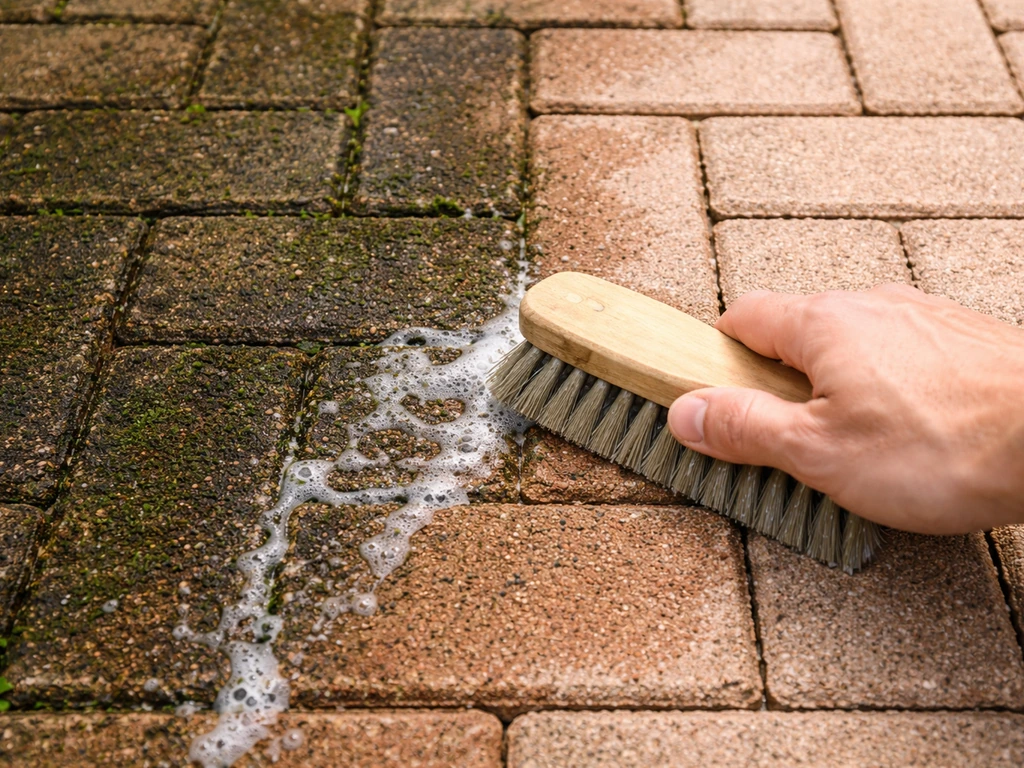
Step 3: Scrub the grout lines
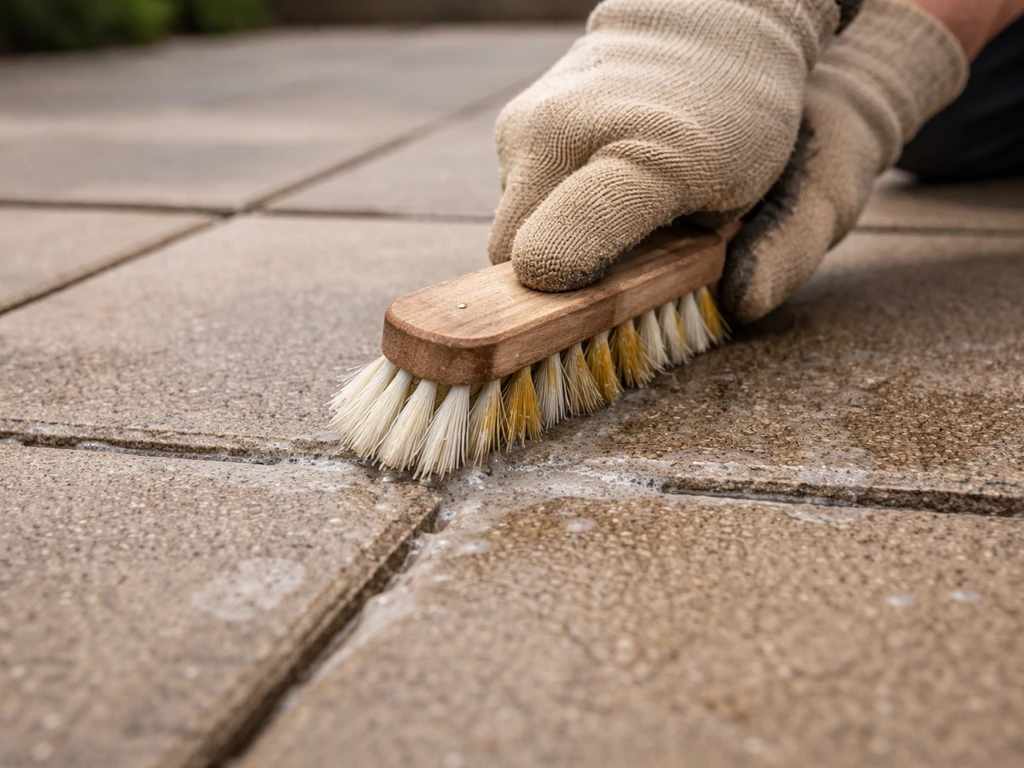
Work section by section rather than trying to cover the whole patio in one pass. Hold the angled brush at roughly 45 degrees to the grout line and use short back-and-forth strokes directly in the channel. Apply firm but controlled pressure. You're trying to loosen and lift grime, not carve into the joint material. If the bristles are deflecting badly, the brush is too soft. If you're seeing stone scratch marks alongside the grout, it's too hard or you're pressing too wide. Keep the brush wet with cleaner throughout. Rinse it off every few minutes to clear loaded bristles and keep it working effectively.
Step 4: Rinse thoroughly
Rinse with a garden hose or low-pressure wash, working the water in the direction of any drainage. MAPEI's product guidelines specifically call for thorough rinsing with clean water, and this matters outdoors too because cleaner residue left in porous grout or stone can attract dirt faster. A wet vacuum or mop can help clear pooled water from patio channels, but a good hose rinse is usually sufficient for outdoor patio work. Avoid high-pressure rinsing directly into joints, as this can dislodge joint sand even at the finish stage.
How to avoid scratching your patio or damaging the grout
The most common mistake is using the wrong stiffness brush for the surface. Wire brushes and extremely stiff synthetic brushes are genuinely damaging on sandstone, slate, and limestone. I learned this the hard way testing various brushes on sandstone paving: even a moderately stiff synthetic bristle left faint surface marks on the face of the slab when it strayed off the grout line. For these softer stone surfaces, medium nylon is the ceiling for stiffness.
The second mistake is scrubbing already compromised grout. If the pointing is cracked, loose, or only held in by surface algae, aggressive scrubbing removes what's left. Press lightly on a few spots first. If grout crumbles or shifts, stop scrubbing and plan for repointing before any serious cleaning. Well-bedded sand-and-cement pointing should be solid under moderate brush pressure.
Acid-based cleaners are another grout killer. Strong acids can wash away cement-based grout over repeated applications, as Stone World notes. Even diluted acidic cleaners over time will degrade grout sealer, which then allows staining and moisture penetration. IICRC’s tile/stone/grout tip sheet also warns that acidic or alkaline cleaners can degrade grout sealer over time. If you're unsure about a product, check its pH. Anything below 7 should be kept off cement grout and all natural stone.
Also, do not substitute high water pressure for brushing when working on grout lines. Pressure washing the slab surfaces is fine, but directing a pressure washer nozzle into grout joints can displace joint sand and lead to shifting pavers over time. The right sequence is: brush and clean the grout lines first, then pressure wash the slab faces at a safe distance if needed.
Keeping patio grout cleaner for longer
Routine light cleaning is far less work than annual deep scrubbing. A quick scrub of grout lines every few weeks during the growing season (spring through autumn) prevents algae and moss from establishing. A stiff-bristled outdoor broom used weekly to sweep debris clear also helps by removing the organic matter that feeds biological growth.
If your patio gets a lot of shade or sits in a damp spot, a biological patio cleaner applied a couple of times a year can slow regrowth significantly. If you're comparing options, a patio stone cleaner review can help you pick the safest cleaner for your specific stone and grout. These work over days and weeks rather than immediately, but they reduce the frequency of hard scrubbing sessions. They're also generally gentler on joint material than bleach-based alternatives used repeatedly.
Sealing the grout after a deep clean makes a real difference to how quickly grime reappears. Products like STONETECH Revitalizer from LATICRETE do a three-in-one job: cleaning everyday messes, reinforcing stain protection, and defending against mold and mildew regrowth. For cement grout on natural stone patios, a dedicated impregnating sealer applied after cleaning can extend the time before the next deep scrub by a year or more.
On the cleaner choice front, switching to a pH-neutral routine cleaner for maintenance (rather than reaching for bleach every time) prolongs grout life. MAPEI's guidance on using appropriate tile and grout cleaners rather than household acids is worth following even outdoors, especially for patios with sandstone, Indian sandstone, or limestone slabs where acid exposure is a real damage risk. If you're looking at the slabs themselves rather than just the grout, there are dedicated cleaners worth exploring for specific surface types, whether that's brick, sandstone, or Indian sandstone paving.
One final practical note: keep a dedicated grout brush in your outdoor cleaning kit and replace it when the bristles start to splay noticeably. A brush with deflected bristles delivers almost no scrubbing action regardless of how hard you press. A fresh, stiff-bristled grout brush makes the job noticeably faster and the results better.
FAQ
How can I tell if the brush is too stiff for my patio stone?
Before scrubbing, do a quick test in a hidden corner by pressing the brush lightly for 30 to 60 seconds. If you see faint marks on the adjacent slab face, switch to medium nylon (not stiff), and keep the brush narrower so the bristles stay in the joint channel.
What should I do if my patio grout looks cracked or loose before cleaning?
If the joint sand is visibly missing, the grout has cracks that open up, or sections feel hollow under gentle pressure, stop cleaning and repoint first. Brushing over compromised joints can pull out remaining material and widen the gap.
Can I use bleach or oxygen bleach every time I clean grout?
Use a pH-neutral routine cleaner for maintenance. Reserve oxygen bleach or diluted bleach for targeted algae or mold problems, and avoid repeating the same bleach schedule on the whole patio, especially if your grout is older or your stone is porous.
Is it ever okay to pressure wash grout joints if I already scrubbed?
Yes, but keep the nozzle well away from the joint line. Brush grout first, then use low pressure for the slab surfaces, and never aim a jet directly into grout channels, since that’s when joint sand gets displaced.
What brush type should I use for very narrow grout lines?
For narrow porcelain or precision-cut stone joints, a toothbrush or detail brush reduces stray contact with the slab face. A full-width angled head is better for wider grout lines, because it stays stable and covers the channel efficiently.
My grout has a lot of loose grit, what’s the safest first step?
If you’re cleaning grout with embedded sand, start with a low-pressure rinse to flush loose grit, then apply cleaner and let it dwell before scrubbing. Trying to scrub dry or over heavy loose grit will grind particles into the grout and make staining worse.
How often should I rinse the brush during an outdoor grout cleaning session?
Stop and rinse, then clear debris from the bristles more often. Loaded bristles lose cutting power and can redeposit grime, so rinse the brush every few minutes and keep reapplying cleaner to the section.
How can I tell if I didn’t rinse grout well enough?
After cleaning, a thorough rinse matters for residue control. If water beads less on the cleaned area over time, or the joint darkens quickly after drying, you likely left cleaner residue, and a second low-pressure rinse may help.
When should I seal patio grout after deep cleaning?
Sealing is most effective after the grout is fully clean and allowed to dry completely. If you seal while moisture is trapped in shaded joints, you can reduce the sealer’s effectiveness and speed up re-soiling.
How do I know it’s time to replace my grout brush?
Replace the brush when bristles splay, bend permanently, or you see reduced contact coverage along the joint line. A worn brush may look “usable” but it stops lifting algae and grime efficiently, which leads to more scrubbing and higher risk of surface marks.
What’s the best way to fix scratched areas next to the grout lines?
If the stone scratches, lighten your pressure and reduce brush width so it stays centered in the grout channel. Also switch from extremely stiff options to medium nylon for softer stones like sandstone, slate, and limestone, and confirm you’re scrubbing in short back-and-forth strokes.
What’s the most effective way to prevent algae from coming back in shaded areas?
For biological growth in shaded damp areas, consider a preventive routine, like periodic biological cleaner use plus lighter brushing during the growing season. Then follow with targeted deep cleaning only when discoloration starts to return, instead of frequent harsh scrubs.
Next Article
Best Patio Brick Cleaner: How to Choose and Use It
Choose the best patio brick cleaner for mold, moss, rust, grease and efflorescence with safe step-by-step use and preven