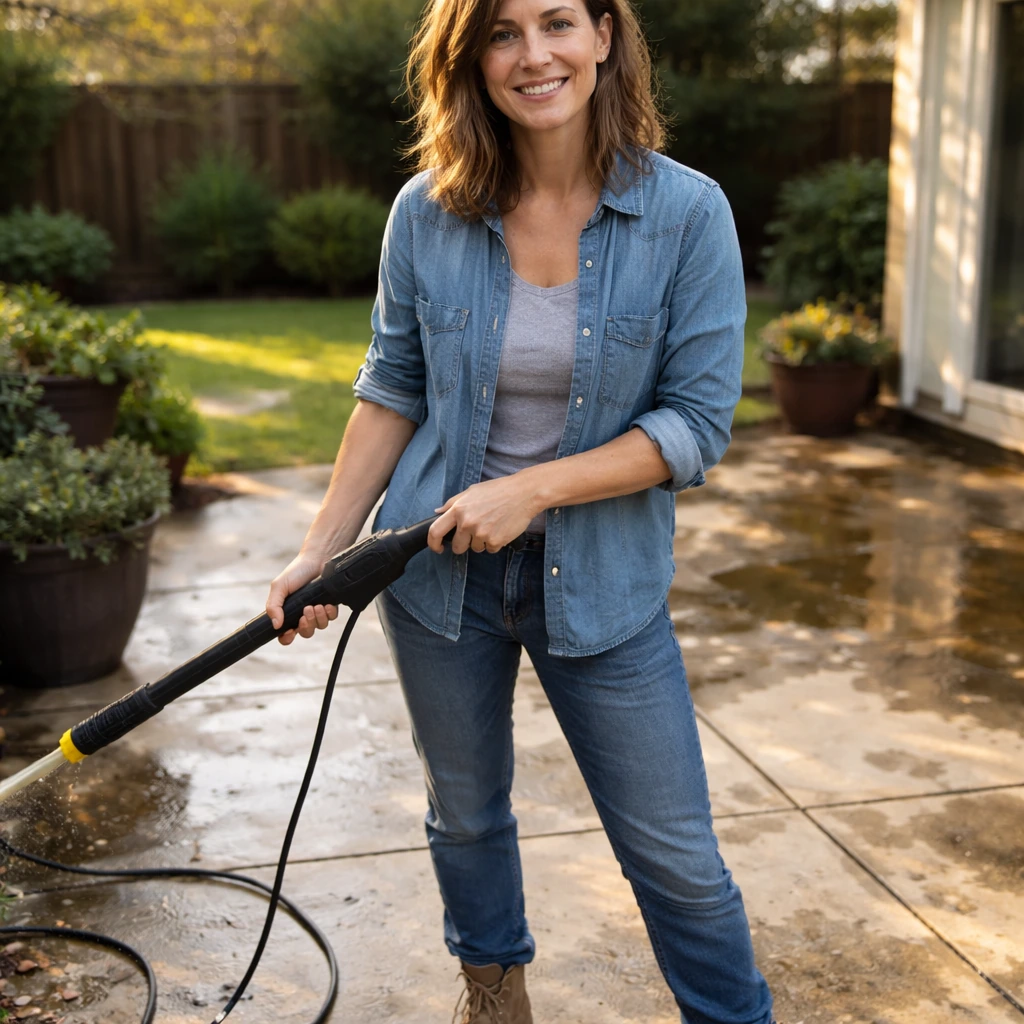
Yes, you can pressure wash a porcelain patio, but you need to keep the pressure below 1,600 PSI, use a wide-angle fan nozzle (25° to 40°), hold the wand at least 12 to 18 inches (30 to 50 cm) from the surface, and never direct a concentrated jet straight into the grout joints. Do those things and porcelain handles pressure washing well. Skip them and you risk blasting away grout, chipping tile edges, and driving water into the sub-base, which causes bigger headaches than the original dirt.
Can You Pressure Wash a Porcelain Patio Safely
Rhea Lang
24 Jun 2026

When pressure washing porcelain is fine vs. when it gets risky

Porcelain is one of the more forgiving patio surfaces to pressure wash, significantly more so than slate, for example. But if your patio is actually slate, you should use a gentler approach because slate is less forgiving than porcelain porcelain is more forgiving patio surfaces to pressure wash. It's dense, very low-absorbency, and the surface itself won't etch under normal cleaning pressures. That said, the tiles are only as strong as their weakest point, and on most patios that's the grout. High-pressure water blasting away at grout joints progressively erodes the material, eventually letting water down into the bedding layer. Once that happens, you're dealing with loose tiles and damp sub-bases, not just a dirty patio.
There's also a meaningful difference between glazed and unglazed porcelain tiles. Glazed tiles have a protective surface layer that's actually fairly resistant to pressure, but if there are any micro-cracks or chips on the glaze, high pressure can work its way in and worsen them. Unglazed porcelain (common in outdoor paver formats) is denser and more uniformly tough all the way through, so it tends to handle pressure washing a little more confidently. Either way, the rules below apply to both.
Pressure washing is risky in a few specific situations: if your grout is already crumbling or missing in places, if the tiles have visible chips or lifting at the edges, if the patio was laid on a sand-set base (more water intrusion risk than a mortar bed), or if the tiles are thin decorative porcelain rather than proper outdoor paver-grade material. In those cases, I'd skip the pressure washer entirely and go straight to the alternatives section at the bottom of this guide. p36s4: This is my first recommendation when grout is in poor condition or if someone asks me whether to pressure wash an older patio alternatives.
How porcelain reacts to water pressure
Porcelain tile itself is genuinely tough. It's fired at very high temperatures, which gives it a density that resists most of what a domestic or light-commercial pressure washer throws at it. The tile body won't absorb the water, and the surface won't etch the way natural stone like sandstone or limestone can. What you're really managing is the joint material between the tiles, not the tiles themselves.
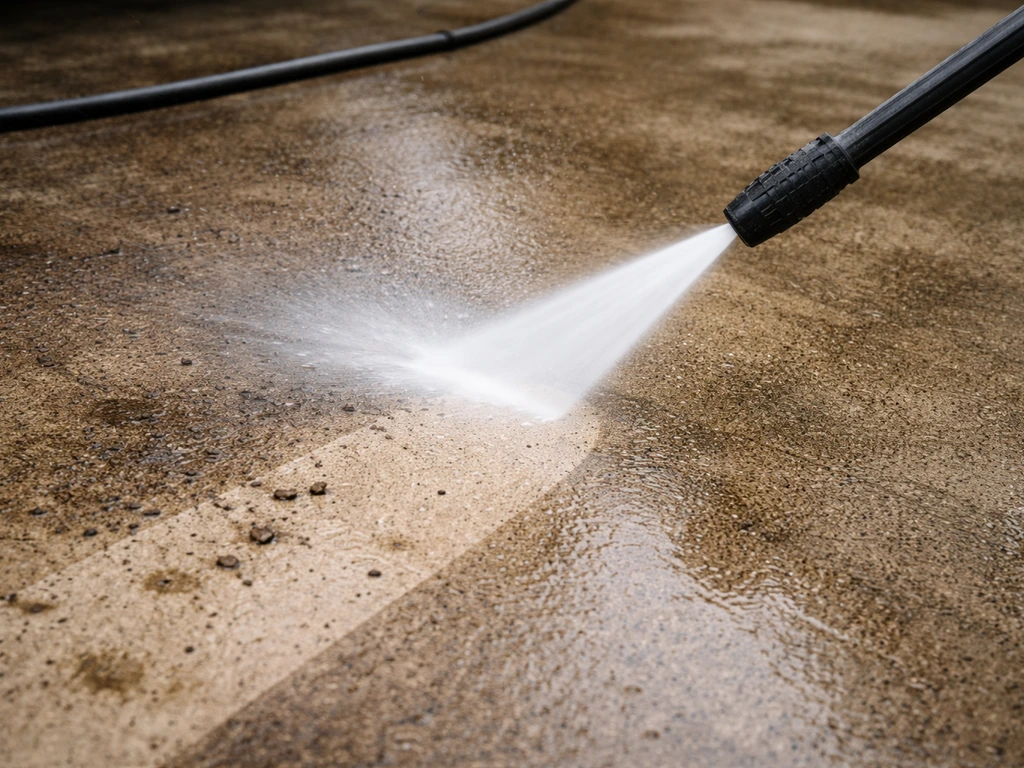
The other thing to watch is the angle and direction of the spray. Water driven straight down into a grout joint hammers it repeatedly with each pass. Aim the spray more parallel to the surface, at a 30 to 45-degree angle, and you're lifting dirt off the tile face rather than drilling water into the joints. Washh recommends using an angled spray, often around 45°, to lift dirt forward rather than driving water straight down into paver or stone joints, which helps reduce water-intrusion risk. This small technique change makes a noticeable difference in how quickly you wear away grout over repeated cleanings. One manufacturer I came across specifically recommends directing cleaning along grout joints rather than across them for exactly this reason.
There's also an efflorescence risk worth knowing about. When a lot of water gets introduced into the sub-base and then evaporates, it can pull mineral salts to the surface, leaving a chalky white haze on grout joints or even on the tile edges. This is more of an issue with repeated heavy-pressure soaking than a single careful clean, but it's worth keeping in mind if you plan to pressure wash regularly.
The right pressure washer settings for porcelain
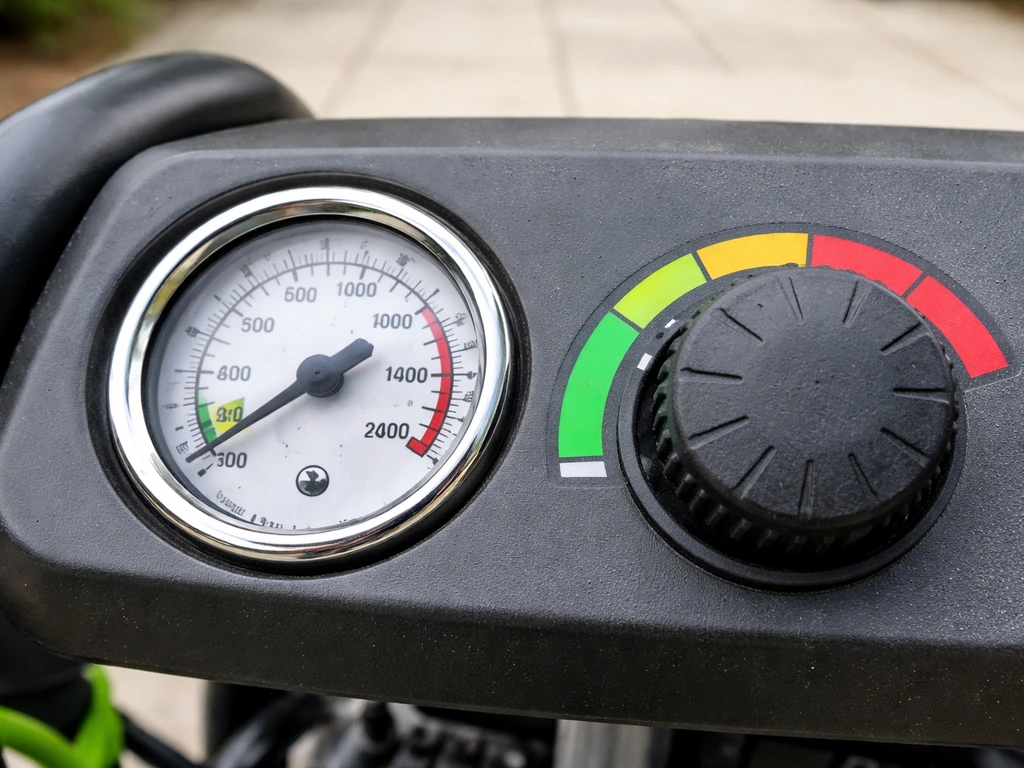
PSI range
Keep the working pressure under 1,600 PSI. Most manufacturer maintenance guides for porcelain pavers land at this figure as the upper ceiling for tougher cleaning tasks, with routine cleaning sitting lower than that. For general grime and light algae, 1,000 to 1,200 PSI is plenty. You don't need to crank the machine to its maximum. If you have a variable-pressure machine (which is worth owning if you're cleaning different patio surfaces), dial it down and work up only if you need to.
Nozzle selection
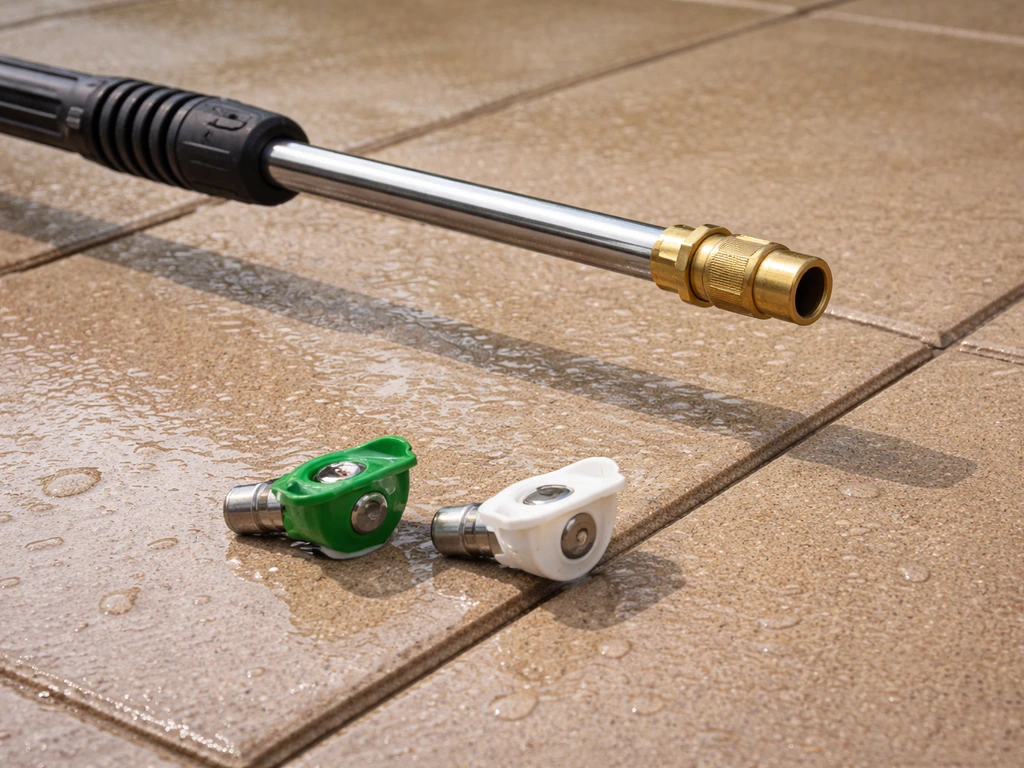
Use a 25-degree (green) or 40-degree (white) fan nozzle. The 40-degree tip is my first choice for porcelain because it spreads the pressure over a wider area, reducing the chance of any localized damage, and it still shifts grime effectively at the right distance. Avoid the 0-degree (red) nozzle entirely on any tiled surface, and be very careful with the 15-degree (yellow) nozzle near grout lines. A rotary or turbo nozzle is useful for concrete, but I'd steer clear of it on porcelain patio tiles.
Distance and angle
Hold the wand 12 to 18 inches (roughly 30 to 50 cm) from the tile surface. Closer than 12 inches concentrates the force too much, especially over grout lines. Keep the spray at a 30 to 45-degree angle to the surface and use smooth, consistent passes rather than stopping in one spot. Move at a steady walking pace: about the speed you'd walk briskly down a hallway. Overlapping each pass by about 50% prevents streaking and missed patches.
| Setting | Recommended | Avoid |
|---|---|---|
| PSI | 1,000–1,600 PSI max | Above 1,600 PSI |
| Nozzle | 25° (green) or 40° (white) fan tip | 0° (red), rotary/turbo nozzle |
| Distance | 12–18 inches (30–50 cm) | Closer than 10 inches |
| Angle | 30–45° to the surface | Straight down (90°) into grout joints |
| Speed | Steady, walking pace | Hovering or pausing in one spot |
Tackling specific porcelain patio problems
Mold, algae, and moss
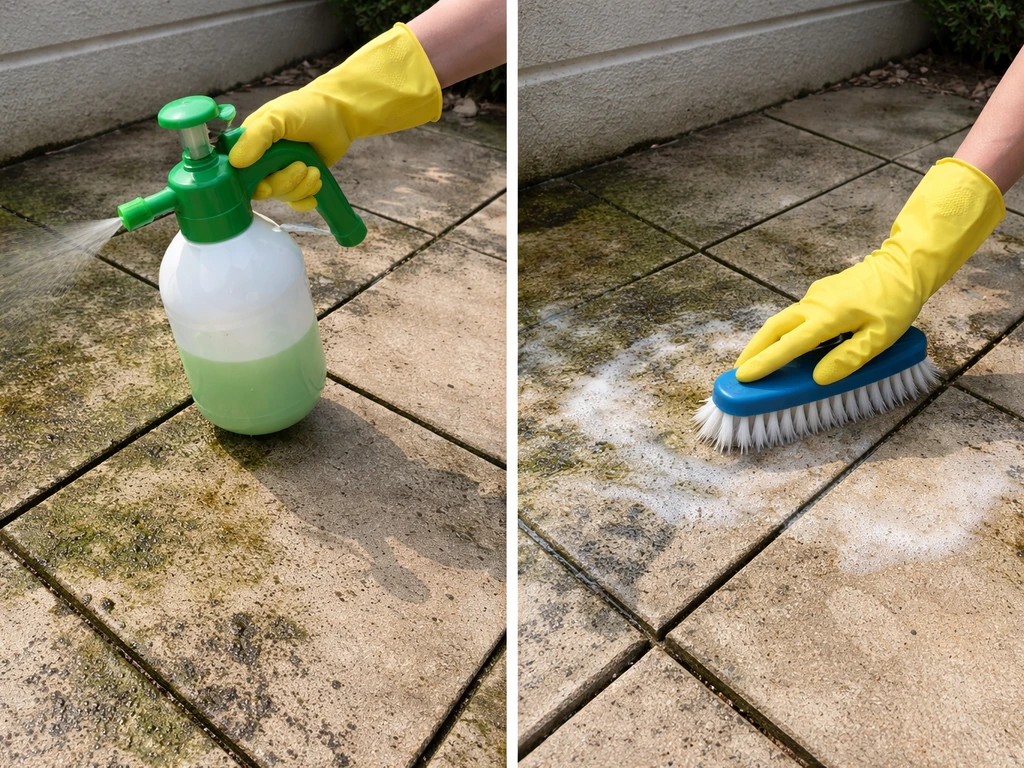
These are the most common complaints on outdoor porcelain, especially in shaded or north-facing areas. For light algae and mold, a pre-treatment with a diluted patio cleaner (pH-neutral or slightly alkaline, not acid-based) applied and left for 10 to 15 minutes will do a lot of the work before the pressure washer touches the surface. Pressure washing then removes the loosened growth without needing high PSI. For established moss, scrape off the bulk with a stiff plastic brush first, then pre-treat and pressure wash. Pressure washing alone won't kill algae and mold at the root: the growth comes back faster. Treating first and rinsing with the pressure washer gives you a much longer window before it returns.
Grease and oil
Grease from barbecue areas or oil drips doesn't respond well to water alone under any pressure. You need a degreasing cleaner applied first. Use a dedicated patio degreaser or a diluted dish soap solution (neutral pH), work it into the stain with a stiff brush, leave it for a few minutes, then pressure wash off. Glazed porcelain is more resistant to grease absorption than unglazed, but either way the pre-treatment step is non-negotiable. Skipping it and just blasting with high pressure spreads the grease rather than removing it.
Rust stains
Rust is one case where pressure washing alone won't help at all. You need a rust remover, but this is where you have to be careful with porcelain: most rust removers are acid-based, and acid-based cleaners can damage glazed tile surfaces and grout. Look specifically for a rust remover labelled safe for porcelain tile and grout. Apply it precisely to the stain, follow the dwell time on the product label, then rinse off gently. I'd use a low-pressure rinse or a garden hose rather than full pressure washer force for this one.
General grime and dirt
For everyday accumulated dirt and surface grime, a simple sweep followed by a rinse with the pressure washer at around 1,000 PSI with a 40-degree nozzle is all you need. No chemicals required. This is the most straightforward porcelain cleaning scenario and where pressure washing really earns its keep.
Chemicals vs. water-only: what actually works (and what damages porcelain)
For routine cleaning, plain water at the right pressure is often enough. For organic growth or grease, a pre-treatment cleaner makes a significant difference. The cleaner you choose matters more than you might think because porcelain grout is chemically sensitive even if the tile body isn't.
Stick to pH-neutral or mildly alkaline cleaners designed for porcelain or stone. Multiple tile manufacturers are explicit on this: avoid anything containing bleach, ammonia, or acid. Bleach sits at around pH 12 (strongly alkaline) and can discolour coloured grout even in diluted form. Ammonia causes similar grout damage and can affect the sheen on glazed tiles. Acidic cleaners (including many general-purpose driveway cleaners) will etch grout and can attack the surface of glazed tiles over time. This doesn't mean one accidental use will destroy your patio, but repeated use of the wrong chemicals gradually degrades the grout and dulls glazed surfaces in a way that's hard to reverse.
- Use: pH-neutral patio cleaner, diluted dish soap for grease, purpose-made porcelain tile cleaner
- Use with caution: diluted mild alkaline cleaners (check they're grout-safe), biocidal treatments for algae/mold (rinse thoroughly)
- Avoid: bleach-based cleaners, ammonia-based cleaners, acid-based cleaners (muriatic acid, citric acid cleaners not rated for porcelain), undiluted anything
If you do use a cleaning product, always do a final low-pressure rinse with clean water to remove all chemical residue. Leaving cleaner on the surface is a common cause of streaking and grout haziness. This final rinse step is easy to skip when you're tired and nearly done, but it matters.
Step-by-step: how to pressure wash a porcelain patio
- Clear the patio. Move furniture, plant pots, and anything else off the surface. Cover or move potted plants that are close to the area: the spray and any cleaning solution can damage foliage.
- Sweep thoroughly. Remove loose debris, leaves, and dirt with a stiff broom. Getting the bulk of the dry material off first means you're not just pushing wet mud around during washing.
- Pre-treat problem areas. Apply your chosen cleaner to stained, mossy, or grimy areas and let it dwell for 10 to 15 minutes. Don't let it dry out: if it starts to dry, mist lightly with water.
- Do a test spot. Before washing the whole patio, do a small test in an inconspicuous corner. Use your planned PSI and nozzle, hold at 12 to 18 inches, and check the result. Look at the tile surface and the grout after. If the grout looks disturbed or the tile surface changes in any way, reduce the pressure or increase the distance before continuing.
- Pressure wash the surface. Work in sections, using smooth overlapping passes at a consistent 30 to 45-degree angle. Keep the nozzle moving at all times and aim along grout lines rather than across them. Maintain a steady pace: don't hover.
- Final rinse with clean water. Switch to a lower pressure setting or widen the nozzle and rinse the whole area with clean water, working from one end to the other to push dirty rinse water off the patio rather than back across clean sections.
- Let it dry before assessing. Porcelain looks different wet. Let it fully dry before deciding whether any areas need a second pass or spot treatment. Wet tile can hide remaining grime or show false streaks.
When pressure washing isn't the right call: alternatives that work
If your grout is already compromised, the tiles are loose, or you just don't have access to a pressure washer, there are effective alternatives that won't cause any of the risks mentioned above. If you're wondering is it OK to power wash patio pavers, the safest answer depends on the material, grout condition, and how you use the pressure.
Soft washing (low-pressure chemical treatment)
Softwashing uses pressures between 40 and 100 PSI, which is essentially garden hose pressure, combined with a biocidal or cleaning solution that does the actual work. The low pressure carries the solution to the surface without any of the grout-damage risk of a full pressure washer. For organic growth like algae, moss, and mold, softwashing actually gives longer-lasting results than pressure washing because the biocide kills the growth at the root rather than just blasting off the surface appearance. The regrowth timeline is significantly longer. This is my first recommendation when grout is in poor condition or if someone asks me whether to pressure wash an older patio.
Chemical soak and scrub
Apply a pH-neutral cleaner or diluted patio cleaning product, let it dwell for the recommended time, and scrub with a stiff-bristled brush (not wire, which can damage grout and leave metal fragments that rust). Then rinse with a garden hose. This is slower than using a pressure washer but gives you full control and no risk to grout or tiles. For a heavily soiled patio it might take a couple of passes, but the result is thorough and safe for any tile condition.
Patio cleaning attachment (rotary surface cleaner)
If you do have a pressure washer but are nervous about direct wand use on porcelain, a rotary surface cleaner attachment distributes pressure more evenly across a larger footprint and reduces the chance of localized grout damage. It also reduces splashback significantly, which is a bonus. Keep the pressure setting conservative (under 1,200 PSI) and move it at a steady pace. It won't reach right into corners and edges, so you'll need to go back with the wand on a low setting for those areas.
Pressure washing is genuinely one of the faster and more effective ways to clean a porcelain patio when you do it right. The key is recognizing that the limits set on PSI, nozzle type, and technique aren't just overcautious suggestions: they're the difference between a clean patio and a grout repair job. Keep the pressure moderate, pre-treat stains, rinse clean, and your porcelain patio will come up looking sharp without any damage.
FAQ
Can you pressure wash porcelain patio if the grout is new and still curing?
Avoid pressure washing until the grout has fully cured and dried per the installer’s timeline, because early-age grout is more easily loosened and can trap moisture behind the tile during rinsing. If you are unsure, do a gentle test in a hidden area using about 1,000 PSI and a 40-degree nozzle, then check after 24 to 48 hours for any grout softening or damp spots.
What PSI should I start with on porcelain patio to be safe?
Start around 1,000 to 1,200 PSI, even though the upper limit is higher. Porcelain usually lifts grime at lower settings, and reducing PSI also lowers the chance of driving water into the sub-base, which is what most grout and tile movement problems trace back to.
Is it better to clean porcelain patio with the nozzle pointed at the grout or angled across it?
Angle the spray so it is more parallel to the tile surface, at roughly 30 to 45 degrees, and avoid aiming directly into the grout joints. You can still clean along the joints by letting the water skim over them, but you should not blast them head-on, especially if your grout shows any hairline gaps or weakness.
Will pressure washing porcelain patio damage sealed tile or patio sealer?
It can, depending on the sealer type and how hard you spray. A strong rinse under higher PSI can reduce the effectiveness of some topical sealers, leading to faster re-soiling. Use lower PSI, a wide fan nozzle, and consider doing a small test patch, then re-seal only after the patio is fully dry if needed.
How do I prevent streaking or a chalky haze after I pressure wash?
Do a final low-pressure rinse with plain water after any cleaner, and avoid lingering in one spot, which can concentrate minerals and residue in grout. If you see a chalky haze, stop increasing PSI and rinse again gently; the haze often relates to dissolved salts or leftover product rather than stuck dirt.
Can I use a turbo or rotary nozzle on porcelain pavers?
It’s usually not the best idea on porcelain tile. Rotary and turbo tips concentrate force and can create micro-damage at edges and around grout lines, especially with repeated passes. If you need more cleaning power, use a conservative PSI with a 40-degree fan nozzle first, or use a rotary surface cleaner attachment at reduced pressure while keeping motion steady.
Do I need to use a chemical pre-treatment before pressure washing porcelain patio algae?
Usually yes for algae and mold, because pressure alone often just removes the top growth and lets it return quickly. Use a pH-neutral or mildly alkaline patio cleaner, let it dwell for the recommended time, scrub the heavy areas first if needed, then pressure rinse at a moderate PSI.
Will pressure washing remove grease stains on porcelain patio?
Not reliably with water alone. Grease often requires a dedicated degreaser or a carefully diluted neutral dish soap solution, applied and worked in with a stiff brush, then given a short dwell time before rinsing. If grease is old or set, you may need a repeat treatment rather than increasing PSI.
How should I handle rust stains on porcelain patio?
Use a rust remover specifically labeled safe for porcelain tile and grout, and apply it precisely to the stain. Many rust removers are acid-based, which can harm grout and glazed surfaces. After dwell time, rinse gently with low pressure, not a full-power jet.
Is softwashing an acceptable substitute if I’m worried about grout damage?
Yes, softwashing is often the safer option when grout is compromised or the patio is older, because it uses much lower pressure (typically garden-hose range) plus a cleaning solution. It tends to be more effective for living growth since the biocide treatment targets the source, but you still need correct dwell time and thorough rinsing.
What’s the safest way to work around patio edges and corners?
Don’t rely on the main wand passes to reach tight corners. Keep the main strokes consistent and angled for the field, then switch to a lower-pressure wand setting or a gentle hand-brush-and-rinse approach for edges where the spray can easily concentrate and erode grout.
Next Article
How Much PSI Do I Need to Clean a Concrete Patio
Get the right PSI for concrete patio cleaning, plus nozzle, distance, and safety tips to remove mold, dirt, and grease.