Pressure washing a patio safely and effectively comes down to four things: the right nozzle for your surface, keeping the wand moving at a consistent distance, using a cleaning solution when water alone won't cut it, and never pointing that jet at anything fragile (including yourself). Get those four things right and you'll go from a grimy, moss-covered slab to a clean patio in a couple of hours without cracking a single tile or etching a line into your concrete.
Tips for Pressure Washing Patio: Concrete to Porcelain Guide
Rhea Lang
23 May 2026
Safety and prep before you switch anything on

This part is genuinely worth five minutes of your time. A pressure washer running at 2,500 PSI can inject water under your skin, strip paint, and crack soft stone before you've even registered what happened. Wear impact-resistant eye protection and closed-toe shoes as a minimum. I'd also recommend waterproof trousers or work trousers you don't mind soaking. Keep pets and people clear of the area while you're working.
On the electrical side: always plug an electric pressure washer into a GFCI-protected outlet and test the GFCI before you start. A CDC incident report found that a fatal pressure washing accident involved a setup with no GFCI protection on either the washer or the circuit. If the GFCI trips during use, stop and have a qualified electrician check the unit before continuing. Also, never use caustic or strongly alkaline cleaning chemicals with an electric pressure washer unless the manufacturer explicitly says it's safe.
Before you turn on the machine, clear the patio completely. Move furniture, pots, and anything else off the surface. Cover nearby garden beds, plants, and borders with plastic sheeting or at least rinse them thoroughly before and after washing. High-pressure overspray carries chemical residue and grit further than you'd expect. Block or cover any low-level electrical outlets on exterior walls. If you have lights or outlets set into the patio itself, cover them with plastic bags and tape.
- Eye protection and closed-toe shoes are the bare minimum PPE
- Plug into a GFCI outlet and test it before starting
- Clear all furniture, pots, and decorations from the patio
- Cover or wet down nearby plants and garden borders
- Protect wall-mounted and in-ground electrical outlets
- Never aim the jet at people, animals, or delicate plants
- Keep bystanders at least 10 feet back while you're washing
Choosing the right pressure washer and nozzle
For a typical residential patio, a pressure washer in the 1,500 to 2,800 PSI range covers most jobs. Gas-powered units give you more flexibility (no cord, higher flow rates), but a good electric pressure washer in the 1,800 to 2,300 PSI range handles concrete, pavers, and brick without any real compromise. For sensitive materials like sandstone, slate, or porcelain, you'll want to stay at the lower end of that pressure range or use a surface cleaner attachment that spreads the pressure over a wider area. A good steam cleaner can be a gentler alternative for removing grime on some patio surfaces, especially when you want to avoid heavy pressure.
Nozzle choice matters more than most people realize. The color-coded system is pretty universal: red is 0 degrees (a laser-focused jet, almost never useful on patios), yellow is 15 degrees (good for stripping), green is 25 degrees (the workhorse for concrete and hard surfaces), white is 40 degrees (gentle rinsing and softer materials), and black is 65 degrees (soap application, too wide to clean effectively). I'd add a surface cleaner attachment to this list if you're doing a large patio. It dramatically reduces streaking and is much gentler on the surface because it distributes the pressure evenly.
| Nozzle | Spray Angle | Best For | Avoid On |
|---|---|---|---|
| Red | 0° | Stubborn spot stains (use with caution) | All patio surfaces unless absolutely necessary |
| Yellow | 15° | Stripping paint, heavily soiled concrete | Sandstone, slate, porcelain |
| Green | 25° | Concrete, hard pavers, brick | Soft or porous natural stone |
| White | 40° | Rinsing, sandstone, softer stone, porcelain | Areas needing aggressive cleaning |
| Black | 65° | Applying detergent (downstream injection) | Direct cleaning (too wide) |
| Surface cleaner | N/A | Large flat areas, reducing streaks | Tight corners, grout lines |
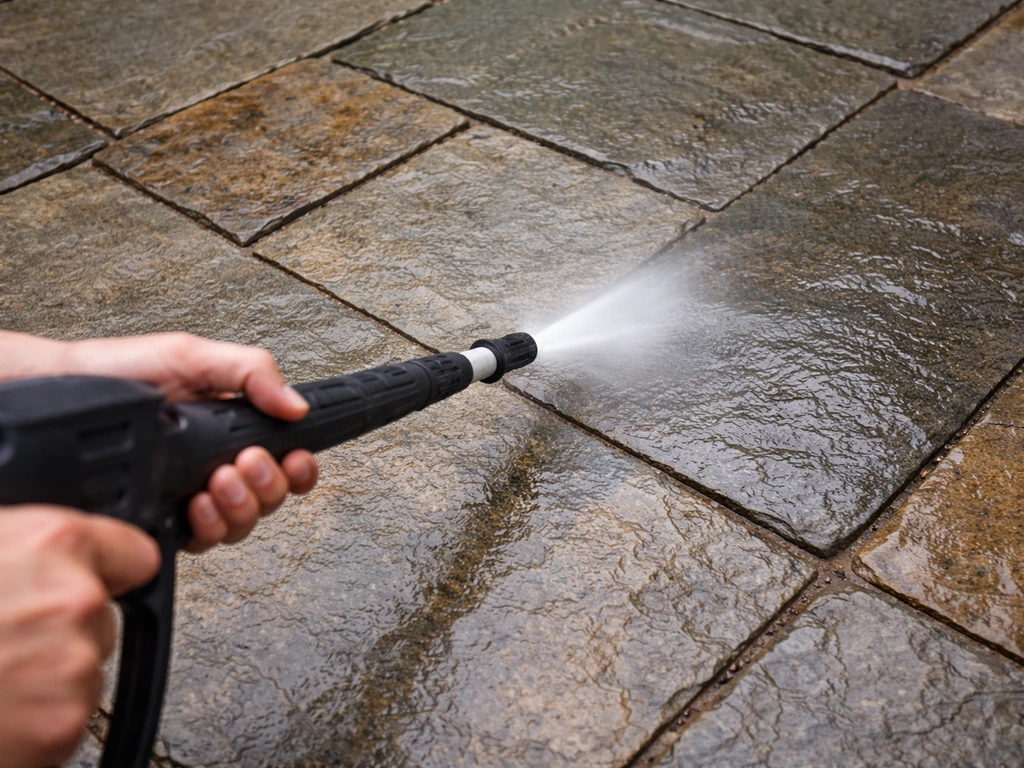
If your pressure washer is capable of more than 3,000 PSI, add extra distance between the nozzle and the surface. A rough rule of thumb is to stay about two feet away at that pressure level. For most electric washers in the 1,800 to 2,300 PSI range, 8 to 12 inches is a workable standoff distance with a green or white nozzle. Start further away, come closer gradually, and stop when you see effective cleaning without surface disruption.
Surface-specific tips: what changes for each patio material
This is where most DIYers go wrong. Treating a porcelain patio slab the same way you'd treat a plain concrete path is a reliable way to damage it. Here's what actually changes by surface.
Concrete
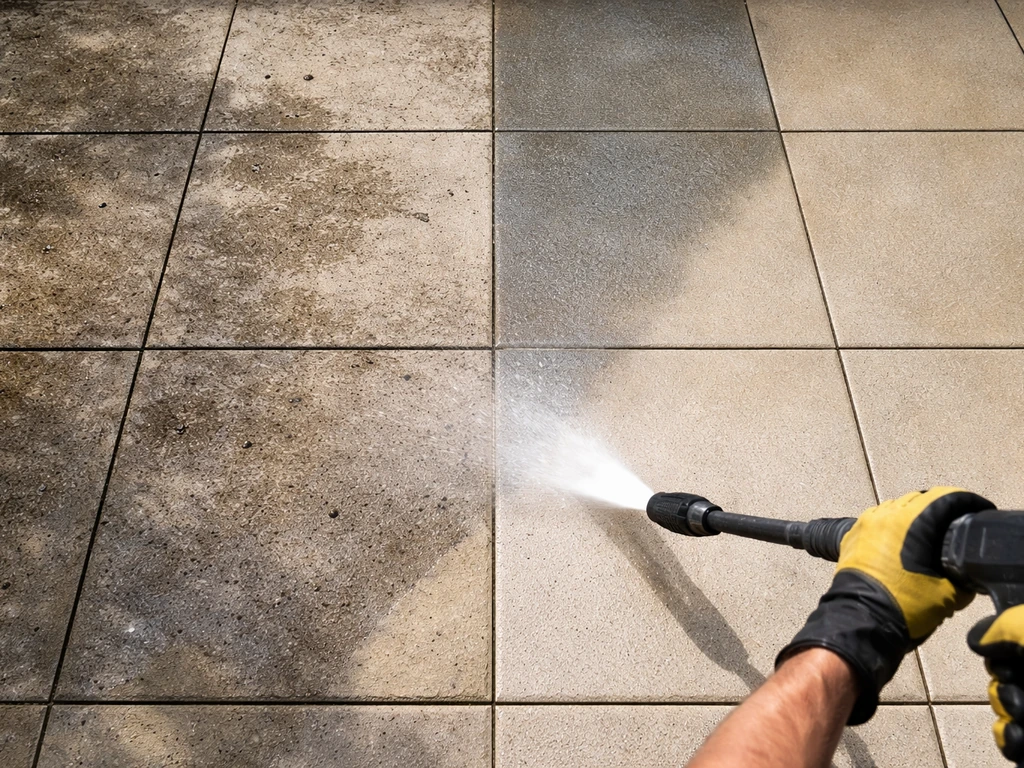
Concrete is the most forgiving patio surface to pressure wash. You can safely use a green (25-degree) nozzle at 2,500 to 3,000 PSI and keep the wand 8 to 12 inches from the surface. Keep the wand moving consistently in long, overlapping sweeps. The main risk with concrete is etching if you hold the nozzle too close or use a zero-degree tip. On older or already-pitted concrete, stick to a 40-degree nozzle or a surface cleaner to avoid making hairline cracks worse.
Pavers (concrete or clay)
The biggest issue with pavers is the joints. High-pressure washing blasts out jointing sand, so after washing you'll almost certainly need to re-sand the joints with kiln-dried or polymeric sand. Use a green or white nozzle, avoid pointing the jet directly into joints, and focus passes along the face of each paver rather than straight down the gaps. After the main surface is clean, Kärcher's guidance rightly points out that you should give the joints specific attention with a mild detergent and a stiff brush rather than pure high-pressure blasting.
Brick
Brick is porous and variable in hardness depending on its age and type. Stick to a white (40-degree) or green (25-degree) nozzle at no more than 1,500 to 2,000 PSI and keep your distance to at least 12 inches. Old or reclaimed brick can crumble at the face under sustained high pressure. Keep the wand moving and never hold it in one spot. Mortar joints are especially vulnerable, so move across the face of the brick rather than along the mortar lines.
Natural stone (including flagstone)
Natural stone covers a wide range of hardness and porosity. As a general rule, stay at 1,200 to 1,800 PSI with a white or 40-degree nozzle and keep 12 to 18 inches of distance. Harder granites can handle a bit more; softer limestones and sandstones need treating more like the sensitive categories below. The biggest risk is surface pitting and stripping the natural texture.
Sandstone
Sandstone is one of the most pressure-sensitive materials you'll encounter on a patio. It's soft, porous, and erodes easily. Keep pressure below 1,500 PSI, use only a white (40-degree) nozzle, and stay at least 18 inches from the surface. Don't use acidic cleaners on sandstone as they'll discolor and eat into it. If you're dealing with heavy moss or algae, let a dedicated stone cleaner or diluted non-acidic cleaner do the work rather than relying on water pressure. A pre-soak followed by gentle washing gives far better results here than force alone.
Slate
Slate is brittle and can flake or delaminate under too much pressure, especially older or lower-quality slate. Keep pressure at 1,000 to 1,500 PSI maximum, use a white nozzle, and move at an angle (roughly 45 degrees to the surface) rather than straight down. Direct perpendicular blasting can force water under any natural layering in the stone. Like sandstone, let chemical cleaners do the heavy lifting and use low pressure to rinse.
Porcelain
Porcelain patio slabs have a very hard glazed surface that doesn't absorb water, but the real vulnerability is the grout joints and the edges of the slabs. Keep pressure at 1,200 to 1,800 PSI, use a white nozzle, and angle the spray so it doesn't blast directly into grout lines. The surface itself cleans up easily, but repeated high-pressure blasting of the joints will hollow them out over time. A surface cleaner attachment is ideal here because it's gentler and almost eliminates the risk of stripping grout.
Cleaning solution strategies for common patio stains
Water alone handles loose grime, surface dirt, and light algae reasonably well. But for mold, deep moss, rust, grease, and biological stains, you need chemical help. The key principle is this: let the cleaner do the breaking down, and use the pressure washer to rinse. High pressure without chemistry just pushes stains around on most surfaces.
Mold and mildew
A sodium hypochlorite-based cleaner (bleach-based patio wash) is the most effective option for mold and mildew on concrete and hard pavers. Products like Jomax Mold and Mildew Stain Remover Concentrate are specifically formulated for pressure washer application. Jomax’s how-to guidance for this concentrate also emphasizes following the manufacturer’s instructions when using it with a pressure washer blank" rel="noopener noreferrer">specifically formulated for pressure washer application. Apply at low pressure using a downstream injector or a dedicated soap nozzle, let it dwell for 10 to 15 minutes while keeping the surface visibly wet, then rinse with a green or white nozzle. Don't use bleach-based products on sandstone, slate, or natural stone without first checking compatibility, as they can cause discoloration.
Algae and moss
For algae and moss, a purpose-made patio cleaner or diluted bleach solution works well on harder surfaces. The dwell time principle is critical here. Saturate the affected area at low pressure, let the chemical sit for 10 to 15 minutes to oxidize the organic cells, and then rinse. Kärcher's guidance for mossy paving recommends working from one edge to the other at a standoff distance of 20 to 30 cm (roughly 8 to 12 inches), holding the jet at a vertical angle and moving slowly and consistently. On sensitive surfaces like sandstone or slate, use an algae and moss killer with a very low pressure rinse and avoid the temptation to get the nozzle close.
Rust stains
Rust stains on concrete or pavers come from metal furniture, fertilizer, or water with high iron content. Pressure washing alone won't remove them. You need an oxalic acid-based rust remover applied directly to the stain, left to dwell for the time specified on the product label (usually 5 to 10 minutes), then scrubbed with a stiff brush and rinsed thoroughly. Do not use oxalic acid on natural stone, especially sandstone, limestone, or slate. For those surfaces, look for a stone-safe rust treatment or consult a stone specialist.
Grease and oil
Grease and cooking oil stains need a degreaser applied before you pressure wash. Apply neat (undiluted) to the dry stain, let it dwell for 10 to 15 minutes, agitate with a stiff brush, then rinse with the pressure washer. Hot water pressure washers are noticeably more effective on grease because heat breaks down oil faster. If you have a cold-water unit, a second application of degreaser after the first rinse usually finishes the job. A patio and deck wash product like Jomax JMX-05 handles both grease and general grime in one pass on concrete and pavers.
Pet stains and odors
Pet urine soaks into porous surfaces like concrete and sandstone and requires an enzymatic cleaner rather than a standard detergent. Enzymatic products break down the uric acid crystals that cause the odor. Apply generously, let it dwell for at least 15 minutes, and then rinse at medium pressure. Avoid bleach-based products on pet stain areas if pets will return to the surface, and check that any cleaning product you use is listed as pet-safe after it dries. Always rinse thoroughly because detergent residue on patio surfaces is slippery and irritating to paws.
Pressure washing technique: angles, distance, passes, and avoiding damage
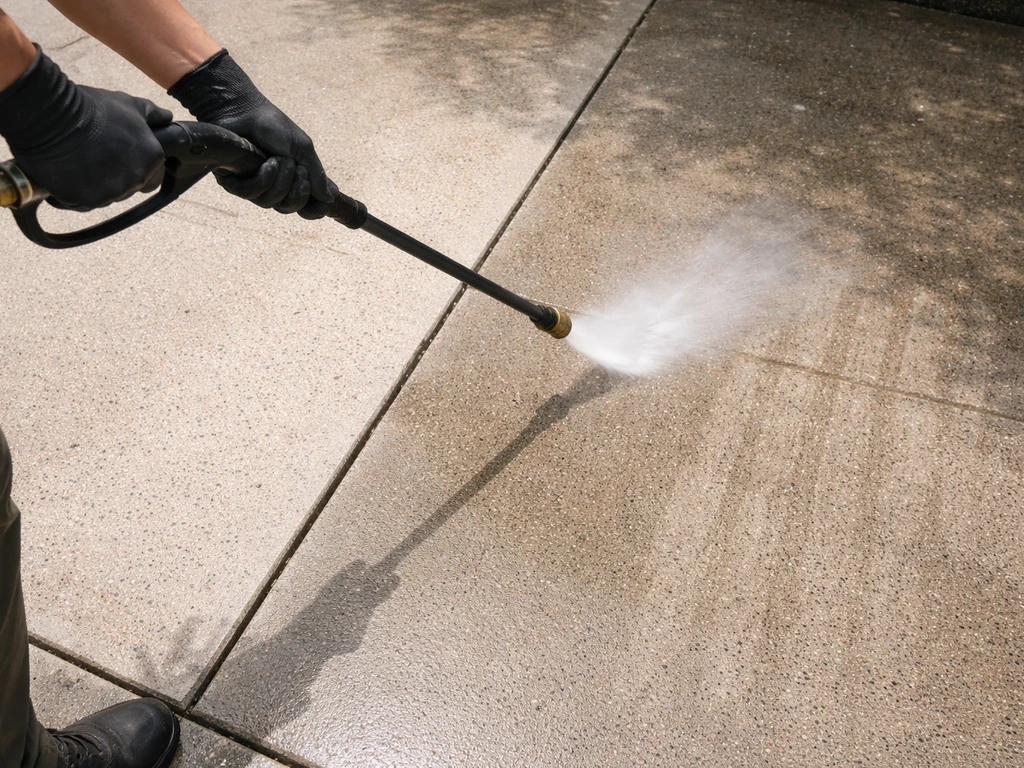
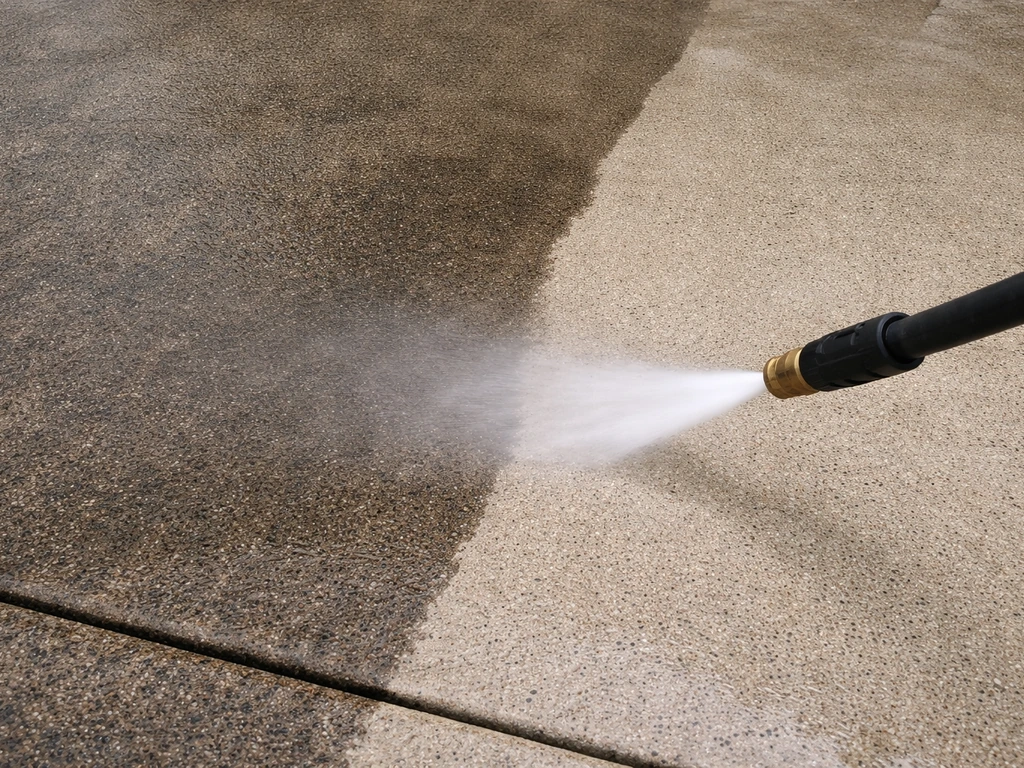
Good technique is what separates a clean patio from a patio with pressure-wash lines across it. The two most common mistakes are stopping mid-pass and reversing direction, and holding the wand at a 90-degree angle (straight down) to the surface. Both leave visible marks.
Use a consistent pendulum or sweeping motion, moving the wand in long overlapping passes. Each pass should overlap the previous one by about 30 to 50 percent. Never stop the wand while the trigger is pulled, and never reverse direction halfway through a pass. The Homes and Gardens guidance on this is spot on: stop marks from hesitating or reversing are one of the most common DIY pressure washing mistakes and they're very difficult to remove after the fact.
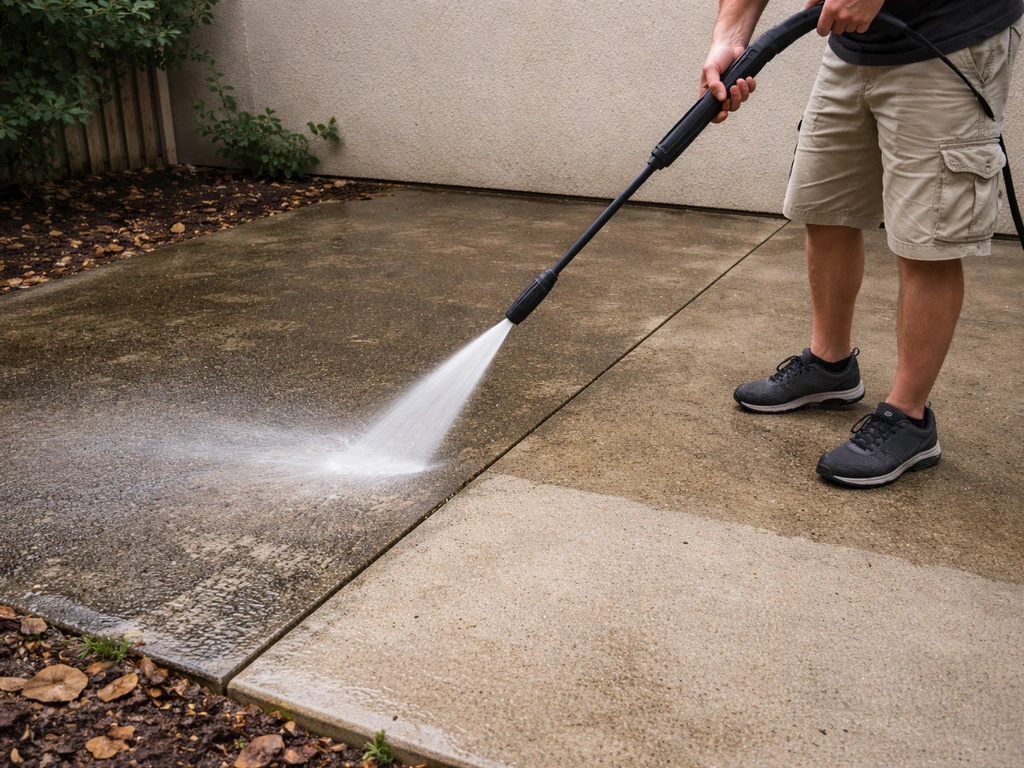
Hold the wand at roughly a 45-degree angle to the surface rather than perpendicular. This gives you better coverage, reduces the risk of forcing water into joints or cracks, and is especially important on slate and layered natural stone. Work from one end of the patio to the other, always directing the spray toward your exit point so you're not walking over dirty water you've just washed off.
Distance from the nozzle to the surface controls both cleaning intensity and the risk of damage. Start at 18 inches and move closer in 2-inch increments until you find the distance that cleans effectively without disturbing the surface texture. For concrete at 2,500 PSI, that's usually around 8 to 12 inches. For sandstone or porcelain, stay at 15 to 18 inches and compensate with a better cleaning solution rather than closer nozzle placement.
For large flat areas, a surface cleaner attachment is genuinely worth the investment. It spins two nozzles under a shroud, giving you even pressure distribution, no streaking, and faster coverage. Kärcher and other brands make attachments that fit most trigger guns. If you're renting a pressure washer for a one-off job, ask if the rental includes a surface cleaner.
After the wash: inspection, drying, and keeping it clean longer
Once you've rinsed off all cleaning product, do a slow walk-over inspection while the surface is still wet. Wet surfaces show up remaining stains, uneven cleaning, and any damage much more clearly than dry ones. Mark any spots that need a second pass or a targeted chemical treatment and deal with them before you pack up the equipment.
After washing, most patio surfaces need 24 to 48 hours to dry fully before you put furniture back or apply any sealer. Shaded areas or porous materials like brick and natural stone can take up to 72 hours depending on temperature and humidity. Concrete that has recently been laid (within the last 28 days) should be treated with extra care: it reaches walking strength around 24 to 48 hours but doesn't reach full cure until around 28 days, so avoid heavy pressure washing on new concrete. If it’s raining, it’s still best to pause and wait so you can clean and dry properly without leaving streaks or missed spots.
If you're going to apply a patio sealer, wait until the surface is completely dry (usually 48 hours minimum after pressure washing). Sealing concrete and paver patios is one of the most effective things you can do to reduce future cleaning work. It slows moss and algae growth, makes oil and grease stains surface-level rather than absorbed, and keeps the surface looking better for longer. Reapply sealer every 2 to 3 years depending on traffic and weather exposure.
For paver patios, re-sand the joints after the surface is fully dry. Use polymeric jointing sand and brush it into the joints, then compact it lightly and wet it down to activate the polymer binder. This prevents moss from re-establishing itself in the joints and stops ants from undermining the base.
A simple maintenance plan to avoid starting from scratch next time
- Sweep or blow leaves and debris off the patio weekly during autumn and at least monthly otherwise. Decomposing organic matter is what feeds moss and algae.
- Apply a diluted patio algae inhibitor or biocide treatment once or twice a year (spring and autumn) to slow biological growth between washes.
- Deal with oil and grease spills immediately with a degreaser and a scrub brush rather than letting them soak in.
- Pressure wash the full patio once a year for hard surfaces like concrete and pavers, or twice a year in shaded or damp gardens where moss establishes quickly.
- Inspect jointing sand annually and top up any areas where it has washed out or thinned.
- Re-seal concrete and pavers every 2 to 3 years to maintain surface protection.
One last thing: if you find you're washing the same stubborn black algae stains off your patio every year, the problem is usually shade and moisture rather than technique. Trimming back overhanging branches or improving drainage near the patio edge will do more for long-term cleanliness than any amount of washing. Good technique and the right equipment get you a clean patio today. For more jet wash patio tips, focus on matching the nozzle and pressure to your patio material and stain type. If you want a step-by-step guide, start by matching the pressure washer, nozzle, and distance to your patio material. A bit of prevention keeps it that way.
FAQ
What PSI should I use if my patio has multiple materials (like concrete slabs with brick borders)?
Choose the lowest-safe setting for the most pressure-sensitive section, then clean the tougher material with a gentler approach (more dwell with cleaner, not closer nozzle). Work in zones, and overlap your passes, so you do not “fix” results on concrete by increasing pressure where brick or natural stone is present.
How do I avoid etching or dulling on concrete after pressure washing?
Use a wider-angle nozzle (40-degree/white or 25-degree/green), keep the wand moving, and avoid sustained dwell in one spot. If you notice a chalky or rough look, stop reducing distance and switch to a lower pressure plus cleaner dwell instead of repeatedly “chasing” spots at close range.
Can I pressure wash new concrete right away?
Avoid washing within the first month if the slab is newly poured. Even if the surface looks hard, the bond and surface strength are still developing, and higher pressure can expose fine aggregate. Wait until it has cured to about 28 days before doing any heavy cleaning, then start farther back and test an area.
What should I do if my GFCI keeps tripping during use?
Stop immediately and do not keep trying at the same setup. Check for damaged extension cords, loose connections, or water getting into plugs or the washer inlet. If the washer itself or the circuit keeps tripping after replacing accessories, have the unit and circuit inspected before continuing.
Is it safe to use bleach (sodium hypochlorite) on all patio stains?
It is generally effective for mold and mildew on concrete and hard pavers, but compatibility matters for stone. Do not apply bleach-based products to sandstone, slate, or other natural stone unless the product label explicitly allows it, because it can cause discoloration and surface damage.
How long should I let patio cleaner sit before rinsing?
Follow the dwell window, but use a practical rule: keep the surface visibly wet during the wait. If the area dries before you rinse, re-wet it with low-pressure water and give the cleaner additional time, because many patio chemicals need contact time with the wet surface to work.
What’s the best way to prevent streaks and leftover “wash lines”?
Do not stop mid-pass, and overlap each pass by roughly one-third to one-half of the spray width. Also rinse using consistent strokes from one end to the patio to your exit point, then do a wet inspection walk-over so missed streaks can be corrected while everything is still damp.
How close can I bring the nozzle without damaging grout on porcelain or tile patios?
Angle the spray so it does not aim straight into grout lines, and stay in the lower-to-mid range described for porcelain (around 1,200 to 1,800 PSI). If grout lines keep loosening, increase standoff distance and consider a surface cleaner attachment or a separate grout-focused cleaner applied with a brush rather than blasting.
Do I need to re-sand paver joints every time I pressure wash?
Not always, but plan on checking the joints. High pressure commonly dislodges jointing sand, especially if you cleaned perpendicular to the gaps. If you see gaps, wash-out, or sand loss after drying, re-sand with polymeric or kiln-dried sand and lightly compact and wet to activate binders.
Why do grease stains sometimes come back even after washing?
If grease was allowed to soak into porous concrete or the first cleaning did not fully emulsify oil, residues can reappear after the patio heats up or rain follows. Use a degreaser on the dry stain with adequate dwell, agitate with a stiff brush, rinse thoroughly, and only then decide if a second degreaser pass is needed.
How should I deal with pet urine stains and odor for porous surfaces?
Use an enzymatic cleaner rather than relying on detergent or bleach, because enzymes are what break down uric acid crystals. Apply generously, keep the area wet for at least the minimum dwell time, then rinse at medium pressure and monitor after drying to confirm odor is gone.
Should I use a sealer right after pressure washing?
Wait until the surface is fully dry, typically at least 48 hours, because trapping moisture under sealer can cause haze or premature failure. If you plan to seal, do the inspection while still wet first, fix problem spots, then let everything dry fully before applying any sealer.
What if my patio stays dirty each year even when I clean it correctly?
If black algae returns annually, look first at shade and moisture pathways, like overhanging branches, blocked drainage, or water pooling near the patio edge. Improving airflow and drainage often reduces regrowth more than increasing pressure or cleaning frequency.
Next Article
How to Jet Wash a Patio: Safe Steps for Every Material
Step-by-step how to jet wash a patio safely, choosing pressure, nozzles, chemicals, and techniques for each material.