You can make a reliable patio cleaner at home using ingredients you probably already have: white vinegar, dish soap, hydrogen peroxide, or sodium percarbonate (oxygen bleach). The right recipe depends on what you're dealing with and what your patio is made of. A simple mix of 1/4 cup of 3% hydrogen peroxide per gallon of cold water handles mold and algae on most surfaces. Oxygen bleach (roughly 2 tablespoons of sodium percarbonate per gallon of warm water) is the all-rounder for general grime, green growth, and moss. For rust, lemon juice or a diluted oxalic acid solution is your best bet. For grease, start with dish soap and warm water. I'll walk you through each one.
How to Make Patio Cleaner: DIY Recipes for Any Surface

Rhea Lang
29 Apr 2026
Step one: figure out what you're fighting and what surface you have
Before you mix anything, spend two minutes identifying the stain type and your patio material. Using the wrong cleaner can bleach out sandstone, etch slate, or leave a vinegar smell in your grout for weeks. Get this right and everything else is much easier.
What does the stain actually look like?
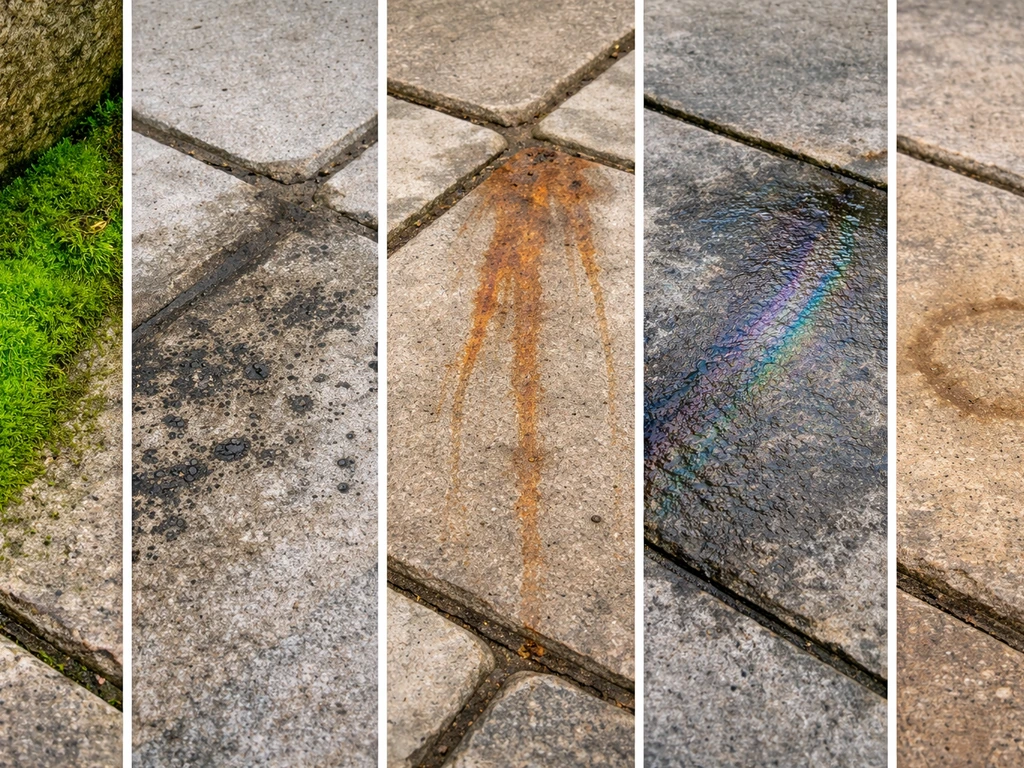
| What you see | What it probably is | Recipe to use |
|---|---|---|
| Green, velvety or tufted mat, especially in shady corners or beside garden beds | Moss | Oxygen bleach solution or hydrogen peroxide spray |
| Green, red, brown, or black fuzzy/flat discolouration across the surface | Algae, lichen, or mould/mildew | Hydrogen peroxide spray or oxygen bleach solution |
| Orange or brown blotches near metal furniture, planters, or a grill | Rust (iron leaching from nearby metal) | Lemon juice soak or diluted oxalic acid |
| Dark, slightly glossy patches that feel slick or attract dirt quickly | Oil or grease | Dish soap + warm water scrub |
| Yellow or strong-smelling patches near a back door or lawn edge | Pet urine | Oxygen bleach solution or dish soap + white vinegar rinse |
Know your surface before you mix
Concrete and brick are forgiving and tolerate most DIY solutions at normal dilutions. Natural stone (sandstone, limestone, slate, marble) is acid-sensitive, so vinegar and lemon juice can etch or discolour it. Porcelain tiles are durable but grout lines can be damaged by strong bleach-based cleaners if used repeatedly. I'll call out specific warnings for each surface in the surface-by-surface section below.
DIY patio cleaner recipes you can mix today
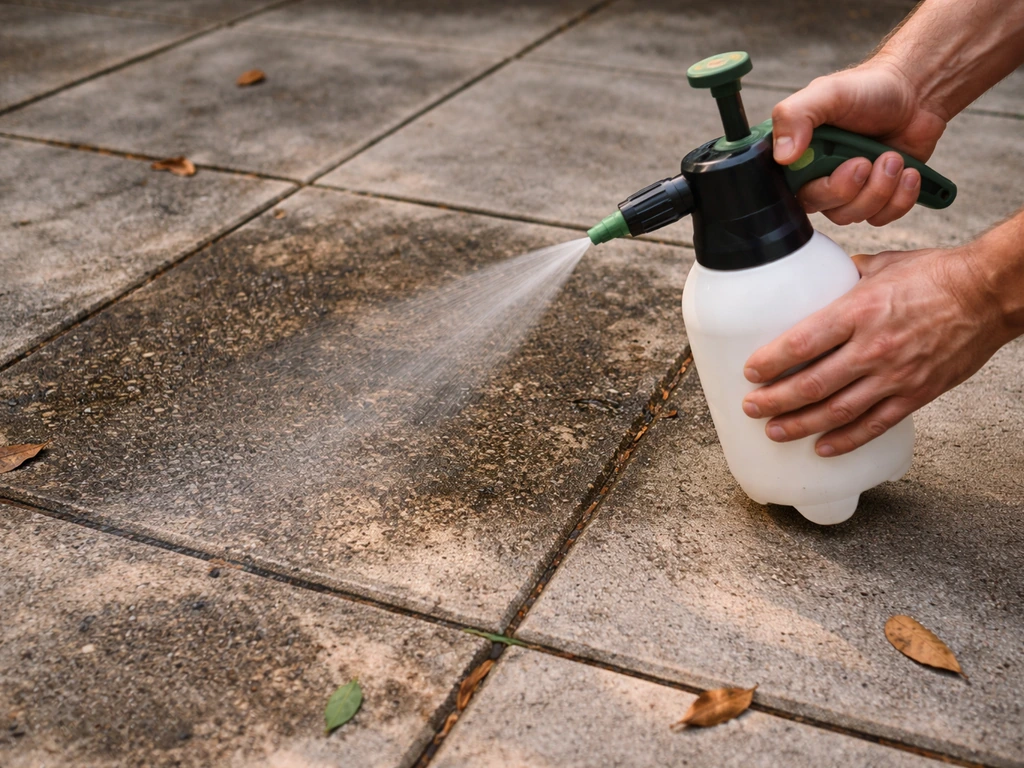
Recipe 1: Hydrogen peroxide spray (mould, algae, mildew)
Mix 1/4 cup of standard 3% hydrogen peroxide (the kind from a pharmacy) into 1 gallon of cold water. Pour it into a garden sprayer or a bucket. This is a gentle oxidising solution that breaks down biological growth without harsh fumes. It works on concrete, brick, porcelain, and most composite decking. Avoid using it on coloured or dyed concrete if you haven't done a patch test first, as repeated use could lighten pigment.
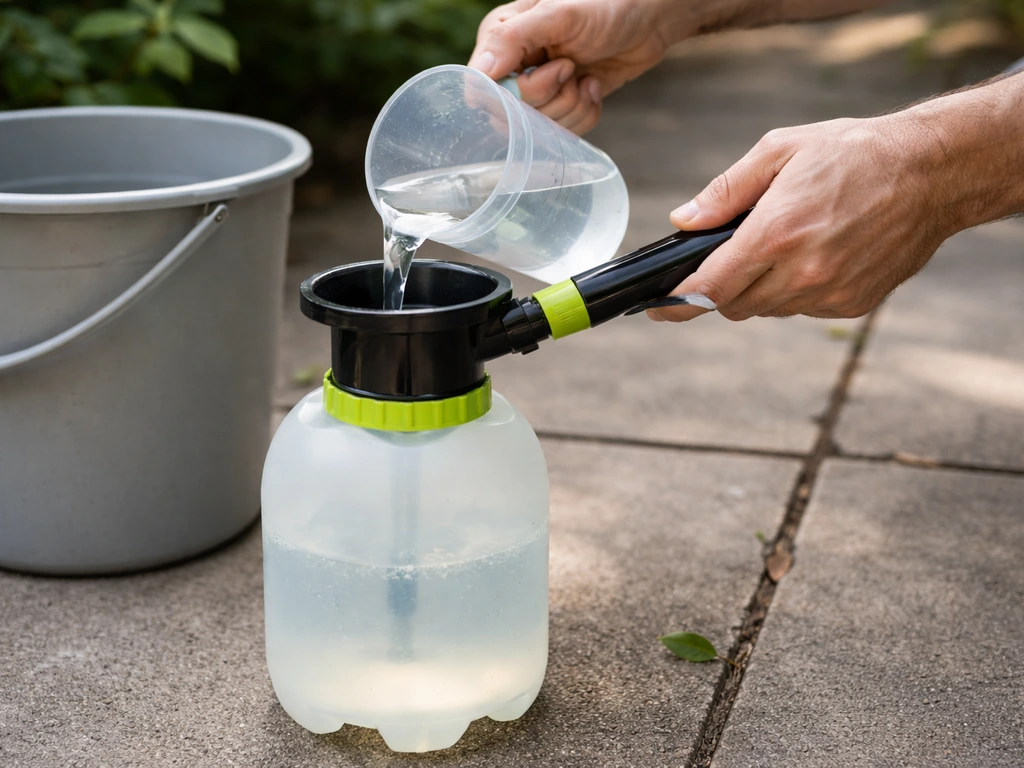
Recipe 2: Oxygen bleach solution (general grime, moss, algae, pet stains)
Dissolve approximately 2 tablespoons of pure sodium percarbonate (sold as oxygen bleach powder) into 1 gallon of warm or hot water. Warm water activates it faster. This is my go-to for a full patio clean because it tackles moss, algae, and general embedded grime in one pass. It's colour-safe on most surfaces and far less aggressive than chlorine bleach. You can scale it up easily for a larger area.
Recipe 3: White vinegar solution (light algae, surface grime, pet odour)
Mix 1/2 cup of white vinegar per gallon of water for a mild, all-purpose outdoor cleaner. This works well on concrete and brick for light surface grime, and is especially useful for neutralising pet urine odour. You can optionally add a tablespoon of dish soap to improve its ability to cut through grease and dirt. Important: never use vinegar on sandstone, limestone, marble, or slate. The acidity will etch and permanently dull those surfaces.
Recipe 4: Lemon juice soak (rust stains)
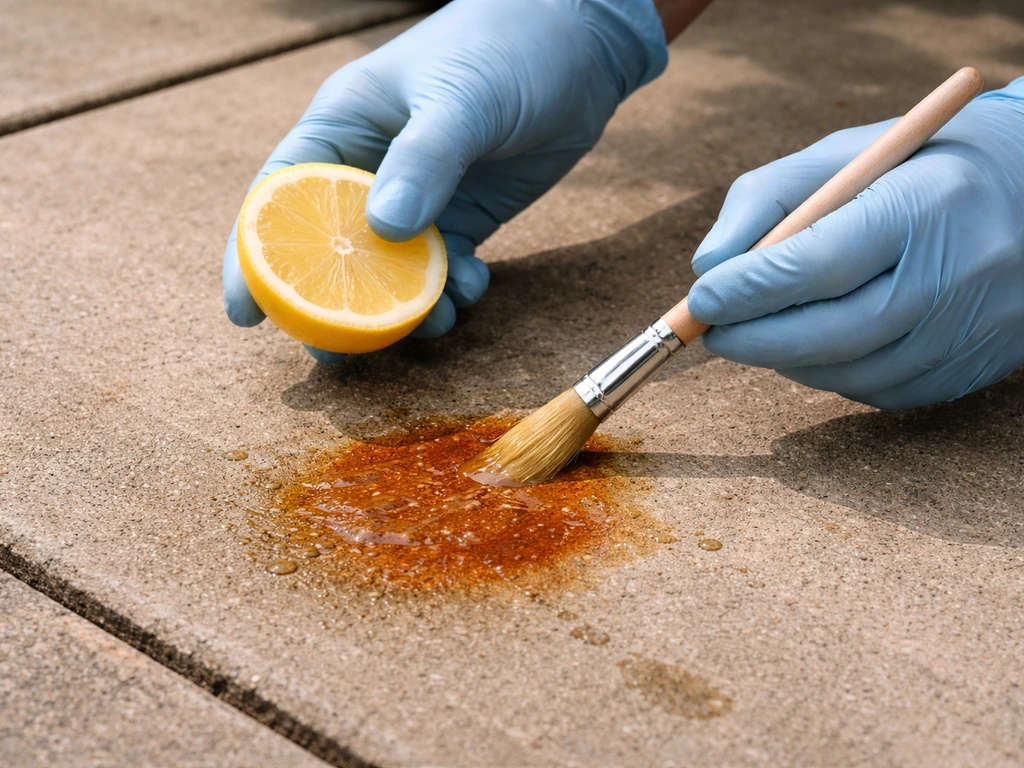
For orange or brown rust stains, apply undiluted lemon juice directly to the stained area and let it sit for up to 15 minutes. Then scrub firmly with a stiff brush and rinse well. The citric acid chelates the iron, making it easier to lift off. This works best on concrete and brick. If the stain is old or deep, a diluted oxalic acid solution (follow the product label for mixing ratios, typically around 1:1 or diluted further for lighter stains) is more effective because it's a stronger chelating agent. Rinse thoroughly after either treatment.
Recipe 5: Dish soap degreaser (oil and grease)
Squirt several generous drops of washing-up liquid or dish soap onto the stained area, then add enough warm water to work up a lather. Let it sit for 5 to 10 minutes to break the oil's surface bond, then scrub hard with a stiff brush. This is a first-line approach for fresh or moderate grease. For old, set-in oil stains (especially on porous concrete), you may need to repeat this two or three times, since oil that has penetrated deep into the surface gradually wicks back up after an initial clean.
How to apply your DIY cleaner properly
The mixing is the easy part. Getting the application right is what separates a patio that looks clean for a week from one that stays clean for months. Once you pick the right recipe, follow these steps to learn how to apply patio cleaner properly so it works and stays looking clean longer. If you’re also wondering how to use patio cleaner effectively, match the cleaner to the grime and follow the right application and dwell timing for your surface patio cleaner how to use. Follow this sequence every time.
- Clear and sweep first. Move all furniture, pots, and decorations off the area. Sweep away loose leaves, debris, and dirt. This matters more than most people think: cleaning solution sitting on top of a layer of leaves just cleans the leaves, not the patio.
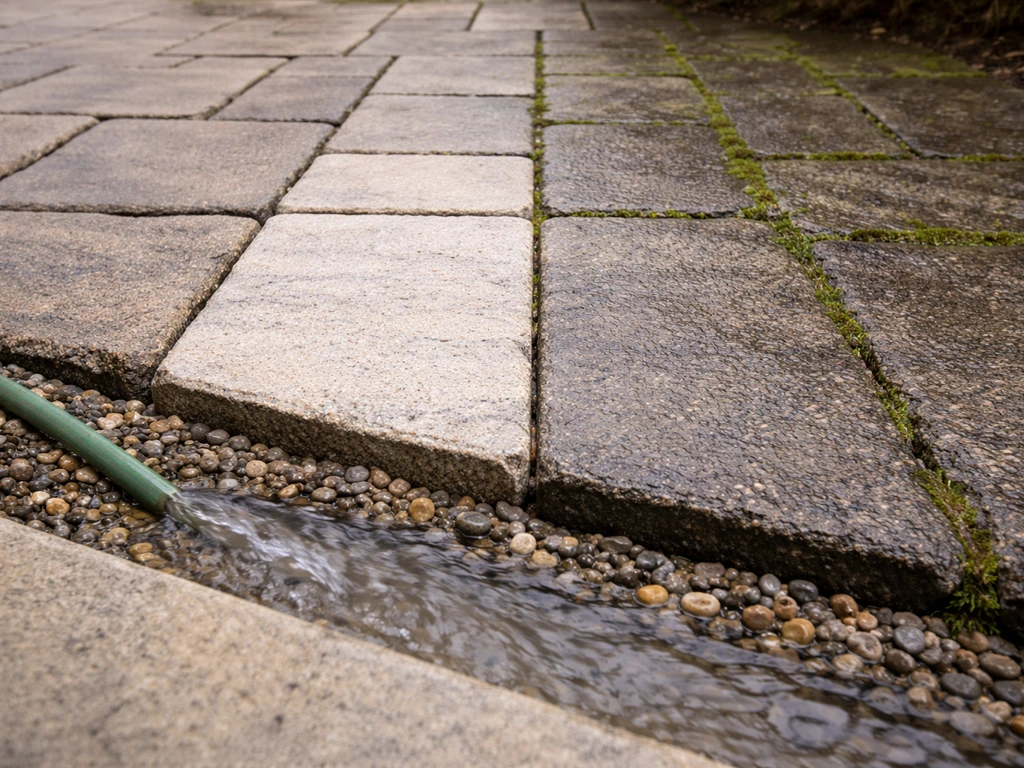
- Pre-soak the surface with plain water. Wet the whole area before applying your cleaner. This stops the solution from being absorbed too quickly into porous surfaces like concrete or sandstone, giving it time to work on the stain instead.
- Apply your cleaner and let it dwell. Pour or spray your solution generously onto the surface. For most biological growth (mould, algae, moss), let it sit for 10 to 20 minutes. For rust, up to 15 minutes with lemon juice. For oil/grease, 5 to 10 minutes. Don't let it dry out during this time — on hot days, you may need to reapply.
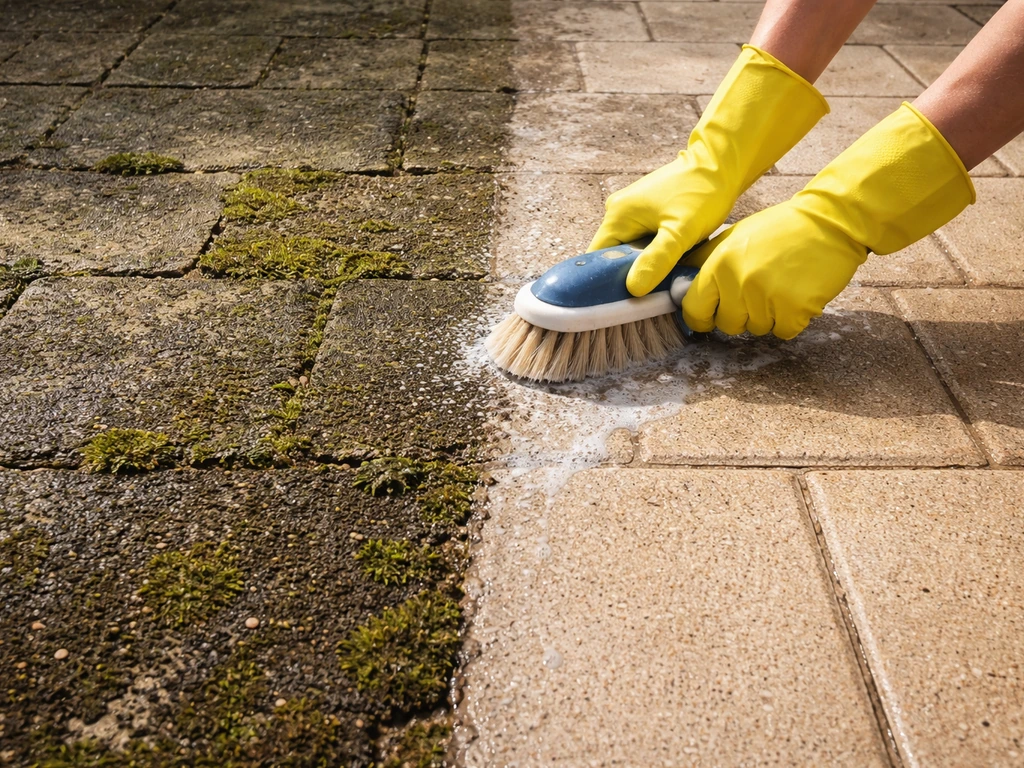
- Scrub. Use a stiff-bristled deck brush or outdoor scrubbing brush. Work in sections and apply firm pressure, especially for moss or embedded grime. Don't use a wire brush on stone or porcelain — it will scratch.
- Rinse thoroughly. Use a hose with a strong setting to flush the area completely. Start from the highest point and work downward so you're pushing dirty rinse water off, not back over cleaned sections. Residual cleaner left on the surface can cause streaking, attract new dirt faster, and in the case of acid-based cleaners, continue to work on your patio material.
- Patch test before doing the full patio. If you've never used a recipe on your surface before, test it in a small hidden corner first. Wait 10 minutes, rinse, and check for discolouration or surface damage before committing to the whole area.
Surface-by-surface guide: what to use and what to avoid
Concrete
Concrete is the most forgiving patio surface. Oxygen bleach, hydrogen peroxide, vinegar solutions, dish soap, and oxalic acid all work well here. For heavy mould or algae coverage, oxygen bleach is the strongest DIY option. For stubborn rust, oxalic acid is more effective than lemon juice alone. Avoid highly concentrated chlorine bleach on coloured or stamped concrete, as it can strip pigment and leave uneven patches.
Brick
Brick handles oxygen bleach and hydrogen peroxide well. Be cautious with strong acids on older or softer brick, as the mortar joints can be etched over repeated use. Vinegar at normal dilutions is usually fine for occasional use, but don't soak mortar joints in it repeatedly. For rust near iron railings or metal furniture legs on brick, lemon juice followed by thorough rinsing is a safe starting point.
Natural stone: sandstone, limestone, and travertine
These are acid-sensitive surfaces. Do not use vinegar, lemon juice, or oxalic acid on sandstone, limestone, or travertine. Even diluted acids will etch and dull the surface permanently. Stick to oxygen bleach solution (at normal dilution) or hydrogen peroxide spray for biological growth. For grease on these surfaces, dish soap and warm water is the safest option. Always rinse well and always patch test.
Slate
Slate is also acid-sensitive and can be prone to surface damage from aggressive scrubbing. Use oxygen bleach or hydrogen peroxide solution, apply gently, and use a soft-bristled brush rather than a stiff deck brush. Avoid wire brushes entirely. Rinse thoroughly, as slate can absorb residue into its layers.
Porcelain tiles
Porcelain itself is very hard and non-porous, making it relatively easy to clean. Oxygen bleach and hydrogen peroxide both work well. The grout lines between porcelain tiles are the vulnerable point: avoid repeatedly saturating them with strong acid solutions, as this degrades grout over time. A soft to medium brush for scrubbing is fine on the tiles themselves. Rinse completely after cleaning to avoid white residue forming as the water evaporates.
Block paving
Block paving responds well to oxygen bleach and is a common target for moss and algae between joints. Pay particular attention to the joints themselves when scrubbing, since that's where moss tends to establish first. Avoid saturating the joints with vinegar solutions repeatedly; it can loosen jointing sand over time.
Keeping yourself, your plants, pets, and neighbours safe
DIY cleaners are generally much safer than commercial chemical concentrates, but there are still a few things worth taking seriously before you start mixing.
Personal protection
Always wear rubber gloves when handling cleaning solutions, even diluted ones. If you're spraying hydrogen peroxide or an oxygen bleach solution above waist height, add safety glasses or goggles. Work in a ventilated area and don't lean over the bucket while mixing. This isn't about being overly cautious; it's just that getting cleaning solution in your eyes is a genuinely bad time.
The one mixing rule you cannot break
Never mix bleach (chlorine bleach or any product containing it) with ammonia, vinegar, or any acid-based cleaner. Mixing bleach with acids releases chlorine gas, which is dangerous. Mixing bleach with ammonia creates toxic chloramine vapours. The CDC, EPA, and most health authorities are clear on this. The DIY recipes in this article are designed to avoid chlorine bleach entirely for this reason. If you do use a commercial bleach-based product at any point, treat it as completely separate from any acid or ammonia-based product and never combine them even in rinse water.
Plants and garden beds
Pre-soaking nearby plants and grass with plain water before you start cleaning creates a buffer that dilutes any runoff. After rinsing your patio, flush the surrounding area with a hose to dilute any cleaner that has run off. Oxygen bleach breaks down into water and oxygen, so it's among the most garden-friendly options in this list. Undiluted vinegar in large quantities can lower soil pH and harm grass, so keep it directed at the hard surface only.
Pets and children
Keep pets and kids off the patio while your cleaner is dwelling and until you've done a thorough rinse. Hydrogen peroxide and oxygen bleach are relatively low-risk after dilution and rinsing, but no one needs to be walking through concentrated cleaning solution. If you have pets that regularly use the patio, rinse the surface especially well and let it dry fully before allowing access.
Neighbours and drainage
If your patio drains toward a neighbour's garden or directly into a storm drain, be aware of what you're using. Oxygen bleach is the lowest-impact option here. Avoid running acid-based cleaners or large volumes of vinegar solution into neighbouring planted areas.
When to add a pressure washer to the mix
A pressure washer isn't required for DIY cleaning, but it makes a big difference for deeply embedded mould, heavy moss, or a patio that hasn't been cleaned in several years. If you're wondering how does patio cleaner work in practice, the key is matching the chemistry to the grime so it loosens and lifts without damaging your surface. It generally loosens grime through the right chemistry, dwell time, and rinsing so you can remove it without damaging the surface how does patio cleaner work. You can apply your DIY cleaner by hand, let it dwell, and then use the pressure washer to rinse and lift the loosened grime. This combination is more effective than either method alone.
Nozzle and pressure basics
Start on the lowest pressure setting and increase gradually only if needed. For concrete, a yellow 15-degree or green 25-degree nozzle is appropriate for stubborn buildup. For stone, porcelain, or slate, use a wider 40-degree fan tip to reduce the risk of surface damage or dislodging grout. Avoid turbo or rotary nozzles on natural stone or brick, as they can scar or chip softer materials. Hold the nozzle at roughly a 45-degree angle to the surface rather than pointing straight down, and keep it moving to avoid stop marks. For very high-powered machines (above 3,000 PSI), maintain about two feet of distance from the surface on concrete.
Sequence for pressure washing with a DIY cleaner
- Apply your DIY cleaner and let it dwell as described above.
- Switch to the pressure washer for the rinse phase, starting at a low setting.
- Work in consistent parallel passes — don't stop and reverse or you'll create visible lines.
- After the main rinse, do a final sweep with the hose to flush away any remaining residue from the edges and surrounding area.
If you're investing in equipment for the first time, a mid-range electric pressure washer in the 1,400 to 2,000 PSI range is plenty for most residential patio cleaning jobs and is less likely to cause accidental surface damage than a petrol model. The application and dwell steps described in this article matter more than raw power.
How to stop moss, mould, and algae from coming straight back
Cleaning your patio is only half the job. Moss and algae return to the same spots because the conditions that caused them haven't changed. Moss concentrates in persistent-moisture locations: shaded corners, areas under furniture, alongside garden beds, and anywhere that stays damp for long periods. Algae and mould build up where dirt and dust accumulate and airflow is blocked. If you only clean without addressing these conditions, you'll be back doing the same job in six months.
- Improve drainage around the patio edges. If water pools in the same spot after rain, it will grow moss and algae faster than anywhere else. Adjust the surrounding soil level or add drainage channels if needed.
- Trim back overhanging trees, shrubs, or fencing that keeps areas permanently shaded and damp. Even increasing light by a few hours a day significantly slows moss regrowth.
- Move outdoor furniture regularly, especially chairs and tables that sit in the same position season after season. These create the shaded, moist conditions moss loves.
- Clear organic debris (leaves, soil blown in from beds) regularly, because decomposing organic matter is a food source that accelerates biological growth on hard surfaces.
- Apply a preventative oxygen bleach solution (at normal mixing strength) once a year, ideally in early spring before moss and algae have a chance to establish. This is far less work than a full annual clean.
- Check metal furniture, planters, and grills for rust regularly. If you catch iron oxide before it leaches onto the patio surface, you avoid the harder job of removing a set rust stain.
- Re-sand block paving joints after cleaning if you notice the jointing sand has been displaced. Gaps in joints are the first places moss takes hold, and once its root structures get into the joints, it can gradually push against the joint material over time.
One final note: how long you leave your cleaner on the surface, and exactly how you apply it for your specific material, can affect results as much as the recipe itself. As a quick guide, you typically leave patio cleaner for about 5 to 15 minutes depending on the recipe and how heavy the grime is how long do you leave patio cleaner. The application and timing details covered in related guides on this site go deeper on those specifics if you want to refine your technique further.
FAQ
Can I use the same patio cleaner recipe for every surface if I dilute it more?
Sometimes, but not reliably. Acid-sensitive stone (sandstone, limestone, slate, travertine) should not be treated with vinegar or lemon juice at any dilution, because etching can still happen. For these surfaces, stick to oxygen bleach or hydrogen peroxide and do a small patch test first, especially on older, softer stone and on coloured or dyed concrete.
What should I do if my patio looks lighter or patchy after using oxygen bleach or hydrogen peroxide?
Let it dry fully, then assess before reapplying. Lightening or uneven colour can happen on dyed or coloured concrete with repeated oxidizer use. The fix is usually to pause, rinse well, and only resume with lower dwell time or a weaker concentration, starting with a fresh patch test in a hidden spot.
How long should I wait before rinsing, and what happens if I leave it too long?
In general, most DIY recipes are most effective after a short dwell (about 5 to 15 minutes depending on grime). Leaving solutions longer can increase residue risk and may require extra scrubbing or repeated rinsing, particularly on porcelain grout lines and on surfaces that absorb product. If it dries on the surface, rinse thoroughly before it fully cakes.
Is it safe to use a patio cleaner if rain is forecast later that day?
It depends on the recipe and timing. If rain is soon after application, your dwell time may be cut short and you might get patchier results. If rain is later, it can also dilute runoff, but you still need a full rinse when the dwell is done to prevent residue build-up. Avoid letting any solution sit for extended periods just because rain will arrive.
Do I need to scrub after using oxygen bleach or hydrogen peroxide?
Often, light scrubbing is optional if the biological growth loosens well during dwell time. For embedded grime, a stiff brush usually improves results, but be careful on slate and natural stone by using a soft to medium brush. If you see streaking or remaining dark edges, scrub once, then rinse and evaluate before repeating.
Can I mix or layer different DIY cleaners to boost results?
Avoid combining different chemistries in the same bucket. Use one cleaner at a time, rinse thoroughly, then switch if needed. The safest “sequence” is typically: pre-wet, apply the chosen recipe, dwell, rinse well, then address a specific stain type (like rust) with a separate targeted step.
Why do I still see mould or algae after cleaning, even though the patio looks better?
Most recurrences come from persistent moisture and shade patterns, not from insufficient chemistry. Focus on problem zones like shaded corners, under patio furniture, near garden beds, and areas that stay damp. After cleaning, consider improving airflow, trimming nearby plants, and using periodic lighter maintenance rather than waiting for heavy growth.
What’s the safest way to handle runoff so it doesn’t harm plants or enter storm drains?
Pre-wet nearby grass and plants with plain water before you start, then rinse the surrounding area after you finish. Oxygen bleach is typically the lowest-impact option in your list, while vinegar and other acids can lower soil pH and harm grass. If drainage leads to a storm drain or neighbour’s garden, minimize volume and direct rinsing water toward your patio area instead of spraying outward.
Can I use vinegar or lemon juice on sealed concrete or sealed stone?
Be cautious. Seals can be compromised by repeated acids, and some seal types are more vulnerable than others. If the surface is sealed and you are unsure, do a patch test in an inconspicuous area and prefer hydrogen peroxide or oxygen bleach for biological growth. For rust, consider targeted oxalic acid solutions instead of repeated citric acid.
How do I remove rust without damaging nearby grout or metal fixtures?
Apply rust treatment only to the rusted area, then rinse thoroughly. Lemon juice works best for fresh or light rust and should not be flooded across large areas on porous or grout-heavy surfaces. For stronger rust, use a diluted oxalic acid product-following mix, keep it off grout lines as much as possible, and immediately rinse after the dwell.
Will a pressure washer ruin my patio if I use the wrong nozzle?
It can, especially on natural stone, brick mortar joints, and porcelain grout. Use a wider fan pattern on stone and porcelain (around 40-degree), avoid turbo or rotary tips, hold the nozzle at an angle (about 45 degrees), and keep it moving to prevent stop marks. If you are above roughly 3,000 PSI, maintain more distance (about two feet on concrete) to reduce surface gouging.
What’s the safest way to do a patch test before cleaning the whole patio?
Pick a hidden spot that still represents the patio material (including grout lines). Apply the cleaner, match the dwell time you plan to use, then rinse completely. Check results after drying (not just immediately after rinsing) for colour change, dulling, residue, and any texture damage.
Next Article
Patio Cleaner How to Use It Safely on Any Surface
Step-by-step patio cleaner how to use safely by surface, dilution, dwell time, rinsing, and stain fixes to prevent re-gr