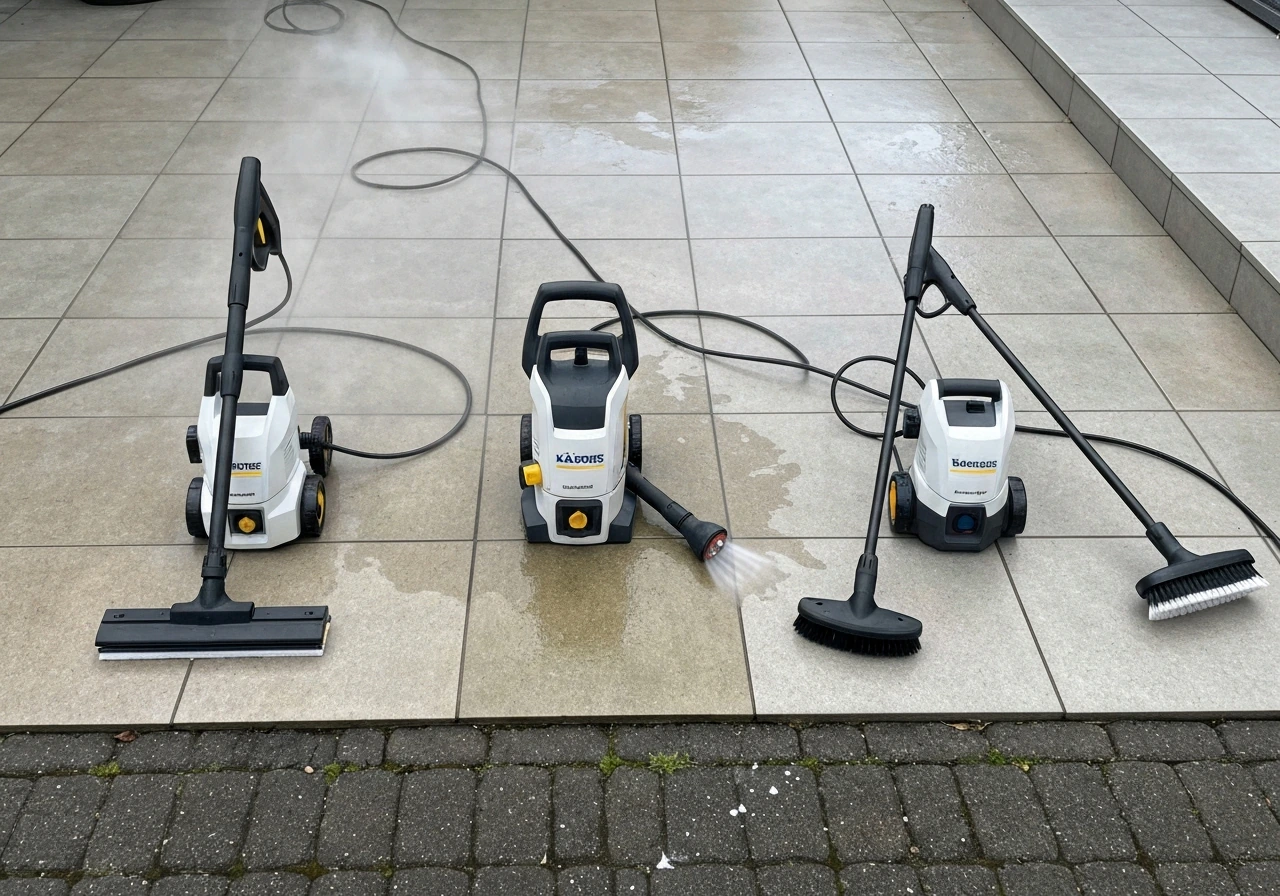
A Kärcher patio cleaner attachment is genuinely worth buying if you have a compatible K2–K7 pressure washer and a decent-sized patio. It cuts cleaning time roughly in half compared to using a standard spray lance, leaves a much more even finish with far less streaking, and handles algae, moss, and general grime on concrete, brick, and porcelain without much fuss. The main caveats: you need to match it to your specific Kärcher model, it won't do edges on its own, and softer natural stone surfaces like sandstone and slate need a careful pressure check before you go full blast.
Karcher Patio Cleaner Attachment Review: Pros, Cons, Tests

Rhea Lang
4 Jul 2026
What the attachment actually does and how it connects
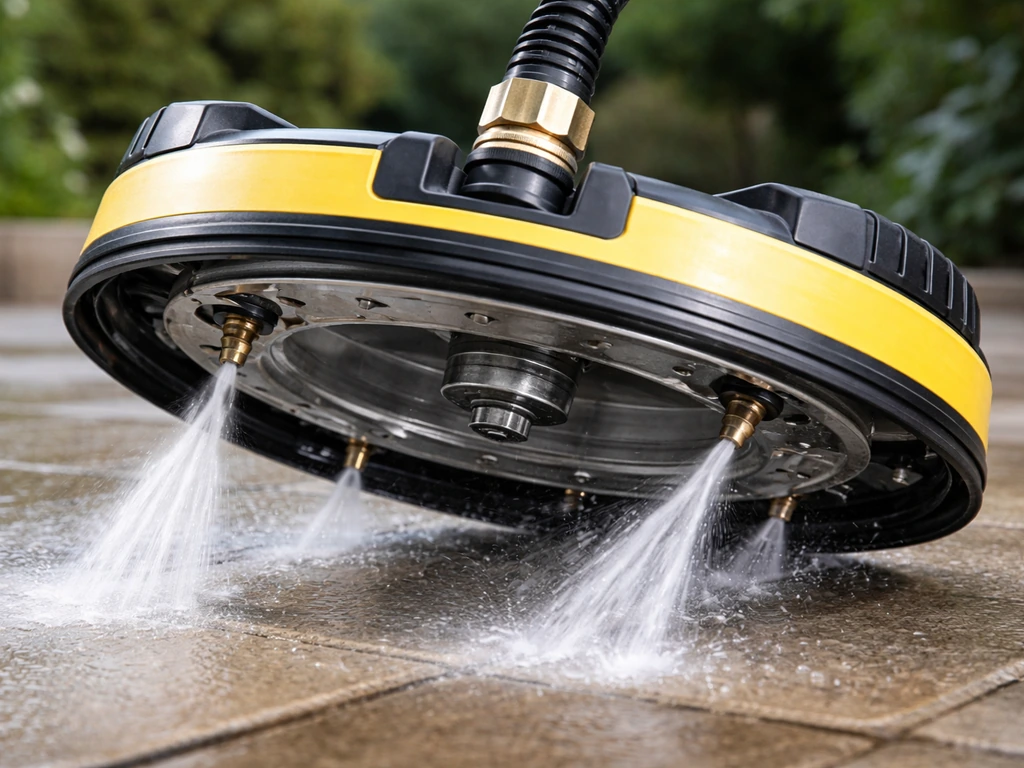
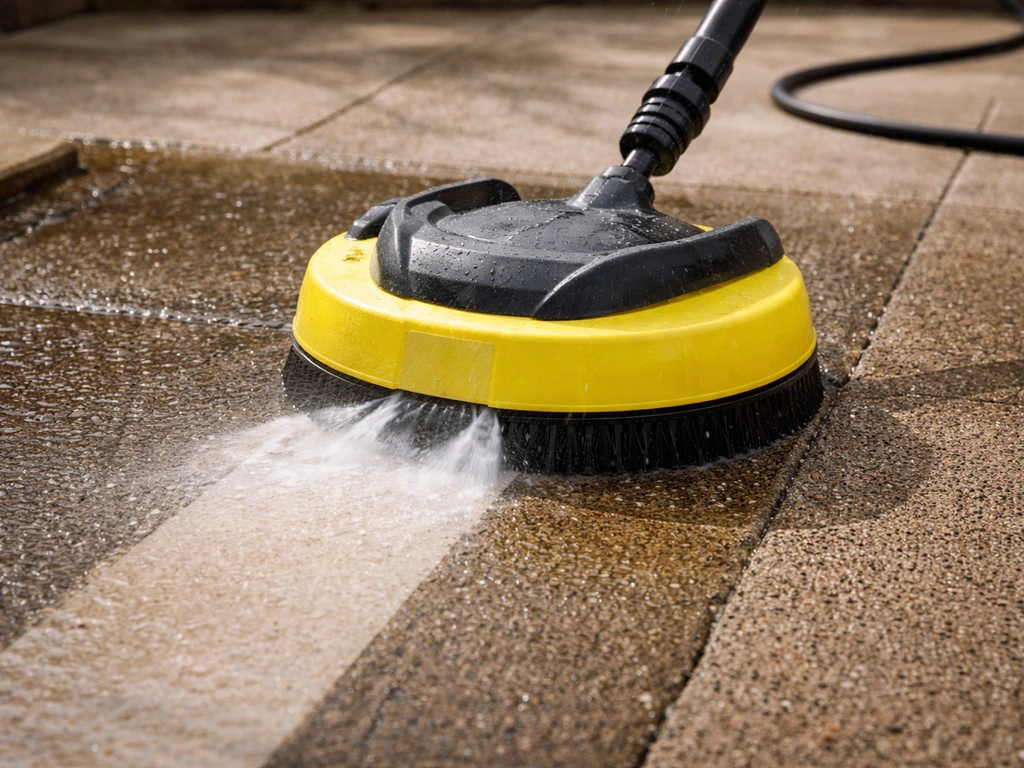
The classic Kärcher patio cleaner attachment (think the T-series and PS-series surface cleaners) works by channelling high-pressure water from your pressure washer through a rotating spray bar inside a circular shroud. There are nozzles at each end of that bar, and as pressurised water forces through them it spins the bar like a sprinkler, creating a consistent, circular cleaning pattern across the surface below. The shroud keeps overspray contained, which is why you get that clean, uniform result instead of the streaky fan-blast you get from a standard lance.
Connection is straightforward. The attachment clicks onto your Kärcher pressure washer's gun or hose using the standard Kärcher quick-connect fitting. A Karcher T150 patio cleaner review is also useful to set expectations on coverage, spray pattern, and how it performs on different surfaces. On most models you simply push and twist to lock it in place. There's no complicated adapter needed as long as you're running a compatible Kärcher machine. A few attachments (notably the PCL 4) work differently: they use rotating roller brushes with integrated water distribution rather than a spray bar, making them gentler and better suited to delicate surfaces. The T350 sits in the middle ground, using twin flat-jet nozzles on a rotation arm, which gives broader coverage than older single-arm designs.
Compatibility and buying checklist
This is where most people go wrong, and it's worth being blunt: not every Kärcher surface cleaner fits every Kärcher pressure washer. If you want to narrow down which karcher for patio cleaning to buy, start by matching the model to your pressure washer range and spec. Kärcher blank" rel="noopener noreferrer">explicitly limits the PS40 and T300 surface cleaners to K2–K5 electric pressure washers only. If you have a K7 or a petrol machine, you need to check the spec sheet before buying. Running too much pressure through an attachment designed for a lower-spec machine can blow the internal seals and void your warranty.
Here's a quick checklist to run through before you buy any Kärcher patio cleaner attachment:
- Check your pressure washer model number (printed on the machine body) and cross-reference it with Kärcher's compatibility list for the specific attachment you're considering.
- Confirm your machine's maximum bar pressure and flow rate (L/hour) meet the attachment's minimum requirements. Under-powered machines won't spin the rotor properly, giving you patchy results.
- Check the connection type. Most Kärcher attachments use the standard Kärcher quick-connect bayonet fitting, but double-check if you have an older machine or a budget Kärcher-branded starter kit.
- Measure your patio. The T350 covers a wider cleaning path per pass than the T5 or T150, so for anything over 30–40m² the wider coverage saves significant time.
- Consider your surface. If you have sandstone, natural slate, or any sealed decorative surface, look at the PCL 4 brush-style attachment or a lower-pressure T150 before defaulting to the T350.
- Budget for a replacement nozzle set. After a season or two of heavy use, nozzle wear affects spin consistency. Genuine Kärcher nozzles are inexpensive and worth keeping as spares.
Cleaning performance by surface type

The attachment doesn't perform identically across all patio surfaces, and being honest about that is more useful than a blanket 'it works great' verdict.
| Surface | Performance | Safe pressure level | Notes |
|---|---|---|---|
| Concrete | Excellent | Full pressure (K3–K5+) | Handles heavy algae, oil stains, and weathering well. Occasional second pass on very rough or porous concrete. |
| Brick | Very good | Medium-high (K2–K5) | Works well on smooth engineering brick. Textured or aged brick may need a pre-soak. Avoid crumbling mortar joints. |
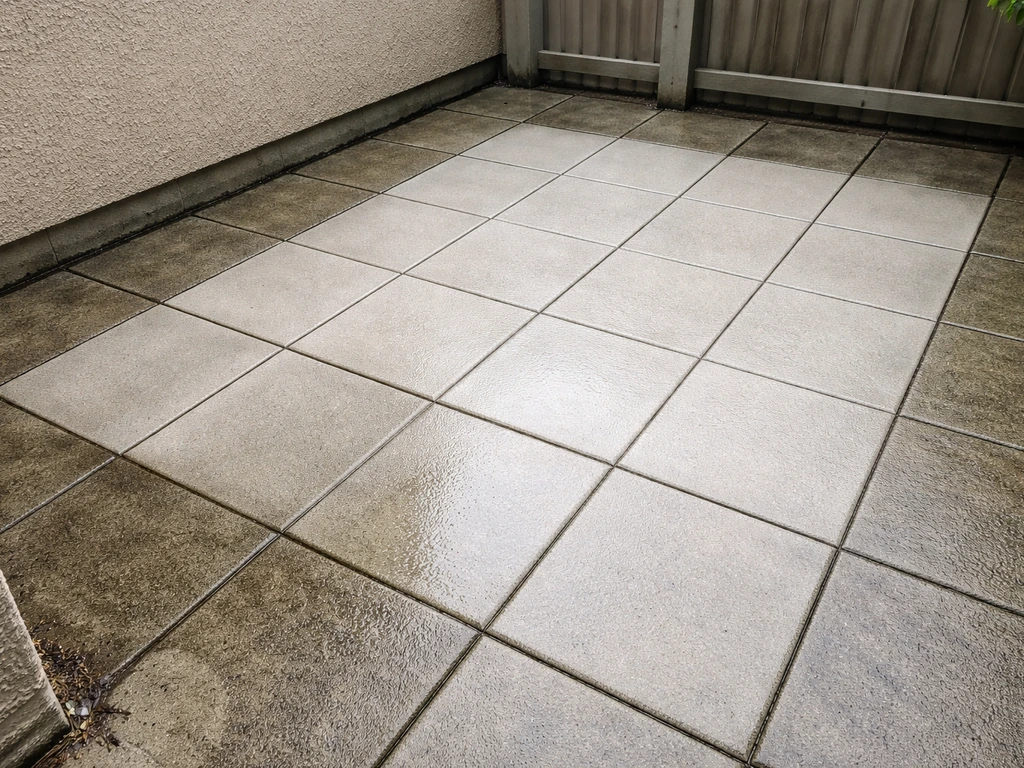
| Porcelain | Excellent | Full pressure | Smooth surface cleans fast with no streaking. Best surface for this attachment. |
| Natural stone (flags) | Good with care | Medium (K2–K3 max) | Test a small area first. Harder limestone and granite are fine; softer varieties can be pitted by repeated use. |
| Sandstone | Risky at high pressure | Low (K2 or PCL 4 brush) | Sandstone is porous and soft. High-pressure rotation can erode the surface. Use the brush attachment or reduce to minimum pressure. |
| Slate | Moderate risk | Low-medium (K2) | Thin slate can delaminate under sustained pressure. Keep the attachment moving constantly, never hold still on one spot. |
Concrete and porcelain are genuinely where these attachments shine. I've run a T350 across a large concrete driveway and a porcelain-tiled terrace and the results are night and day compared to lance cleaning: no stripes, no missed patches, and the whole thing done in a single pass per section. Sandstone is where I learned to be more careful. I pushed too hard on an unsealed sandstone patio early on and ended up with a slightly roughened surface that picked up dirt faster afterwards. The brushes of the PCL 4 are the safer call there.
How to use it effectively
Before you start
Don't skip the pre-clean. Sweep or blow off loose debris, leaves, and dry dirt first. A layer of dry leaf debris under the shroud can clog the attachment and break the rotation, leaving circular marks. If you have heavy moss or thick algae, apply a patio cleaner or moss killer treatment 15–30 minutes before pressure washing. This softens the growth significantly and means the attachment can clear it in one pass rather than two or three.
The technique itself
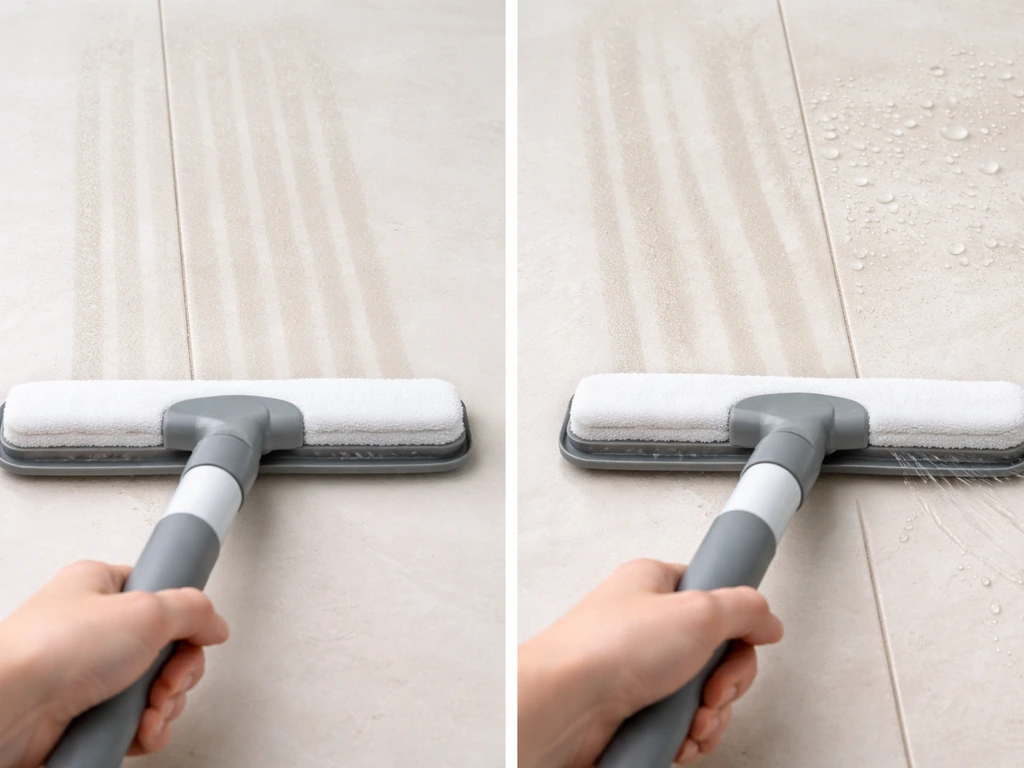
- Keep the attachment flat and flush against the surface. Tilting it breaks the seal under the shroud and throws spray sideways, creating exactly the kind of stripe marks you're trying to avoid.
- Overlap each pass by about 5–10cm. The outer edge of the rotation pattern is slightly weaker than the centre, so overlapping ensures even coverage.
- Keep moving at a steady walking pace. Too slow and you risk surface marking, especially on softer materials. Too fast and you leave dirt behind.
- Do a second pass in a perpendicular direction on heavily soiled areas, especially concrete with embedded grime.
- After finishing with the attachment, go around all edges and corners with the standard lance using a wide-angle (25–40 degree) nozzle. The shroud physically prevents the attachment from getting right into edges, and this step is non-negotiable for a finished look.
- Rinse the whole area with a clean water pass to flush loosened residue away from the surface and off any adjacent grass or planted areas.
Avoiding streaks and foam buildup
Streaking almost always comes down to two things: tilting the attachment and stopping mid-pass. If you stop moving while the machine is running, the rotor parks in one position and you get an arc mark burned into the surface. Keep the machine moving before you pull the trigger and keep moving until you release it. If you're using a foaming patio detergent in a downstream injector, let the foam dwell time complete fully before you attach the surface cleaner. Running the surface cleaner through active foam just moves it around rather than cleaning through it.
What it handles well (and what it struggles with)
The Kärcher patio cleaner attachment is very effective at removing biological growth: algae, green mould, and moss all come off concrete and hard surfaces well, especially with a pre-treatment. General dirt, weathering, and light oil residue clean up without much effort. Here's how it handles the specific challenge stains:
- Algae and green slime: Excellent results with one pass on concrete and porcelain after a short pre-soak with a patio cleaner solution. Algae on sandstone needs a longer pre-treatment dwell and lower pressure.
- Moss: Works well once the moss is loosened, but thick, established moss beds benefit from a pre-treatment applied 24 hours before. The attachment clears the softened residue efficiently.
- Black mould and mildew: Good results on non-porous surfaces. Porous concrete may need a second pass or a dedicated mould treatment applied before washing.
- Rust stains: The attachment moves rust-coloured surface deposits but won't remove deep rust staining from iron in the stone itself. A dedicated rust remover applied first gives much better results.
- Grease and oil: Light grease responds well. Heavy cooking grease or engine oil needs a degreaser pre-treatment, left to dwell for at least 10 minutes before the attachment clears the residue.
- Pet stains: The attachment flushes away surface contamination and odour-causing bacteria effectively on hard, sealed surfaces. For porous concrete or natural stone, a pet-specific enzymatic cleaner applied first is worth the extra step before pressure washing.
Honest pros, cons, and who should buy or skip it
What it does well
- Cuts cleaning time roughly in half versus a standard spray lance for medium to large patios
- Eliminates the stripe pattern that lance cleaning almost always leaves behind
- Consistent cleaning width per pass keeps the job methodical and fast
- Shroud contains overspray, so fences, windows, and planting nearby stay dry
- Easy to connect and disconnect with standard Kärcher quick-fit
- Durable build on the T-series; well-reviewed across multiple seasons of use
Where it falls short
- The shroud design means edges, corners, and areas along walls always need follow-up with a lance. This is the most consistent complaint across user reviews and it's a genuine limitation, not just a minor inconvenience.
- Cleaning width is narrower than most people expect (typically 28–34cm on T-series models). On very large patios this means a lot of passes.
- Lower-spec attachments (T5, T150) can struggle with deeply embedded stains on rough concrete without multiple passes.
- Nozzle wear over time affects spin speed and cleaning consistency. Budget models tend to show this faster than the mid-range T350.
- Not suitable for sandstone or thin slate at full pressure without careful settings adjustment.
- Doesn't apply detergent itself unless used in combination with a downstream detergent system on your pressure washer.
Who should buy it
- Anyone with a concrete, brick, or porcelain patio larger than around 15–20m² who already owns a compatible Kärcher K2–K7 machine
- Homeowners who hate the stripe marks that lance cleaning leaves and want a genuinely even finish
- People dealing with recurring algae or moss who want to clean faster and more consistently each season
- Those who use their pressure washer regularly and want to expand what it can do
Who should skip it or look at alternatives
- Anyone with a very small courtyard or patio under 10m² where the time saving doesn't justify the cost
- Owners of sandstone, very soft natural stone, or unsealed natural slate patios (look at the PCL 4 brush attachment instead)
- Anyone without a compatible Kärcher machine (third-party surface cleaners exist, but this article covers Kärcher-specific options)
- People looking for a solution to deep, chemical-based stains (rust, heavy oil) where the attachment is only the second step, not the fix itself
For a deeper look at specific models, the Kärcher T5, T150, and T350 each have their own strengths depending on your patio size and machine spec. The T350 in particular is the go-to for larger surfaces and gets strong real-world reviews for coverage speed and durability.
Getting started: your setup, test spot, and maintenance checklist
If you've got the right attachment for your machine and you're ready to use it, here's the practical next-steps sequence to get a good result first time and keep the attachment working well long-term:
- Confirm compatibility: Check your Kärcher model number against the attachment spec sheet one more time before first use. K2–K5 machines pair with T300, PS40, T5, and T150. K4–K7 machines support the T350 and higher-capacity models.
- Do a test patch: On any natural stone surface, pick an inconspicuous corner and run the attachment for 10–15 seconds on your planned pressure setting. Wait for it to dry and check for surface etching or colour change before doing the whole patio.
- Pre-treat heavy biological growth: Apply a patio cleaner or moss treatment and wait 15–30 minutes (or 24 hours for thick moss beds) before pressure washing.
- Sweep the surface: Remove all loose debris before attaching to avoid shroud clogs.
- Run through the technique checklist: Attachment flat to the surface, steady pace, overlapping passes, machine running before contact and after lifting.
- Finish the edges: Switch to the standard lance with a 25-degree nozzle and clean all edges, corners, and areas against walls that the shroud couldn't reach.
- Rinse the whole area: A final clean-water rinse flushes loosened grime away from the surface completely.
- Post-use maintenance: Rinse the attachment under clean water and spin the rotor by hand to check it moves freely. Inspect the nozzle tips for wear or blockage after every few uses. Store indoors or in a dry location to prevent UV and frost damage to the shroud.
One last practical note: if you're deciding between multiple Kärcher models and aren't sure which specific attachment version best matches your situation, it's worth comparing the T150 and T350 side by side in terms of cleaning width, compatible machine range, and price. If you’re comparing options, this is exactly why shoppers look for the Karcher T350 patio cleaner best price before buying Kärcher models and aren't sure which specific attachment version best matches your situation. The T350 costs more but the wider coverage and stronger build quality make a real difference on a patio over 25–30m². For smaller patios or a lower-powered machine, the T150 or T5 does the job without overspending.
FAQ
Can I use a patio cleaner attachment on a pressure washer that is outside the K2 to K7 range?
You can, but only if the specific attachment model is rated for your washer’s pressure and flow. If the attachment is limited to K2–K5, running a higher-spec K6 or K7 can over-stress seals and reduce service life. The safest approach is to verify the attachment’s stated compatible pressure washer range before buying.
What should I do if the spray pattern looks uneven or leaves ring marks even when I keep moving?
First, check that the patio cleaner is fully seated on the quick-connect and that the rotating bar spins freely. Then confirm the nozzle end caps are unobstructed, and that you are maintaining a steady walking speed without pressing the shroud down harder than the surface. Uneven patter can also come from cleaning too soon after applying foam or detergent that has not fully washed away.
Will it clean patio edges and corners as well as the main circular area?
Most circular surface cleaners are not designed to fully clean edges because the shroud keeps water coverage inside the ring. Plan on switching to a lance (or edge tool) for borders within a few centimeters, and expect to overlap slightly with the surface cleaner to avoid a thin strip of missed grime.
How do I avoid damaging resin, painted surfaces, or sealed paving?
Use the lowest practical pressure, keep the nozzle height consistent, and test on a small hidden area first. If you notice the surface becoming glossy, eroded, or picking up more dirt after drying, stop and switch to a gentler brush-style model (such as a roller-brush variant) or reduce pressure and dwell time.
Do I need to use a patio detergent, or will the attachment work on its own?
It will work on general grime, but detergent helps with oily residue and stubborn weathering. If you do use foam or a downstream injector, let the dwell time complete according to the product directions before using the surface cleaner, otherwise the foam may be pushed around without lifting grime effectively.
How long should I pre-treat algae or moss before pressure washing?
A typical target is 15 to 30 minutes for many patio moss and algae treatments, but the exact time depends on concentration and weather conditions. If the growth is still intact after that window, reapply or extend the dwell time rather than increasing pressure aggressively, especially on porous or soft stone.
Is it normal for the attachment to clog or stop rotating?
It can happen if dry leaf debris or grit is trapped under the shroud. Sweep or blow the area first, and if rotation stops during cleaning, release the trigger, lift the unit off the surface, and check for blockage at the spray bar ends and in the inlet area before continuing.
How should I store the attachment so the seals and rotation last longer?
After use, flush it with clean water if your model supports it, then run briefly to clear remaining soap or chemicals. Store it indoors away from frost, and avoid leaving it connected under pressure. Periodically inspect the quick-connect and spray bar ends for debris buildup.
What walking speed and overlapping should I use for consistent results?
Aim for a steady pace where each section gets cleaned in one controlled pass without lingering. Overlap adjacent passes slightly (a few centimeters) to prevent thin bands of missed material, and keep the shroud level rather than tilting to chase every mark.
Can I use the attachment on porcelain tiles with grout lines without causing uneven results?
Yes, porcelain is generally a strong match, but grout lines may require attention because texture and joint width can trap grime. Keep the unit flat, overlap slightly, and if grout remains dark, use a separate targeted cleaning step with a suitable nozzle or brush rather than trying to force grout cleaning by pressing harder.
Next Article
Which Kärcher for Patio Cleaning Choose the Best Model
Pick the best Kärcher for patio cleaning with PSI flow, nozzles, attachments, and tips for mold, algae, moss, grease.