Yes, you can power wash a paver patio safely, but the pressure level and nozzle choice matter a lot. Keep the PSI at or below 1500 to 1600 psi, use a wide-angle or rotary turbo nozzle, hold the wand at a high angle, and work in smooth, overlapping passes rather than blasting one spot at a time. Do that and your pavers will come up clean without losing joint sand or etching the surface.
Can You Power Wash a Paver Patio? Best Way to Do It
Rhea Lang
8 Jun 2026
Power washing vs. pressure washing: is there actually a difference?
For cleaning a paver patio, the difference is mostly academic. Power washing uses heated water, pressure washing uses cold water at high pressure. In practice, almost every residential machine people rent or buy is a cold-water pressure washer. Heated units are commercial grade and rare for home use. So when a homeowner asks 'can you power wash a paver patio,' the real answer applies equally to both: yes, with the right pressure settings and technique. Throughout this guide, I'll use both terms interchangeably the way most homeowners do.
The more important distinction for pavers is not hot versus cold water. It is PSI (pressure) versus GPM (flow rate). A machine with a higher GPM rinses debris away faster and more thoroughly, which actually reduces how much raw pressure you need to apply. That matters when you are trying to clean without blowing out the sand between your paver joints.
When pressure washing your pavers is a great idea (and when to skip it)
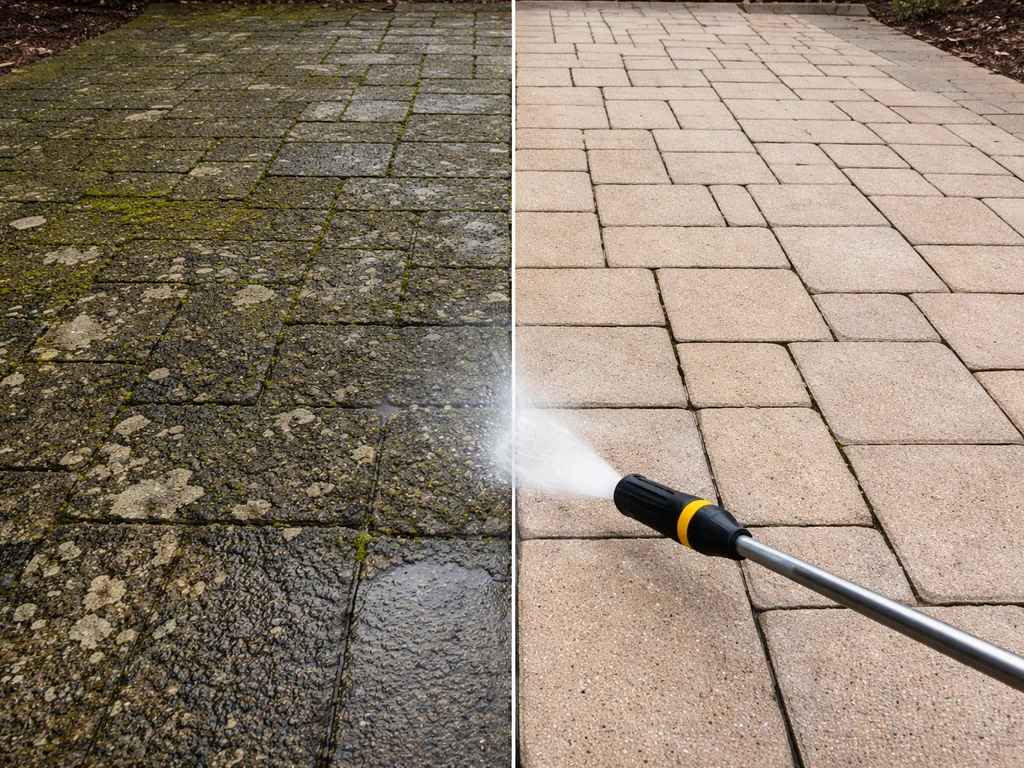
Pressure washing is genuinely the best tool for heavy biological buildup like moss, algae, and lichen that a garden hose will not shift. If you're wondering should i pressure wash my patio, the same PSI and nozzle rules apply to keep paver joints from getting damaged Pressure washing is genuinely the best tool. It also works well on grease stains (combined with the right cleaner), embedded dirt, and general grime that has built up over a season or two. If your pavers are reasonably well installed, the joints are solid, and you use the settings described below, you will get excellent results.
That said, there are situations where you should either skip pressure washing or be extra cautious about it.
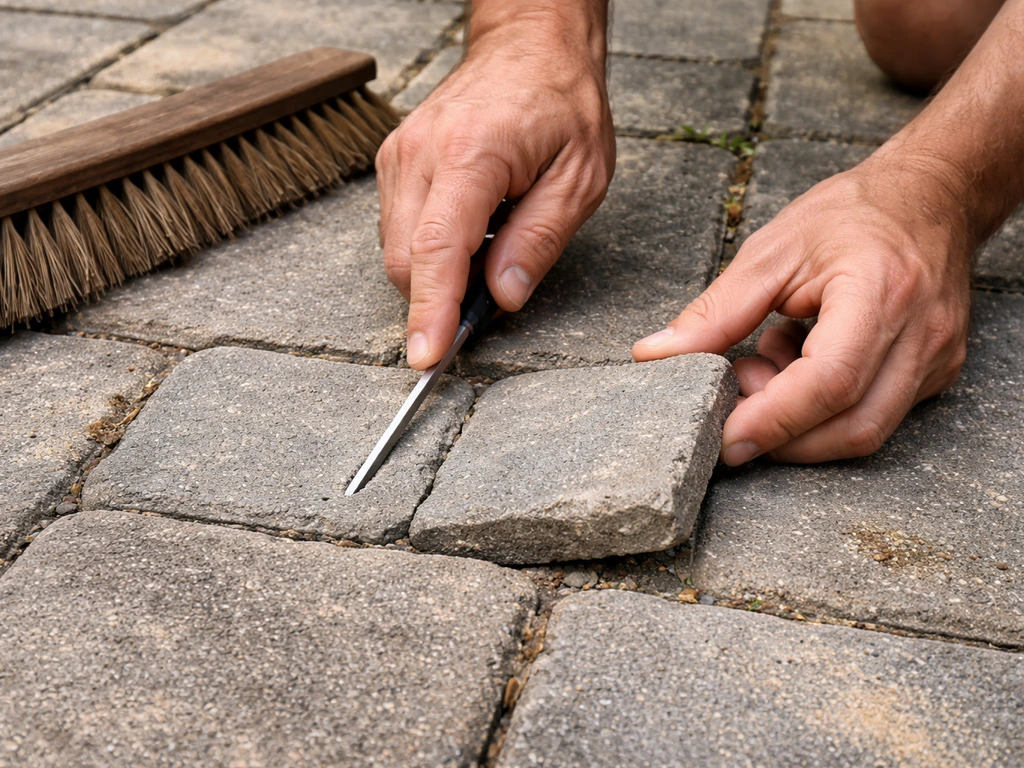
- Your paver joints already have loose or washed-out sand: adding more pressure just makes the problem worse. Re-sand first, then clean.
- You have soft or highly porous pavers (some natural sandstone, for example): high pressure can pit or etch the surface permanently, and that damage is not covered under most paver warranties.
- The installation is new and joints have not fully cured: polymeric sand typically needs 24 to 72 hours to harden after installation before any water is applied.
- You have an active drainage or settling problem: pressure washing will not fix underlying issues, and disturbing the bedding sand makes them worse.
- You are dealing with minor surface dust or light pollen: a stiff broom and garden hose are enough and much gentler.
Step-by-step: how to pressure wash a paver patio
Step 1: Inspect and prep the area
Walk the patio before you turn on a single tap. Look for cracked or crumbling pavers, sunken sections, and joints that are already missing sand. Follow this step-by-step method for how to pressure wash a patio safely, including inspections and prep like cracked pavers and missing joint sand how to pressure wash a paver patio. Note any areas where water pools, because those spots will need extra care with the nozzle angle. Move all furniture, planters, and outdoor rugs off the surface. Cover nearby garden beds, shrubs, and any delicate plants with a tarp if you plan to use a chemical cleaner, since runoff can harm plant roots even with milder formulas.
Step 2: Sweep and pre-wet the surface
Use a stiff broom or leaf blower to clear loose debris, leaves, and any dry soil. This step matters more than people realize. Loose material blasted by a pressure washer just redistributes into the joints and becomes mud. After sweeping, pre-wet the entire patio with a garden hose. This helps any cleaning solution penetrate instead of beading off dry pavers, and it softens any dried-on organic material.
Step 3: Apply your cleaning solution (if needed)
For moderate to heavy staining, apply your chosen cleaner (see the section below on cleaners) before you start pressure washing. Let it dwell on the surface for the time recommended on the label, typically 5 to 15 minutes. Do not let it dry out. This pre-treatment does most of the heavy lifting, so the pressure washer is really just rinsing the loosened grime rather than blasting it off mechanically.
Step 4: Set up your pressure washer at the right settings
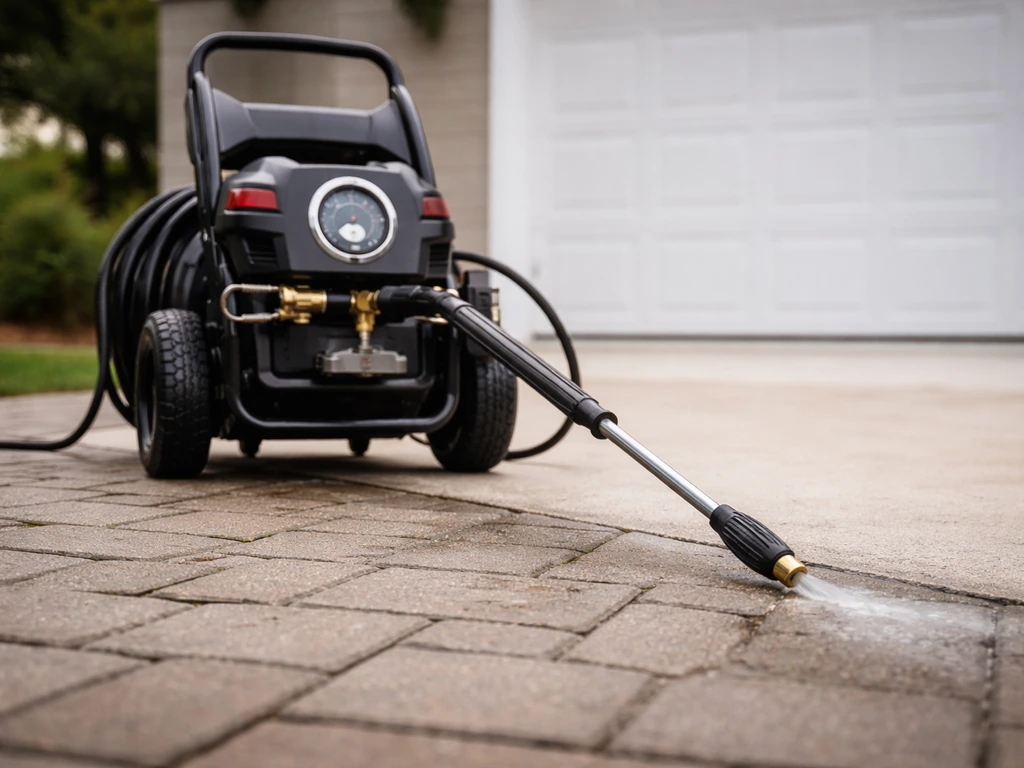
Set your machine to no more than 1500 to 1600 psi. Belgard's professional consultation guide (revised January 2026) specifically caps it at 1600 psi for pavers with polymeric sand joints, and Techniseal's restoration guide targets 1500 psi as the sweet spot that cleans without causing damage. If your machine only has preset modes, use the lowest setting available and test it on an inconspicuous area first.
Step 5: Choose the right nozzle and hold the correct angle
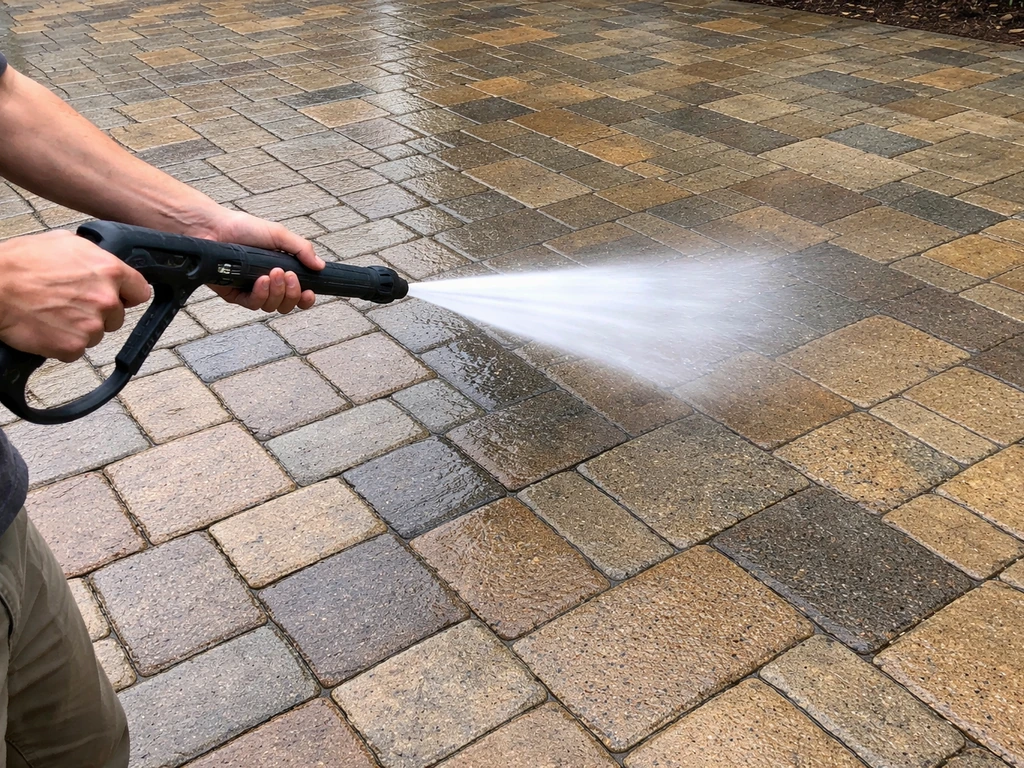
Use a 25-degree (green) or 40-degree (white) fan tip, or better yet a rotary turbo nozzle. Techniseal specifically recommends a concrete turbo or rotary nozzle for paver restoration work because it combines reasonable pressure with a wide cleaning path. Avoid the 0-degree (red) nozzle entirely, and be careful with the 15-degree (yellow) tip. Techo-Bloc's guidance is clear on this: narrow or direct spray tips can cause permanent etching to the paver surface. Hold the wand at a high angle, roughly 45 degrees or more relative to the surface, and keep it at least 12 inches away from the pavers. The further back you stand, the safer it is for both joints and the surface texture.
Step 6: Work in controlled, overlapping passes
Start at the highest point of your patio and work toward the drainage direction so you are always pushing dirty water away from already-cleaned areas. Use smooth, sweeping strokes that overlap each pass by a few inches. Keep the wand moving at all times. Stopping in one spot concentrates pressure and is exactly how you end up with etched patches or blown-out joints. Techo-Bloc emphasizes using a siphon tip approach and keeping pressure indirect, which reinforces the idea of letting the machine work at a safe angle rather than hammering straight down.
Step 7: Final rinse
After your main pass, do a second rinse with clean water, either with the pressure washer at low pressure or with a garden hose. Techniseal's restoration guide specifically calls for blank" rel="noopener noreferrer">rinsing again after pressure washing to dislodge any remaining sand or soil particles that were loosened but not fully cleared. This final rinse also removes any cleaning solution residue that could leave a haze on the surface.
Choosing the right equipment: PSI, GPM, nozzles, and wand attachments
| Equipment | Recommended Spec | Notes for Pavers |
|---|---|---|
| Pressure washer PSI | 1200 to 1600 psi | Do not exceed 1600 psi on pavers with polymeric sand joints |
| Flow rate (GPM) | 1.8 to 2.5 GPM | Higher GPM means better rinsing at lower pressure |
| Nozzle (fan tip) | 25-degree (green) or 40-degree (white) | Safe starting point for most paver types |
| Nozzle (rotary/turbo) | Concrete-rated rotary nozzle | Recommended by Techniseal for paver restoration work |
| Nozzle to avoid | 0-degree (red) or 15-degree (yellow) | Risk of etching, surface pitting, and joint blowout |
| Wand extension | 12 to 18 inch extension wand | Helps maintain safe distance and high angle more easily |
| Surface cleaner attachment | Disc-style flat surface cleaner | Great for large flat areas, reduces streaking risk |
| Brush attachment | Soft-bristle rotating brush | Useful for light stains on delicate or textured pavers |
For most homeowners, a mid-range electric pressure washer in the 1400 to 1600 psi range is the better choice over a gas unit for paver work, simply because it is easier to control and less likely to accidentally exceed safe pressure levels. If you are renting, ask specifically for a cold-water unit in that PSI range. A surface cleaner attachment (the disc-style tool) is worth the extra rental cost for a large patio because it keeps pressure even and reduces the risk of streaking.
Cleaning solutions: what to use for mold, algae, moss, efflorescence, and grease
Mold, algae, and moss
These are the most common problems on shaded or damp paver patios. A sodium hypochlorite (diluted bleach) solution at about 1:10 with water works on algae and mold on concrete-based pavers, but check the paver manufacturer's guidance first since some natural stone pavers react badly to bleach. Purpose-made patio cleaners containing quaternary ammonium compounds or hydrogen peroxide are safer across a wider range of paver types and are worth the extra cost for mixed installations. Apply the solution, let it dwell, then pressure wash. A second application is sometimes needed for stubborn lichen.
Efflorescence (white mineral haze)
Efflorescence is that chalky white film caused by soluble salts migrating to the surface. Pressure washing alone will not remove it. You need an acidic cleaner, typically one based on diluted muriatic acid or a purpose-formulated efflorescence remover. Apply it carefully (wear gloves and eye protection), let it react for the dwell time on the label, then rinse thoroughly with the pressure washer. Neutralize with a baking soda and water solution before the final rinse if using a strong acid-based product. Techniseal makes a well-regarded efflorescence remover designed specifically for concrete pavers if you want a product that is easier to handle than raw acid.
Grease and oil stains
Pressure washing without a degreaser on oil stains mostly just spreads the grease into a larger stain. Apply a concrete degreaser or alkaline cleaner first, agitate it with a stiff-bristle brush, let it dwell, then pressure wash. For old, set-in grease, you may need two applications. Cat litter or an absorbent compound left on fresh oil overnight before you begin washing can also pull a lot of the grease out before any cleaning product is applied.
General organic staining (leaf tannins, rust, fertilizer)
Leaf tannin stains usually respond well to an oxalic acid-based cleaner. Rust stains from metal furniture or fertilizer use need a dedicated rust remover, not a general patio cleaner. Fertilizer stains (often orange-brown) typically respond to citric acid-based cleaners. For all of these, the pattern is the same: apply, dwell, agitate if needed, then pressure wash and rinse.
Protecting your pavers: joints, edges, and sealer
Joint sand: the biggest risk with pressure washing
This is the issue that trips up most people. Pavestone's maintenance guidance is direct: pressure washing causes the removal of fine sand from between paver joints. Once that sand is gone, pavers become unstable, weeds get a foothold, and the whole surface can start to shift. The solution is to check your joints after washing and re-sand any gaps before they become a bigger problem. Polymeric sand is the best choice for refilling joints because it binds together when wet, resisting future washout and weed growth better than regular jointing sand.
To minimize sand loss during washing, keep the nozzle at a high angle rather than pointing straight down into the joints, maintain at least 12 inches of distance, and work in the direction of the joint lines rather than across them where possible. Techo-Bloc's care materials specifically flag this: even careful use of a pressure washer can disturb bedding sand, so checking joint depth after washing is not optional, it is part of the process.
Edge restraints
While you are inspecting the patio before and after washing, check the edge restraints. These plastic or aluminum borders hold the whole installation together. If they have lifted, cracked, or the spikes have worked loose, address that before you start blasting water at the surface. A loose edge restraint means pavers can shift during washing and the whole perimeter loses stability.
Sealing after washing

Sealing pavers after a thorough clean is the single best thing you can do to protect your work. A quality paver sealer locks in the color, slows biological regrowth, makes future cleaning much easier, and helps bind the joint sand. Pavestone's maintenance guidance notes that sealing is an important part of the overall paver care workflow, particularly after cleaning. Wait at least 24 to 48 hours after washing before applying sealer so the surface is completely dry. If you have re-sanded joints with polymeric sand, follow the manufacturer's curing time before sealing (usually 24 hours minimum, sometimes longer in humid conditions).
Keeping pavers clean after washing: a simple maintenance plan
The easiest way to avoid another heavy-duty cleaning session is a bit of consistent maintenance. Here is a realistic schedule that actually fits into normal life:
- Weekly or after storms: sweep debris off the surface. Leaves and organic matter are the main fuel for algae and mold growth. Remove them before they decompose into the joints.
- Monthly: rinse the patio down with a garden hose, especially in shaded areas that stay damp. This removes spore buildup before it takes hold.
- Every 6 to 12 months (depending on your climate): apply a diluted patio cleaner or a mild algae-inhibiting treatment to keep biological growth suppressed. This is much less work than a full pressure wash.
- Every 1 to 3 years: a full pressure wash at the settings described in this guide, followed by joint inspection, re-sanding where needed, and a fresh coat of sealer.
- Every 3 to 5 years: assess your sealer. Most paver sealers last 2 to 5 years depending on UV exposure and foot traffic. A simple water test tells you when it is time: if water no longer beads on the surface, the sealer has worn through.
One practical tip I have found makes a real difference: trim back any overhanging plants or trees that shade the patio for most of the day. Shade keeps moisture trapped and dramatically accelerates algae and moss growth. Even opening up an hour or two of direct sun each day noticeably slows down biological buildup between cleaning sessions.
If you are planning to tackle other outdoor surfaces while you have the pressure washer out, just note that the settings and techniques used for paver patios do not automatically transfer to other materials. Patio cushions and fabric items, for example, need a very different approach with much lower pressure, and some outdoor items should not be pressure washed at all. To keep patio cushions safe, use much lower pressure and follow the fabric care instructions before you clean them.
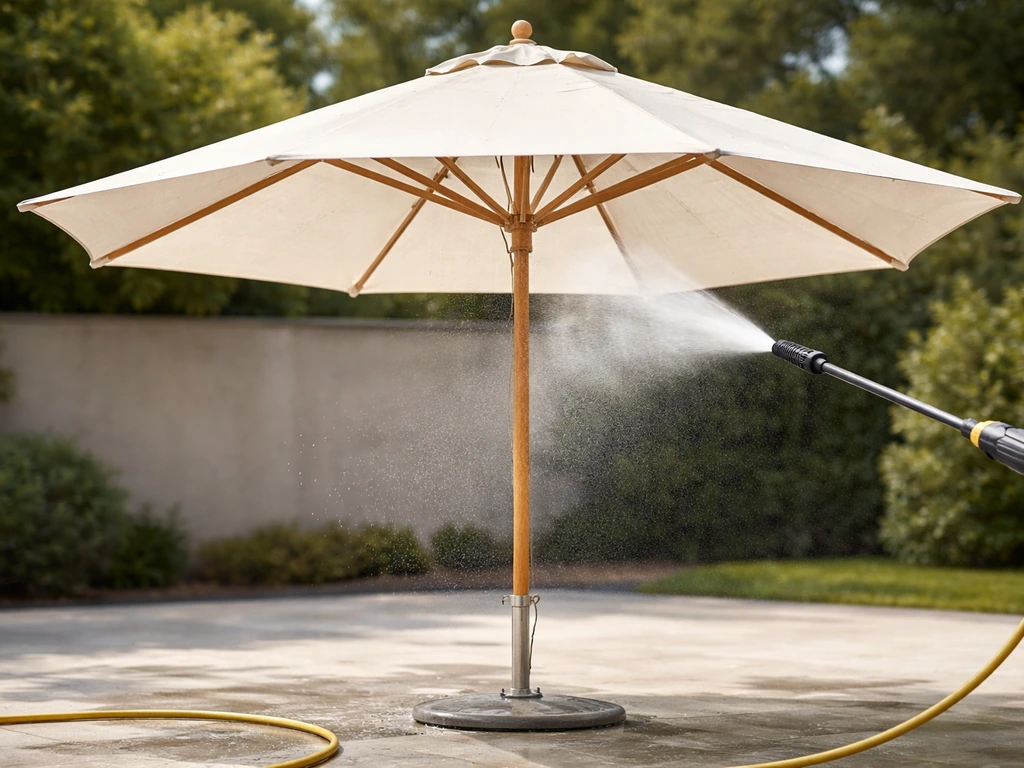
A patio umbrella is different from pavers, so you should use gentler pressure and appropriate cleaning to avoid damaging the fabric or coatings. For patio cushions, the best waterproofing spray helps protect outdoor fabric from water absorption and reduces the chance of mildew or stains Patio cushions and fabric items.
If you want to clean patio cushions, use much lower pressure and follow the fabric care instructions so you do not damage the material Patio cushions and fabric items. Stick to the paver-specific settings here when you are working on your stone or concrete paver surface, and you will get clean results without any of the damage risks.
FAQ
Can I power wash a paver patio if it has some cracked pavers or low spots?
Yes, but only if your pavers are already in stable condition. If you find sunken areas, missing joint sand, or cracked pavers during the pre-walk, pause and patch or re-sand first. Pressurized cleaning on a loose or failing base can accelerate movement and make the patio uneven.
If I power wash, will it remove efflorescence (white chalky film) from concrete pavers?
Not for efflorescence. Efflorescence is soluble salts, and rinsing or pressure alone usually leaves the chalky film behind. Use an efflorescence-specific acidic product (or muriatic-acid-based remover), then rinse thoroughly and neutralize if the product calls for it.
Will pressure washing ruin polymeric joint sand, and can I still use the same joints after cleaning?
You can, but it is riskier than most people realize. Work with a reduced pressure setting and keep the wand angled high, then inspect joints immediately afterward and re-sand. If you need heavy chemical treatment, avoid applying anything to unknown-polymeric or distressed joints without following the joint-sand curing and product instructions.
What causes those etched patches or streaky lines after pressure washing a paver patio?
It depends on the nozzle and how you move. If you stop or “hover” in one spot, you can etch the paver surface or create visible streaking, even at safe PSI. Use continuous, overlapping strokes and keep the tip distance consistent.
Does higher flow rate (GPM) make pressure washing safer for paver joints, or does it increase washout risk?
Yes, but you should control the “how,” not just the PSI. Higher GPM helps rinse debris out, but it can also increase how quickly sand and fines get mobilized if you point too low at the joints. The safer approach is high wand angle, adequate standoff distance, and re-checking joint depth after the rinse.
How long should I wait after power washing before sealing my pavers?
You should not assume your patio is cured enough to seal. Concrete and polymeric joints can hold moisture longer than the surface looks. Wait 24 to 48 hours minimum after washing, then only seal once the surface is fully dry and the manufacturer’s polymeric curing time is met.
Can I use diluted bleach or sodium hypochlorite to clean moss and algae on pavers?
Yes. If your goal is to remove algae and lichen, bleach solutions can work on some concrete-based pavers, but natural stone can react badly. When you have mixed materials or you are unsure of paver type, use a patio cleaner that is formulated for broader paver compatibility instead of diluted bleach.
I have an oil spot on my paver patio, should I just power wash it first?
Add an extra step of oil removal before you pressure wash. Grease often spreads if you rinse without a degreaser, so apply an alkaline or concrete degreaser, agitate, dwell, then rinse. For old grease, expect two rounds and consider absorbents like cat litter overnight before chemicals if the stain is fresh or semi-wet.
Is it okay to power wash near garden beds and plants, especially if I used a cleaner?
Avoid it unless you are sure the units are compatible and you can keep runoff controlled. Pressure washing near grass and beds can carry chemicals, and even plain dirty water can damage plants if it pools. Cover landscaping when using any cleaner, and rinse away residue promptly.
What are the biggest mistakes that lead to blown-out joints?
Do a quick checklist: sweep thoroughly, pre-wet, clean from the high point toward drainage, keep the wand moving, and finish with a dedicated final rinse. Most joint washout happens from blasting across joint lines at a low angle, so prioritize working along joint lines when possible and re-sand afterward.
Is a surface cleaner attachment (disc-style) a good idea for paver patios?
Yes, and surface cleaners can be helpful on large patios, but they still require caution. If you use a disc-style attachment, keep the tool height and movement controlled so it does not create concentrated impacts at the joint lines, then inspect joints immediately after.
If weeds are coming through, will power washing fix the problem permanently?
If weeds are already growing in the joints, cleaning alone may not solve the root problem. After washing, re-sand the joints properly (polymeric where appropriate), then pull weeds and consider spot treatment so regrowth does not re-establish in the same gaps.
Next Article
Can You Pressure Wash a Patio Umbrella Safely
Yes with conditions: clean canopy and frame safely, PSI and nozzle tips, stain fixes, and avoid seam and frame damage.