The best patio sealer remover for most concrete and paver surfaces is a chemical stripper like Brickform Strip-It, Techniseal Stripper for Concrete and Masonry, or Seal King Strip-All. For natural stone, sandstone, or slate, you need a gentler bio-based or water-based stripper that won't etch the surface. Porcelain needs the most care of all. Which one is right for you depends entirely on your patio material and what kind of sealer failed, so read on and I'll walk you through the whole process from diagnosis to re-seal.
Best Patio Sealer Remover: How to Remove and Prep Safely

Rhea Lang
22 Jun 2026
When you actually need a sealer remover (and when you don't)
Not every tired-looking patio needs a full strip. Sometimes all you need is a deep clean, a re-application of compatible sealer on top, or a targeted stain treatment. Pulling out a chemical stripper when you don't need one is just extra work and risk.
You do need a sealer remover when you see peeling or flaking film lifting off the surface, a persistent white haze or cloudy patch that won't come off with cleaning, patches where a new sealer refused to bond or dried patchy, or where the wrong sealer was applied for the surface type. If you're re-sealing with a different product chemistry (say, switching from solvent-based to water-based), the old coat usually needs to come off first or the new one won't stick properly.
You probably don't need full removal if the sealer is simply faded but still adhering uniformly, or if there's a localized stain sitting on top of intact sealer. In that case, a compatible topcoat or a targeted stain remover is the better call. In that case, a compatible topcoat or a targeted stain remover is the better call, and that’s where the best patio stain remover approach can help you avoid stripping everything. Spot-treating rust, grease, or organic staining on sealed surfaces is worth trying before you commit to stripping everything.
What not to do before you start
- Don't apply a new sealer over a failing one hoping it'll bond — it won't, and you'll double the removal job later.
- Don't use a strong acid-based cleaner (like a hydrochloric/muriatic acid wash) on sandstone, slate, or natural limestone — it will etch and permanently damage the surface.
- Don't skip the test patch. Every product and every surface reacts slightly differently, and I've seen expensive natural stone ruined by someone who assumed the product was safe.
- Don't let stripper dry on the surface during dwell time — once it dries, it loses effectiveness and can leave a residue that's harder to deal with than the original sealer.
- Don't pour stripper runoff directly into drains or water features without neutralizing it first.
How sealers fail and what you're actually dealing with
Understanding why a sealer failed tells you a lot about how hard removal is going to be. There are a few classic failure scenarios that come up again and again.
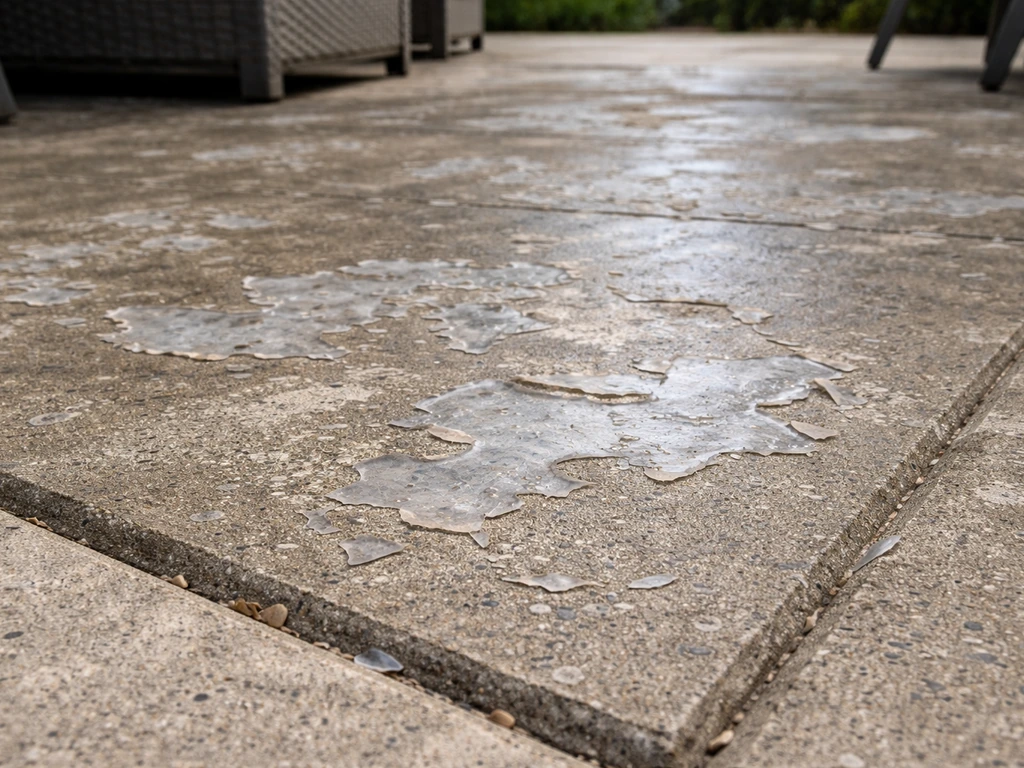
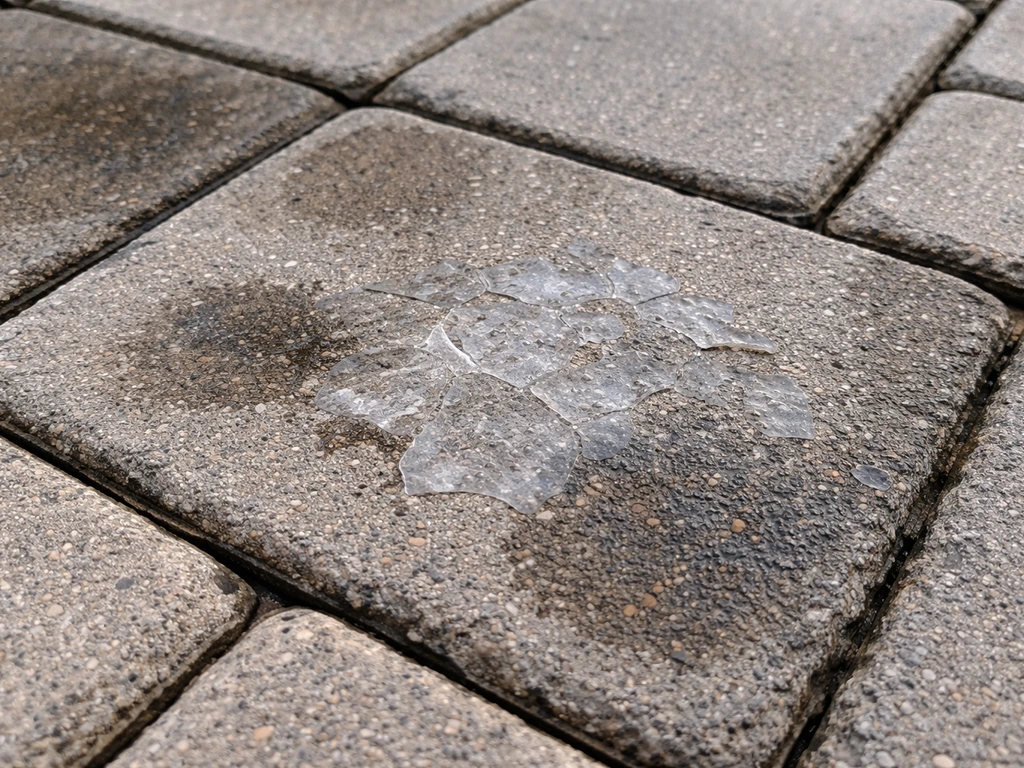
Peeling and flaking usually means the sealer was applied to a damp surface, or it was a film-forming sealer (like an acrylic gloss) that simply aged out. Film-forming sealers sit on top of the surface rather than penetrating it, so when the bond breaks down, you get visible lifting. These are usually the easiest to strip because the product is sitting on the surface rather than soaked in.
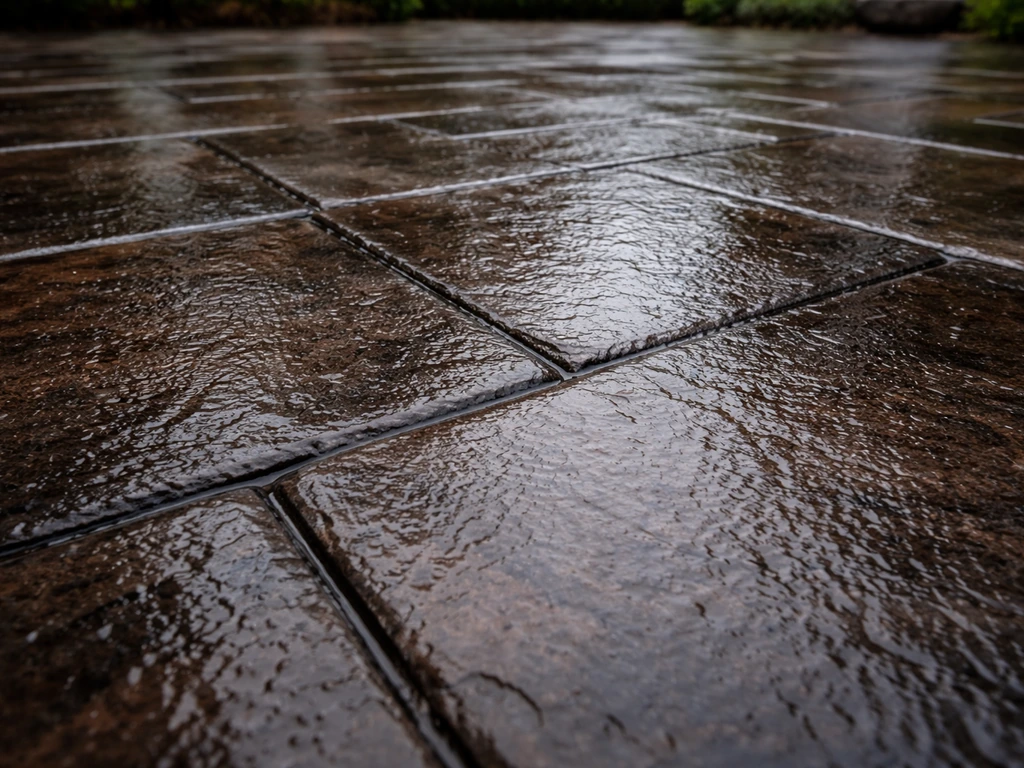
A white haze or milky cloudy appearance is almost always moisture trapped under the sealer during application. This is an extremely common issue with wet-look acrylic sealers applied in cool or humid conditions. If you’re comparing wet look patio sealer reviews, the cure conditions matter just as much as the chemistry wet-look acrylic sealers. The sealer cured over trapped moisture and the result is a semi-permanent whitish film. Standard stripping products deal with this well, but you need to make sure the surface is bone dry before you re-seal.
Recoat adhesion failures happen when a new sealer is applied over an old, incompatible one. You'll see the new coat peel off in sheets or dry with a rough, uneven texture. Solvent-based and water-based sealers don't always play nicely together, and some penetrating silane/siloxane sealers leave a residue that prevents film-forming products from bonding. If you've ever looked at your patio and thought 'I followed all the instructions and it still looks terrible,' this is often why.
Multiple coats built up over years create their own problem: a thick, gummy layer that shrugs off light strippers. In these cases, you'll need a heavier-duty solvent-based product, more dwell time, and probably more than one application pass. PROSOCO’s Sure Klean Heavy Duty Paint Stripper PDS also notes that dwell time optimization based on label instructions is important, and that improper cleaning and neutralization after treatment can lead to problems on the surface more dwell time.
Choosing the best sealer remover by patio type
This is where most guides fall short. 'Use a chemical stripper' is not useful advice if you have delicate sandstone and the stripper in question will bleach it. Here's how to match the product to the material.
| Surface | Recommended Stripper Type | Products to Consider | Key Cautions |
|---|---|---|---|
| Concrete (smooth/brushed) | Solvent-based or heavy-duty water-based | Brickform Strip-It, Techniseal Concrete & Masonry Stripper, Seal King Strip-All | Safe for concrete; test on coloured/exposed aggregate first |
| Concrete Pavers / Clay Brick | Water-based or mild solvent stripper | Seal King Strip-All, Techniseal Stripper, SureStrip | Avoid strong acids; rinse very thoroughly after |
| Natural Stone (limestone, granite) | Bio-based or pH-neutral water-based stripper | SureStrip, PROSOCO Sure Klean Fast Acting Stripper | Acid-based products will etch; always test first |
| Sandstone | Mild water-based or bio-based only | SureStrip, diluted water-based strippers | Highly porous and acid-sensitive; most vulnerable surface |
| Slate | Mild water-based or bio-based only | SureStrip, specialist stone strippers | Can discolour with harsh solvents; rinse thoroughly |
| Porcelain | Mild water-based stripper, short dwell time | Diluted water-based products only | Glazed surface means low absorption; mechanical help needed; no harsh acids |
For concrete driveways and standard pavers, you have the most flexibility. Products like Brickform Strip-It are specifically designed to handle both water-based and solvent-based sealers and paints, and Techniseal's concrete and masonry stripper is a solid choice if you're planning to re-seal with a Techniseal product afterward (they're formulated to work together). Seal King Strip-All works well across pavers and concrete and covers most domestic removal jobs.
For natural stone, sandstone, and slate, I'd reach for SureStrip or a similar bio-based product first. The SureStrip technical data sheet specifically states it does not damage or etch surfaces and is safe for most substrates, that 'does not etch' claim matters a lot when you're working on sandstone or limestone, where acid-based strippers will leave permanent marks. PROSOCO's range (Sure Klean Heavy Duty Paint Stripper and Fast Acting Stripper) is a professional-grade option worth knowing about for stubborn cases. PROSOCO’s Sure Klean Fast Acting Stripper SDS outlines safety and handling requirements, including rinsing guidance for exposure scenarios, and it is intended to be used alongside label instructions PROSOCO's range (Sure Klean Heavy Duty Paint Stripper and Fast Acting Stripper).
Porcelain is tricky because it's non-porous and the sealer often sits as a thin film on the glazed surface. A mild water-based stripper with a short dwell time is the starting point, but you'll almost certainly need mechanical agitation alongside it, more on that below.
Chemical vs mechanical removal: what works and when to combine them

Most successful sealer removal jobs use both methods together. Chemical strippers break the bond; mechanical action removes the loosened material. Trying to do it with only one approach is usually where people get frustrated.
Chemical stripping
Chemical strippers are the primary tool for sealer removal. Solvent-based strippers are the most aggressive and best for thick, multi-layer buildups on hard surfaces like concrete. Water-based and bio-based strippers are safer to handle, kinder to delicate stone, and much easier to dispose of responsibly. The trade-off is they sometimes need a longer dwell or a second application on stubborn buildup. The right call depends on your surface (table above) and how many coats you're dealing with.
Mechanical removal
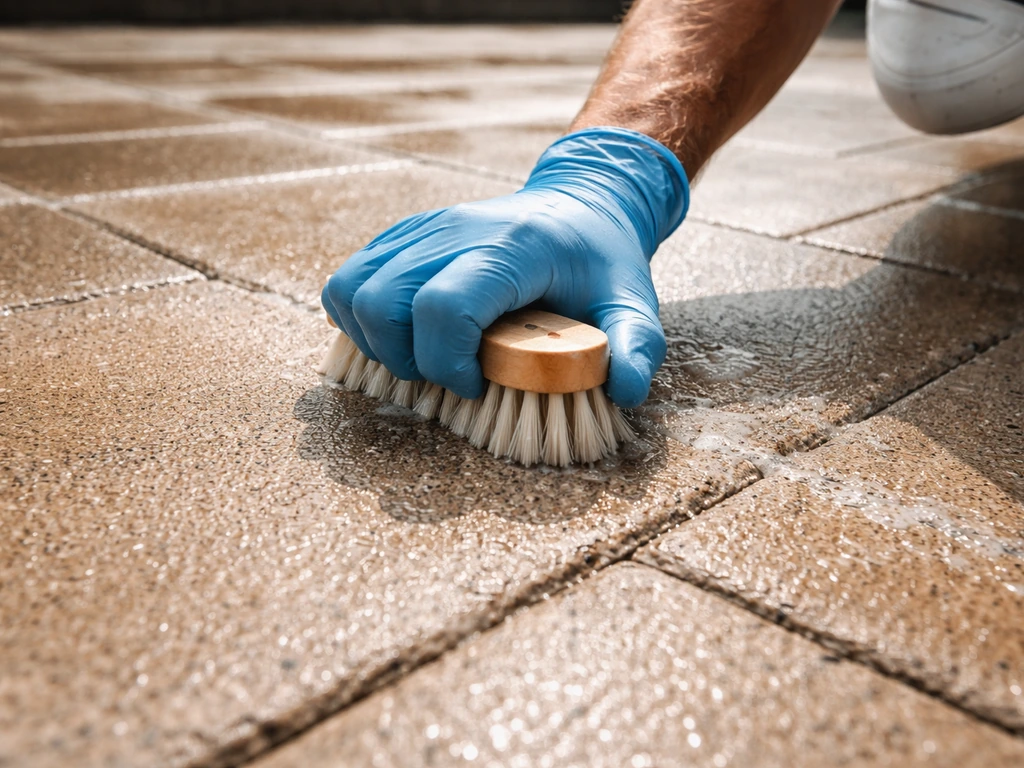
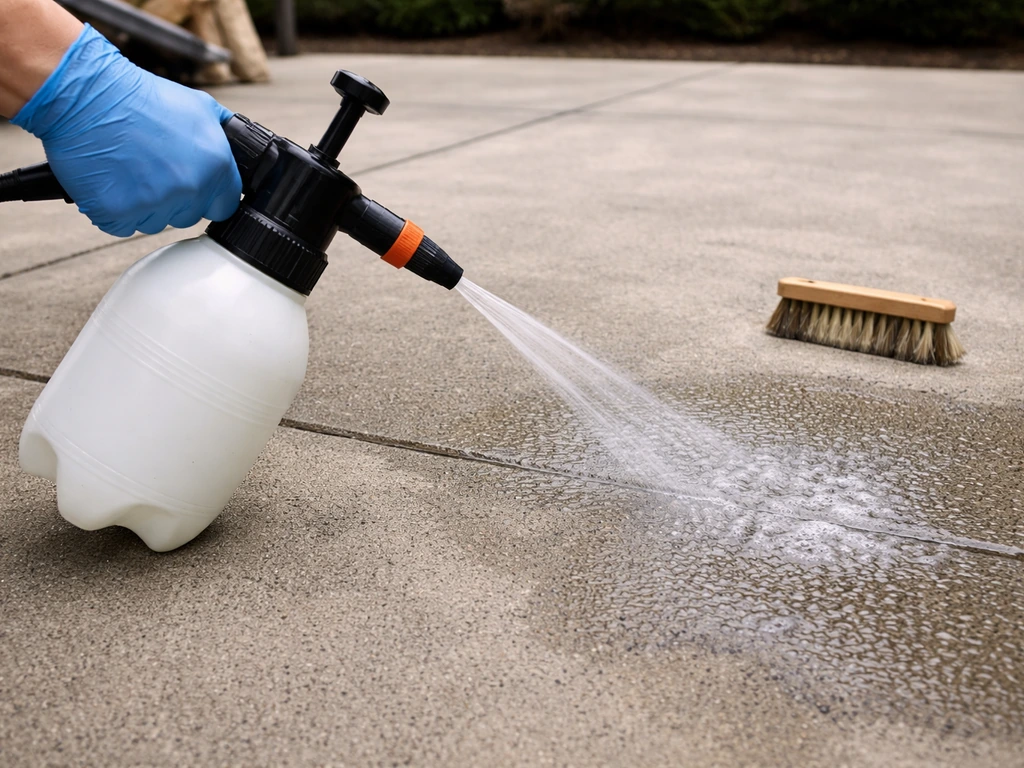
A pressure washer is your best mechanical tool for rinsing off loosened sealer. After the chemical dwell time, hit the surface with a pressure washer (typically 1500–2000 PSI for pavers and concrete, lower for natural stone) to flush everything off. A stiff-bristle deck brush or a floor scrubber works well for agitation mid-dwell. Floor grinders fitted with diamond pads or scarifying attachments can mechanically abrade sealer off concrete, but these are overkill for most domestic jobs and will scratch stone surfaces badly. A simple plastic or metal paint scraper is useful for getting under peeling film before or after chemical application.
On porcelain and very smooth surfaces, a soft nylon brush or non-scratch scrubbing pad is enough mechanical help alongside the stripper. Never use wire brushes on stone, brick, or porcelain, they leave metal deposits that rust and stain.
How to use patio sealer remover safely and effectively
Here's the full process I use. Follow this and you'll get a clean, ready-to-reseal surface without damaging anything or leaving chemical residue that ruins the next coat.
- Clear and sweep the patio. Remove all furniture, planters, and debris. Sweep off loose grit — you don't want it mixing with the stripper and grinding into the surface.
- Protect surrounding areas. Mask off or wet down adjacent lawns, borders, and any surfaces you don't want the stripper touching. Solvent-based products can kill grass and discolour render. Lay plastic sheeting over drains if you're using a solvent-based product.
- Put on your PPE. Nitrile gloves, eye protection, and old clothes are minimum. For solvent-based strippers in enclosed or poorly ventilated spaces, add a respirator. Always check the product SDS — Seal King's Strip-All SDS and similar documents flag ventilation hazards clearly for a reason.
- Do a test patch. Apply the stripper to a small inconspicuous area first, follow the full process, and check the result before you commit to the whole patio. This takes 30 extra minutes and has saved me from expensive mistakes more than once.
- Apply the stripper. Use a brush, roller, or low-pressure/high-volume sprayer as appropriate for the product. SureStrip's technical data sheet recommends exactly this approach. Work in manageable sections — Brickform specifically advises working in small sections so you can stay on top of dwell time without parts drying out before you get to them.
- Maintain the dwell time. Keep the product wet on the surface throughout the dwell period. Brickform Strip-It specifies 15 minutes; Seal King Strip-All calls for 10–30 minutes depending on buildup. If it starts to dry, mist with water to keep it active. Don't let it dry — this is the mistake that leads to a sticky residue that's difficult to remove.
- Agitate. Use a stiff-bristle brush or deck scrubber to work the loosened sealer into a slurry. On peeling film, you can use a paint scraper to lift larger sections first.
- Rinse thoroughly. This is where people cut corners and regret it. Rust-Oleum's support guidance for their stripper product specifically calls for rinsing the surface three times to ensure all stripper is fully removed. Use a pressure washer where safe for the surface, and flush all residue toward a collection point away from drains. Rinse from the top of any slope downward.
- Neutralize if required. Some acid-containing strippers need a neutralizing rinse (a diluted alkaline solution like baking soda and water) before the final water flush. Check your product's TDS — if neutralization is needed, it will say so. PROSOCO flags this directly: failure to neutralize treated surfaces properly can cause problems with subsequent products.
- Dispose of runoff responsibly. Collect wash water in buckets where possible and dispose of it via your household waste system, not directly into surface water drains. Check local council guidelines for chemical disposal if you've used a solvent-based product.
Dealing with leftover staining and contamination after stripping
Stripping the sealer often reveals what was hiding underneath it. This is the stage that surprises most people. Suddenly you can see the patio in its bare state, and there may be issues to sort out before you even think about re-sealing.
Mold, algae, and moss
Black or green biological growth embedded in porous surfaces like concrete, pavers, or sandstone needs treating with a biocidal patio cleaner after stripping. A diluted bleach solution or a proprietary algae/moss remover works well on concrete and brick. For natural stone, use a stone-safe biocidal cleaner, bleach can lighten some stones. Let the treatment fully dry and confirm growth is dead (it'll turn brown/beige rather than staying green) before applying any sealer.
Rust stains
Rust staining from metal furniture legs, fixings, or fertiliser is common on light-coloured patios and shows up clearly once the sealer is gone. An oxalic acid-based rust remover is the standard treatment for concrete and stone, apply, let it dwell, scrub, and rinse. Avoid strong hydrochloric acid-based products on sandstone, slate, or limestone. For persistent rust, a specialist patio rust remover product will do a better and safer job.
Grease and oil stains
Barbecue grease, cooking oil, or vehicle oil that soaked in when the old sealer was worn won't come off with water alone. If WD-40 gets on a patio, it can leave an oily residue that may stain or discolor the surface, so clean it up quickly Barbecue grease, cooking oil, or vehicle oil. A degreasing patio cleaner or alkaline cleaner applied to the dry surface, followed by agitation and a hot-water rinse, usually handles light to medium grease. Stubborn grease may need a poultice treatment: apply an absorbent material mixed with a solvent degreaser, cover it, leave it for 24 hours, and then remove and rinse.
Efflorescence
That white powdery deposit that appears on concrete, brick, and some natural stone is efflorescence: mineral salts drawing to the surface with moisture. It's very common after stripping because you've just opened the pores of the surface. Brush it off dry first, then use a diluted acidic cleaner (specifically an efflorescence remover formulation) on concrete or brick. Never use acid on sandstone or limestone. Always neutralize and rinse thoroughly afterward. Don't seal over active efflorescence, seal it in and it'll push back through within a season.
Pet stains and organic marks
Urine, leaf tannin staining, and general organic discolouration respond well to enzymatic cleaners or an oxygen-based patio cleaner. These work by breaking down organic compounds rather than just bleaching over them. For pet urine specifically, an enzymatic cleaner is more effective than bleach because it eliminates the odour-causing compounds rather than just masking the visible stain.
Preventing the same problem from happening again
Doing all of this work and then making the same mistake with the new sealer is completely avoidable. Here's what actually makes the difference.
Wait for the surface to be properly dry
This is the number one cause of sealer failure, and it's the thing people are most impatient about. After stripping, cleaning, and treating stains, concrete and pavers need at least 24–48 hours of dry weather before you re-seal. Porous natural stone like sandstone can need 48–72 hours or more depending on temperature and how deeply it was saturated during cleaning. A moisture meter is cheap and gives you certainty. Sika explicitly identifies removing bond-inhibiting materials and ensuring proper substrate prep as critical to successful sealer adhesion, and that includes moisture. Sika patio seal instructions are especially important for prep, curing time, and ensuring the substrate is properly dry before you apply a new coat.
Do the test patch before sealing
Apply sealer to a small area, let it cure fully, and check for adhesion, finish consistency, and any whitening before you do the whole patio. This catches moisture issues, compatibility problems, and application rate errors when they're still easy to fix.
Choose a compatible sealer for your surface
Film-forming acrylic sealers (including wet-look finishes) give a high-sheen result on concrete and pavers but need stripping when they fail. Penetrating silane/siloxane sealers soak into the substrate, leave no surface film, and are generally much easier to manage on natural stone and pavers. If you've just gone through the pain of stripping a failed wet-look sealer, think carefully about whether that finish is worth repeating, a quality penetrating sealer is far less dramatic to maintain. If wet look is what you want, just make sure it's rated for your specific surface and applied in the right weather window.
Re-seal timing and maintenance
Most concrete and paver sealers need refreshing every 2–5 years depending on traffic, UV exposure, and product quality. Don't wait until you have a full failure before acting, a light re-application over intact sealer (when products are compatible) is much easier than a full strip. Check the sealer manufacturer's guidance on re-coat windows and compatibility before you top up, and you should be able to avoid another full removal job for a good few years. If you want the best wet look patio sealer UK, choosing a compatible product chemistry is just as important as getting the remover right.
FAQ
Can I use the best patio sealer remover and then seal the same day to save time?
Usually no. Even if the surface looks dry, trapped moisture and residual stripper can stop proper bonding, especially on concrete and pavers. Plan on 24 to 48 hours dry weather for most surfaces, and longer (48 to 72 hours or more) for porous natural stone. If you use a moisture meter, target a consistently dry reading across the patio, not just in one spot.
How do I know if my sealer failure needs full stripping or just a top clean?
Check adhesion, not appearance. If the coating is peeling or flaking, or if new sealer beads up or turns patchy, you need removal. If the surface is only dull or faded but feels uniform and firm, try deep cleaning first and test a small topcoat area to confirm bonding before committing to full strip-out.
What’s the safest way to test product compatibility before stripping everything?
Do a small, inconspicuous test patch with both the remover and the planned new sealer. Strip a small section, then after drying apply the new sealer to see whether it bonds evenly, whitens, or peels. This catches the common solvent versus water chemistry mismatch and any residue left behind by old penetrating products.
Do I need to pressure wash right after the stripper dwell time?
You should flush off according to the stripper’s instructions, but do not rush or overdo it. For most pavers and concrete, pressure washing around 1500 to 2000 PSI helps remove loosened material, but lower pressure is safer for natural stone. Also keep the nozzle angle controlled so you do not gouge soft stone or drive contaminants deeper into porous substrates.
Will a bio-based or water-based patio sealer remover work on thick, multiple coat buildup?
Sometimes, but often not on the first pass. Water-based and bio-based strippers are generally safer for stone and easier to dispose of, but they may require longer dwell or repeated applications on multi-layer film buildup. If the stripped area still feels tacky or leaves smeary residue, switch to a more aggressive solvent-based approach or do additional agitation passes.
What should I do if the patio looks clean after stripping but develops white powder or haze again?
That usually indicates efflorescence or salts migrating back to the surface after pores were reopened. Do not seal over active efflorescence. Brush off loose powder dry, treat using a dedicated efflorescence remover for concrete or brick, then rinse thoroughly and verify it stays gone before resealing.
Can I use a wire brush or metal scraper on natural stone or porcelain to speed things up?
Avoid wire brushes on stone, brick, or porcelain. They can leave metal deposits that rust and stain later. Use plastic or metal scrapers for film lift, and for smooth surfaces rely on soft nylon brushes or non-scratch pads to prevent surface damage.
How should I handle rust, grease, or organic staining after removing the old sealer?
Treat based on the contamination type before resealing. Use an oxalic acid-based rust remover for concrete and stone, avoid hydrochloric acid on sandstone, slate, or limestone, and use an alkaline degreaser for oils and grease. For pet urine and tannin-type staining, prefer enzymatic or oxygen-based cleaners because they target odor-causing and staining compounds rather than just bleaching.
Is it normal for penetrating silane or siloxane sealers to be harder to remove?
They can be, because they may not form a surface film and might leave minimal removable material. If you applied a penetrating sealer previously, some film-forming products may have bonding issues due to residue or changed substrate chemistry. This is a strong reason to do a sealer-on-small-spot adhesion test after stripping or after a targeted clean, before doing the whole patio.
How often should I refresh a patio sealer to avoid reaching full failure again?
Many concrete and paver sealers perform best with refreshing every 2 to 5 years, depending on traffic, UV exposure, and product quality. The key is not waiting for visible peeling or bonding failure. When the patio looks a bit tired but still adheres, a compatible top-up over intact, properly cleaned surface is usually far less work than full removal.
Next Article
Best Patio Sealer Wet Look: How to Choose and Apply
Choose and apply the best wet look patio sealer with prep, patch testing, coat tips, and fixes for stains and algae.