For most concrete and paver patios, an acrylic-based wet look sealer like Brickform Gem-Seal or DRYLOK WetLook gives you the best combination of genuine high-gloss shine, color enhancement, and durability. For natural stone like slate or sandstone, you want a penetrating silane-siloxane sealer instead, because a film-forming topical product will peel or cloud on porous, uneven stone. The single most important decision is matching the sealer type to your surface, not just picking the glossiest label on the shelf.
Best Patio Sealer Wet Look: How to Choose and Apply

Rhea Lang
20 Jun 2026
What a wet look sealer actually does (and how it ages)
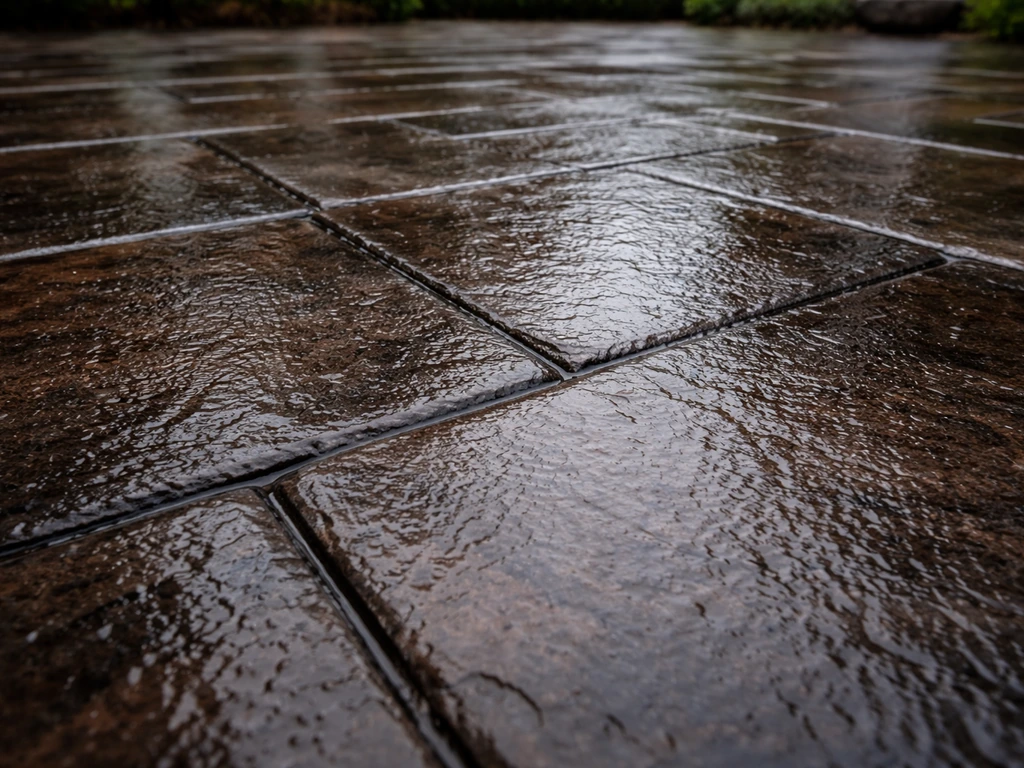
A wet look sealer makes your patio look like it just rained. Colors deepen, texture pops, and the surface takes on a sheen that ranges from a soft satin to a high-gloss lacquer finish depending on the product. There are two fundamentally different ways products achieve this, and they behave very differently over time.
Film-forming sealers (typically acrylic or acrylic-plasticizer blends like Techniseal WLWR) sit on top of the surface as a thin layer. Techniseal identifies its WLWR Wet Look (WLWR) technical documentation as an acrylic/plasticizer “film-forming” wet look protector, meaning it forms a topical film for sheen. That layer is what creates the gloss and color enhancement. The downside is that films can yellow in UV-heavy environments, peel if moisture gets trapped underneath, or turn milky white if applied in humid conditions. On a smooth concrete patio or clay brick, they look brilliant. On a porous stone like sandstone, they almost always cause problems.
Penetrating sealers, like silane-siloxane systems (SikaCem-102, Repelicone H) and some water-based acrylics (DRYLOK WetLook), work by soaking into the pores and reacting with the substrate. They enhance color and add sheen but leave no surface film. They are breathable, which matters enormously for natural stone and brick that holds moisture. The wet look effect is typically less intense than a film-forming product, but the finish ages more gracefully and rarely peels. On very dense or already-sealed surfaces, penetrating sealers cannot absorb at all, so they are wasted product.
In terms of longevity, expect a quality film-forming acrylic wet look sealer to last 2 to 5 years on a well-prepped surface in moderate climate. Penetrating sealers typically last 3 to 7 years because there is no surface film to degrade. Both will fade gradually, and you will notice the patio starts to look dull again rather than failing dramatically. UV exposure accelerates this on south-facing patios, so always check whether the product specifies UV-stable or UV-resistant formulation.
Which sealer suits your patio material
Getting this wrong is the most common and most expensive mistake. Here is how to match the sealer to the surface.
Concrete (plain, stamped, or exposed aggregate)
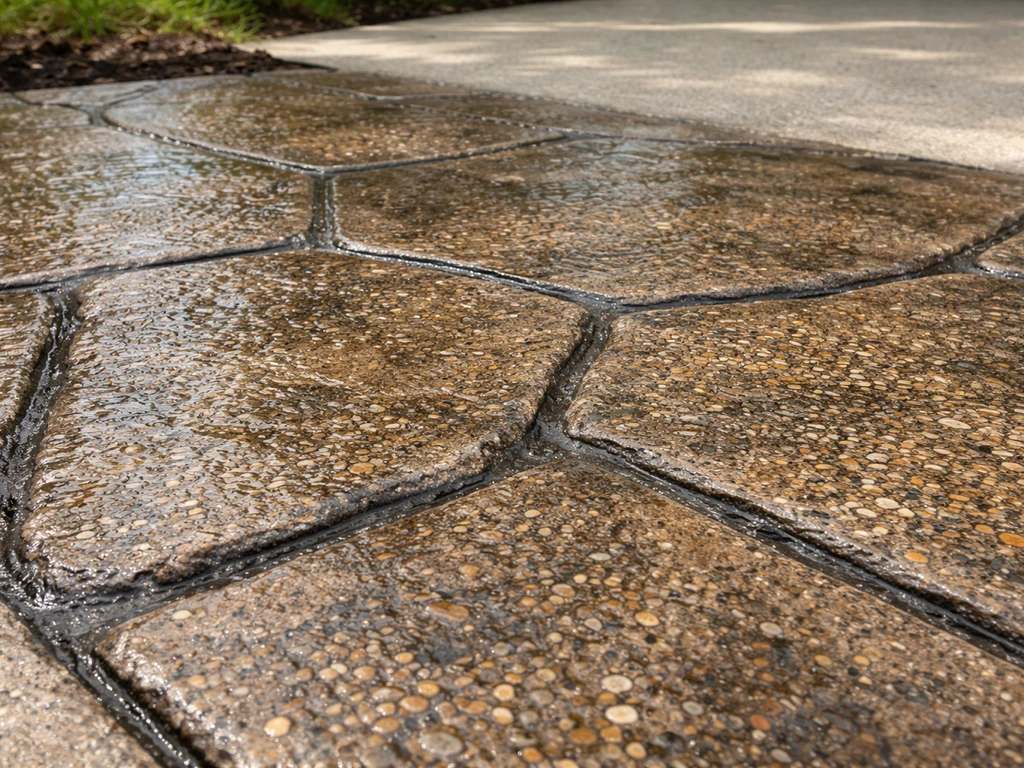
Concrete is the ideal surface for wet look sealers. It is porous enough to accept penetrating products and smooth enough for film-forming acrylics to sit evenly. For stamped or exposed aggregate concrete where you want to really make colors pop, a high-gloss acrylic like Brickform Gem-Seal is a strong choice. It is specifically formulated for these applications and available in both water-based (lower VOC) and solvent-based versions. The solvent-based version penetrates slightly better and gives a more intense wet look, but it requires proper ventilation and has a stronger odor. For plain brushed concrete, DRYLOK WetLook is easier to work with and widely available at hardware stores. The key warning from the DRYLOK data sheet is to avoid puddles and heavy surface film during application, which is excellent advice for any acrylic sealer.
Clay brick and concrete pavers
Brick and concrete pavers work well with film-forming wet look sealers, but you have to be rigorous about prep. Any efflorescence (the white salt bloom on the surface) or organic staining must be fully removed before sealing or you will seal it in permanently. Techniseal WLWR is a popular paver-specific product that delivers a high-gloss wet look and includes a plasticizer for flexibility. Techniseal WL4 is the lower-gloss alternative from the same range. Worth noting: Techniseal's own technical data specifies an absorption test before applying. If you drip water on your paver and it beads immediately, the surface is already sealed or too dense for the product to work properly. Do the test before you buy.
Slate, sandstone, and natural stone
This is where most homeowners go wrong. Natural stone is porous but also moisture-sensitive, and it moves slightly with temperature changes. A film-forming acrylic will trap moisture and peel within a season, often leaving the stone looking worse than before. The right approach here is a penetrating silane-siloxane sealer. Products like SikaCem-102 or Repelicone H soak in, react with the stone, and give a subtle wet look enhancement without a film. The gloss is less dramatic than on concrete, but it holds up properly. If you want a deeper wet look on slate specifically, look for penetrating sealers labelled as 'colour enhancing' or 'wet look penetrating' rather than anything that says 'high gloss film' or 'coating.' There is a more detailed look at sandstone and slate-specific products in the best wet look patio sealer UK guide within this site.
Porcelain and non-porous surfaces
Porcelain pavers are nearly non-porous, which means penetrating sealers are pointless and most film-forming sealers struggle to adhere properly. If your porcelain is sealed from the factory, it may not need sealing at all. If you want to add a wet look to grout lines between porcelain tiles, a penetrating sealer applied specifically to the grout is a better approach than coating the whole surface.
| Surface | Best sealer type | Top product picks | Avoid |
|---|---|---|---|
| Plain or brushed concrete | Film-forming acrylic or penetrating acrylic | DRYLOK WetLook, Brickform Gem-Seal | Silane-siloxane (minimal wet look) |
| Stamped / exposed aggregate concrete | High-gloss film-forming acrylic | Brickform Gem-Seal (solvent or water-based) | Matte or breathable penetrating sealers |
| Clay brick / concrete pavers | Film-forming acrylic or paver-specific | Techniseal WLWR, Techniseal WL4 | Anything without UV stabiliser |
| Slate / sandstone / natural stone | Penetrating silane-siloxane | SikaCem-102, Repelicone H | Film-forming acrylics, solvent coatings |
| Porcelain | None needed / grout sealer only | Penetrating grout sealer | Full-surface topical film-forming sealers |
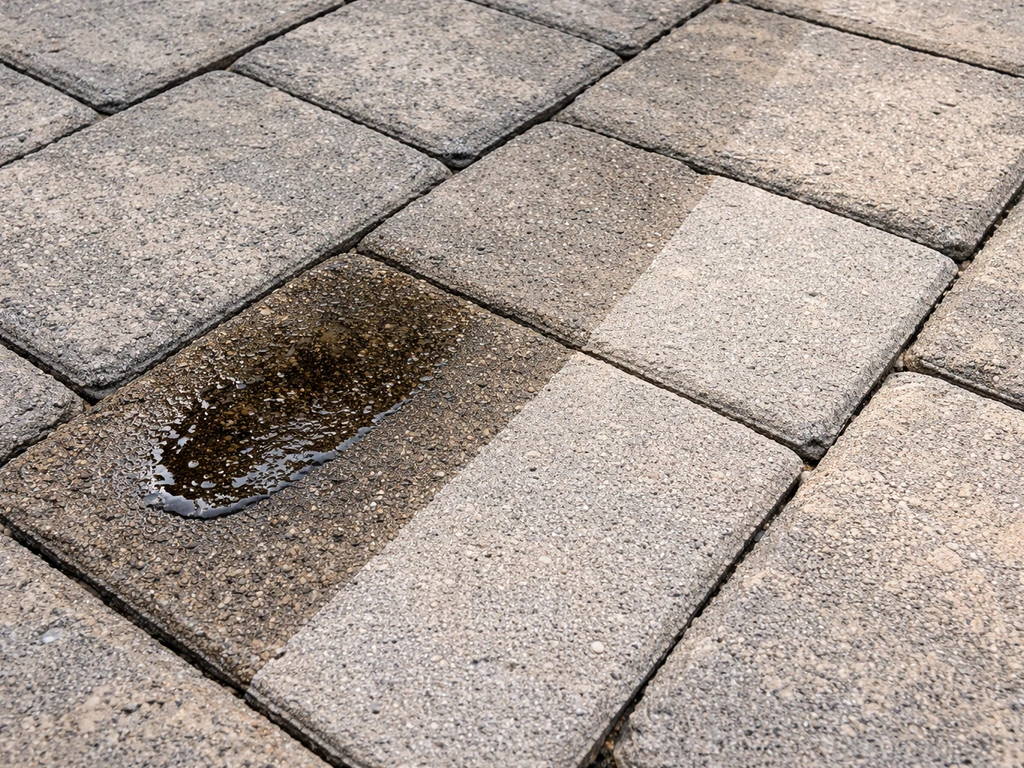
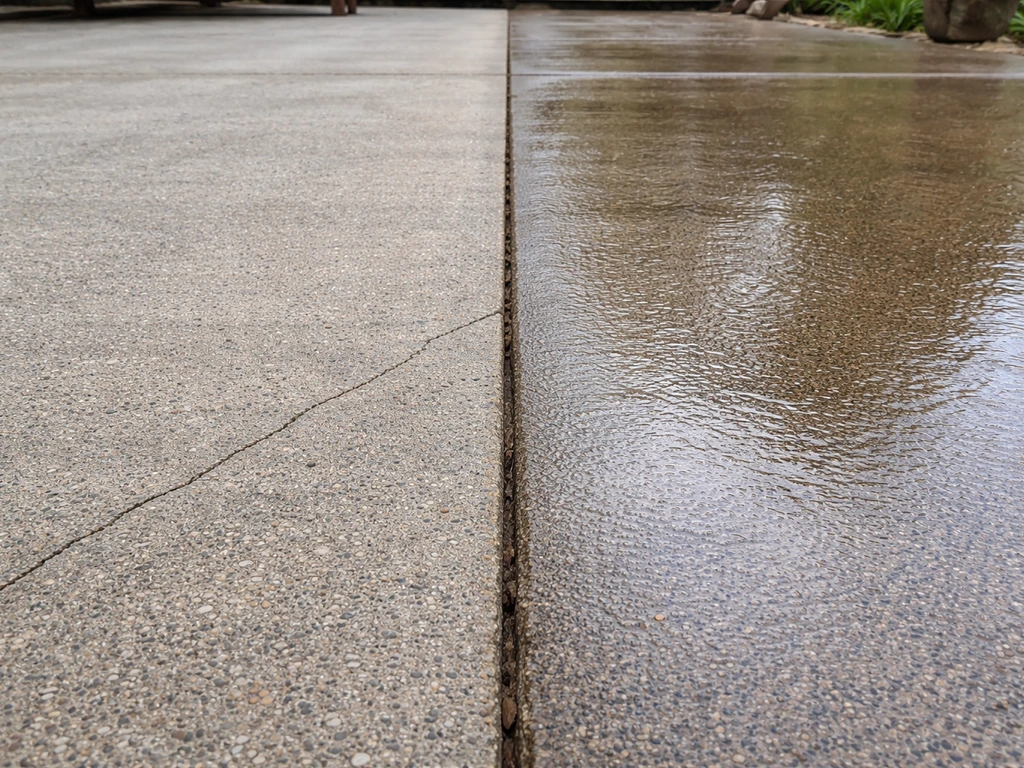
Prep the patio properly (this is where the wet look actually lives or dies)
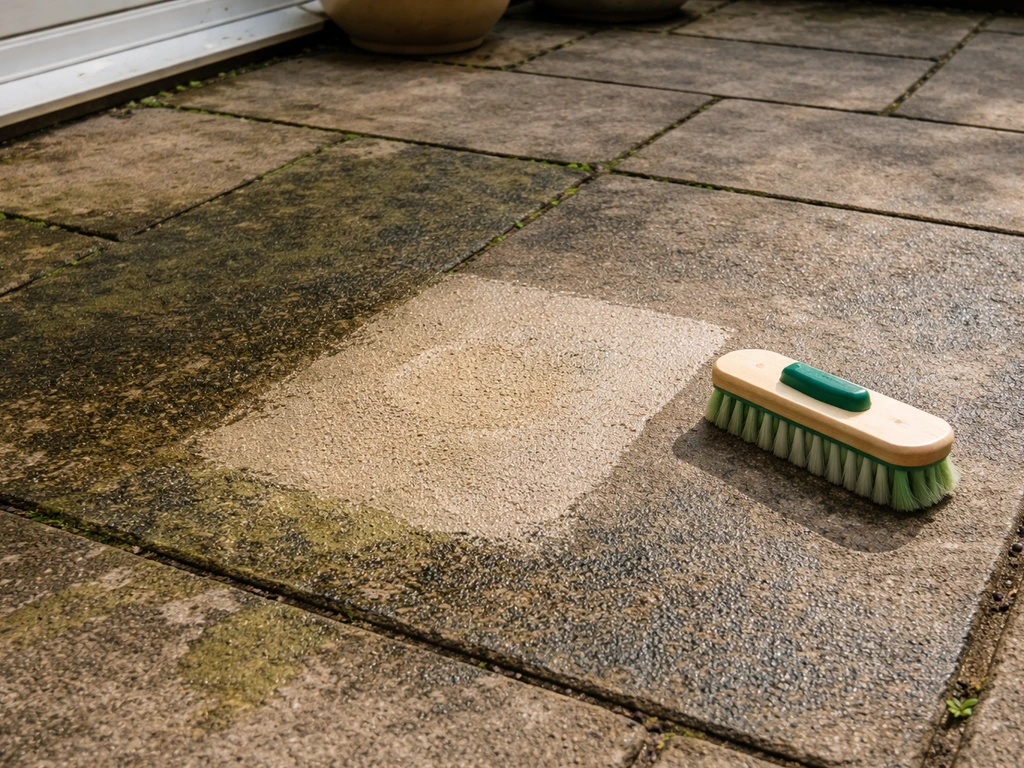
I cannot stress this enough: a wet look sealer applied to a dirty, stained, or damp patio will lock in every problem permanently, turn cloudy, or peel within months. WD-40 can leave oily residues, so wipe any overspray and degrease the area first to prevent staining before you apply a wet look sealer wet look sealer applied to a dirty, stained, or damp patio. Every product's technical data sheet says the surface must be clean, dry, and free of contaminants. Here is what that actually means in practice.
Mold, algae, and moss
If your patio has green or black organic growth, you need to kill it and remove it before sealing. A diluted bleach solution (1 part bleach to 4 parts water) works well on concrete and brick. For natural stone, bleach can cause discolouration so use a dedicated stone-safe biocide or patio cleaner instead. Apply the treatment, let it dwell for 15 to 20 minutes, scrub with a stiff brush, and rinse thoroughly. On heavy growth, you may need two passes. Pressure washing after chemical treatment is effective for shifting the dead matter, but keep the pressure at 1,200 to 1,500 PSI on concrete and much lower (under 1,000 PSI) on sandstone or slate to avoid surface damage. The patio must then dry completely before sealing, which on a shaded patio can take 48 to 72 hours even in warm weather.
Rust stains
Rust stains come from metal furniture legs, steel reinforcement leaching through concrete, or iron-rich water. A wet look sealer will not hide them. For stubborn stains before sealing, it helps to use the best patio stain remover for the specific type of discoloration. In fact, it will make them more visible by deepening the colour around them. Use an oxalic acid-based rust remover on concrete and most stone before sealing. Apply it to the stain, let it work for 5 to 10 minutes, scrub, and rinse. Do not use hydrochloric (muriatic) acid on natural stone. For bad rust on concrete, you may need a second application. Rinse completely and let dry.
Grease and oil
Grease is the enemy of adhesion for film-forming sealers. A degreaser, either a dedicated patio degreaser or a strong dish soap dilution, should be scrubbed into any greasy patches and given 10 to 15 minutes of dwell time. Rinse thoroughly. If the grease has penetrated deep into concrete, you may need a poultice (a paste of absorbent material and solvent) left overnight to draw it out. Test with water after degreasing: if the water still beads on the formerly-greasy area, the grease is still there.
Final rinse and drying
After all cleaning, rinse the entire patio down thoroughly. Then wait. In warm, sunny conditions (18°C / 65°F and above), 24 hours is the minimum dry time. In cooler or shaded conditions, give it 48 hours. If you apply a film-forming wet look sealer to a surface with any trapped moisture, you will get a white, milky haze that is very difficult to remove. For stone, use the plastic sheet test: tape a sheet of plastic over a section overnight and check for condensation underneath in the morning.
How to choose the right product: features that actually matter
Sheen level
Products label themselves as satin, semi-gloss, or high-gloss. High-gloss gives the most dramatic wet look but also shows imperfections, footprints, and wear more obviously. On a patio with varied stone textures or hand-made bricks, satin tends to look more natural and flattering. On smooth concrete or pavers in a modern garden, high-gloss looks intentional and sharp. Think about how the patio will actually be used before going for maximum shine.
Film-forming vs penetrating
As covered above, film-forming products give more gloss and stronger colour enhancement but require the surface to be stable, non-porous enough to anchor the film, and dry. Penetrating products are more forgiving and more durable on natural materials. The UK market leans more heavily toward breathable penetrating sealers for garden stone, while North American products (Brickform, DRYLOK, Techniseal) are often formulated for concrete-heavy applications.
Solvent-based vs water-based
Solvent-based sealers typically penetrate deeper, give a richer wet look, and are more resistant to oil and heavy traffic. They also have higher VOCs, smell strong, require careful ventilation, and are harder to clean up. Water-based versions are lower odour, easier to apply, and more environmentally friendly, but may require an extra coat to match the depth of a solvent product. For a residential patio where you are applying it yourself, water-based is usually the practical choice. Go solvent-based only if the product you want specifically requires it for your surface type.
UV stability
Any film-forming sealer on a south-facing or exposed patio needs UV stabilisers in the formulation, or it will yellow within a couple of seasons. Always check the product data sheet for UV resistance. This is non-negotiable for acrylic film-formers.
Anti-slip rating
A high-gloss film on a smooth surface can become dangerously slippery when wet. Some wet look sealers are formulated with anti-slip additives, or you can buy separate anti-slip granules to mix in. If your patio is used by children or older adults, or if it is shaded and tends to stay damp, this is worth checking before you buy.
How to apply a wet look sealer for a streak-free result
The biggest application mistake is putting on too much product too fast. More is not more with wet look sealers. Thin, even coats give a better finish than one heavy coat.
Tools
For large flat areas like concrete slabs, a lambswool roller or a solvent-resistant foam roller is the best tool. For textured surfaces like exposed aggregate or rough stone, a brush or a pump-up garden sprayer followed by a roller to even it out works better. Avoid cheap foam rollers on solvent-based products as they can dissolve. Have a brush on hand for edges and tight corners.
Weather and timing
Most wet look sealers require air temperature between 10°C and 30°C (50°F to 86°F) with the surface dry and warm to the touch, as Techniseal's data sheets specify. Always follow the specific sika patio seal instructions on the label or data sheet for the right surface prep, application method, and curing time. Do not apply if rain is forecast within 24 hours. Do not apply in direct hot sun as the product can dry too quickly and leave lap marks. Early morning in warm weather, after the dew has dried, is usually the best window. Avoid application in autumn and winter in most UK and northern US climates as low temperatures prevent proper film formation or curing.
Application steps
- Do a final sweep and check the surface is fully dry and free of dust or loose grit.
- Stir the sealer gently (do not shake, as this causes bubbles in film-forming products).
- Apply a thin first coat in one direction, working in manageable 1 to 2 metre sections to maintain a wet edge and avoid lap lines.
- Allow the first coat to tack dry, usually 30 to 60 minutes depending on temperature. It should feel touch-dry but not fully cured.
- Apply a second coat in the opposite direction for even coverage.
- For high-gloss products, a third coat can be applied after the second tacks, but only if the product data sheet recommends it. Two coats is sufficient for most applications.
- Keep foot traffic off for at least 24 hours and avoid vehicle traffic or heavy furniture for 48 to 72 hours. Full cure typically takes 7 days.
I learned the hard way on a stamped concrete job that rushing the second coat before the first had tacked properly causes clouding. If in doubt, wait longer between coats rather than shorter.
Avoiding streaks and lap marks
Streaks usually come from stopping mid-section and letting the edge dry before continuing. Always maintain a wet edge. Work in straight passes rather than circular motions. If you are using a sprayer, back-roll immediately with a roller to smooth the product evenly. On a hot day, work in smaller sections or you will lose the wet edge before you can blend.
Test, troubleshoot, and plan your resealing
Do a test patch first
Always apply your chosen sealer to a small, inconspicuous area first, ideally a 30cm square section. Let it fully cure for 24 to 48 hours, then assess the sheen level, colour change, and finish quality. This is also where you confirm the product is compatible with your specific surface. If it looks milky, beads on top without absorbing, or leaves a patchy result, you have either the wrong product or a surface issue to fix before proceeding.
Common problems and fixes
- White or milky haze: Almost always caused by moisture trapped under the film. Lightly sand with fine-grit sandpaper to open the film, let the area dry fully, then apply a fresh thin coat.
- Peeling: Usually moisture under the film or a surface that was too dense for the product to adhere. Strip back the peeling area with a patio sealer remover, prep again, and choose a product better suited to the surface.
- Uneven sheen or streaking: Apply an additional thin coat once the existing coat has fully cured, maintaining a wet edge throughout.
- Too much gloss: If the finish is too glossy for your taste after curing, very fine wet-and-dry sanding can take the sheen down slightly. Prevention is better: choose a satin product next time.
- Product beading on surface (not absorbing): Either the surface is already sealed, too dense, or not fully clean. Strip and re-prep before trying again.
When to reseal
The easiest test is water: pour a small amount onto the sealed surface. If it beads well, the sealer is still working. If it soaks in within a few seconds, the sealer has degraded and resealing is due. On a busy patio in a wet UK or northern US climate, plan to inspect every 2 years and reseal every 3 to 4 years for film-forming products. Penetrating sealers on natural stone can go 5 years before needing a refresh. Before resealing, you need to thoroughly clean the surface again. If you originally used a film-forming sealer and it has started to peel or degrade, you will need to use a dedicated patio sealer remover to strip it back before applying fresh product. If you are dealing with peeled or degraded film-forming sealer, the right patio sealer remover is key to getting back to a clean surface before resealing. Sealing over a degraded film rarely ends well.
One final note: if your patio has recurring staining issues, including rust, oil, or biological growth, the sealer will help but is not a complete solution on its own. Dealing with the source of rust stains, improving drainage to reduce algae regrowth, and regular light cleaning will extend the sealer's life significantly and keep that wet look looking its best between resealing cycles. If you are dealing with rust stains, applying the best patio rust remover before sealing can prevent the marks from coming back through the wet look finish.
FAQ
How do I tell if my patio is already sealed before buying a “wet look” sealer?
Do a water-absorption test in 2 to 3 spots, not just one. If water beads for more than a few minutes, the surface is likely sealed or too dense for penetrating products, so a film-forming acrylic is usually the better match, or you may need to strip the old coating first.
Can I apply a wet look sealer over a previously sealed surface if I’m not sure what type it was?
Only if the old coating is firmly bonded and compatible. If the old film is flaking, you must remove it because new sealers often bridge over weak areas and then peel in sheets. If you cannot confirm type, test a small area and check after 24 to 48 hours for beading, milky haze, or lifting.
Will “wet look” sealer work on painted patio surfaces or epoxy coatings?
Often it does not perform well. Film-forming sealers can remain tacky or delaminate on paint and some epoxy, and penetrating products may not bond because there is little open pore space. If you want a glossy finish on coatings, look for a product specifically rated for painted or coated substrates and verify with a compatibility test.
My patio looks darker immediately after sealing, but it fades quickly. Is that normal?
Yes, some fade is expected, especially after the first couple of months as excess product fully cures and as UV exposure begins. If the sheen drops fast within weeks or you see patchiness, the cause is usually uneven prep, leftover moisture, or application too thick in one coat.
Can I use pressure washing to prep for a wet look sealer?
Yes, but it can backfire if you cut the surface or leave contaminants embedded. Use the right PSI for the substrate (lower for slate or sandstone), avoid concentrated nozzles, and do not seal until everything is fully dry and chemically clean, not just “visually dry.”
What’s the difference between anti-slip additives and a separate anti-slip product?
Additives mixed into the sealer increase traction across the coated surface but can slightly dull the gloss depending on the mix rate. Separate anti-slip granules or broadcast treatments can create more texture, but they may change the look and can trap debris. If you care about high gloss, add-ins are often the more consistent option, then test on a small section.
How long should I wait before walking on the patio after sealing?
Many products allow light foot traffic only after the film has cured, typically 24 to 48 hours, and full cure can take longer depending on temperature and humidity. Avoid dragging furniture cushions or bins early, because they can mark a fresh film or imprint a soft tacky finish.
Is it safe to apply wet look sealer if the forecast calls for light rain later the same day?
No. Even if the surface seems dry, rain can contaminate wet sealer and cause clouding, streaking, or permanent hazing. A safe rule is to apply only when no rain is expected for at least 24 hours, and also avoid foggy, high-humidity periods that increase condensation risk.
Why does my sealer look milky or cloudy after application?
Most causes are moisture-related or mix/application issues. Trapped water beneath a film-forming sealer, applying in high humidity, or using too much product can create a white haze. The plastic sheet test helps diagnose condensation on stone, and the fix usually requires stripping if a true film trapped moisture.
Can I reseal without stripping if my wet look sealer is peeling?
Usually no. Peeling indicates loss of adhesion, so resealing on top simply locks in the failure. Strip the old film with the correct remover, clean the surface thoroughly, then apply a product that matches the substrate and the original sealer type.
What happens if I apply too thick of a coat?
Too-thick applications are a common reason for sticky spots, uneven gloss, and fast deterioration. Film-formers especially can trap solvent or moisture under the surface, which then leads to hazing or peeling. Staying with thin, even coats and allowing proper tack time between coats prevents most problems.
How do I choose between solvent-based and water-based wet look products for my home?
Pick solvent-based only if the exact product is required for your substrate and you can ventilate safely. Solvent options often deliver a deeper look and better oil resistance, but they have stronger odor and higher VOCs. Water-based is usually the practical DIY choice, sometimes needing an extra coat to reach the same wetness level.
Do wet look sealers prevent rust or oil stains from coming back?
They help slow re-soiling, but they do not neutralize the source. Rust and grease can bleed through or reappear if the underlying cause continues. For best results, remove the stain before sealing and address contributors like metal furniture contact points, drainage issues, and routine light cleaning.
Next Article
Does WD-40 Stain a Patio? How to Remove Oily Marks
Find out if WD-40 stains patios and how to remove oily marks fast using material-specific steps and spot testing.